An official website of the United States government Here's how you know
Official websites use .gov A .gov website belongs to an official government organization in the United States.
Secure .gov websites use HTTPS A lock ( Lock A locked padlock ) or https:// means you’ve safely connected to the .gov website. Share sensitive information only on official, secure websites.

Inspection, Repair, and Maintenance for Motor Carriers of Passengers - Part 396
General – § 396.3(a).
- Every motor carrier shall systematically inspect, repair, and maintain, or cause to be systematically inspected, repaired, and maintained, all motor vehicles subject to its control.
- Parts and accessories must be in safe and proper condition at all times.
- Pushout windows, emergency doors, and emergency door marking lights must be inspected at least every 90 days.
Required Records – § 396.3(b)
For vehicles controlled for 30 consecutive days or more, except for a non-business private motor carrier of passengers (PMCP), the motor carrier shall maintain, or cause to be maintained, the following record for each vehicle:
- An identification of the vehicle including company number (if so marked), make, serial number, year, and tire size. If the motor vehicle is not owned by the motor carrier of passengers, the record must identify the party providing or leasing the vehicle.
- A means to show the nature and due date of the various inspection and maintenance operations to be performed.
- A record of inspection, repairs, and maintenance showing their date and type.
- A record of tests conducted on pushout windows, emergency doors, and emergency door marking lights on buses.
Unsafe Operations – § 396.7
Commercial motor vehicles (CMVs) must not be operated in such a condition as to likely cause an accident or a breakdown of the vehicle.
Roadside Inspection Reports – § 396.9
Any driver who receives a roadside inspection report must deliver it to his/her employing motor carrier. The motor carrier official must examine the roadside inspection report. Within 15 days after the inspection, the motor carrier must sign the report to certify that all violations have been corrected, and return it to the address indicated.
A copy must be retained on file by the motor carrier for 12 months from the date of the inspection.
Driver Vehicle Inspection Reports – § 396.11
- Drivers are required to complete a daily written post-trip inspection report at the end of each driving day.
- The inspection report must identify the vehicle and list any defects or deficiencies discovered by or reported to the driver, which could affect the safety of operation of the vehicle or result in a mechanical breakdown.
- The motor carrier or its agent must certify that any listed defect or deficiency has been repaired or that immediate repair is unnecessary.
- The motor carrier must maintain the original copy for 3 months.
- Section 396.11 does not apply to a non-business PMCP or to a motor carrier operating only one vehicle.
- Prior to requiring or permitting a driver to operate a vehicle, every motor carrier or its agent shall repair any defect or deficiency listed on the driver vehicle inspection report which would be likely to affect the safe operation of the vehicle.
Annual Inspection – §396.17
Every commercial vehicle, including each segment of a combination vehicle requires periodic inspection that must be performed at least once every 12 months. At a minimum, inspections must include all items enumerated in the Minimum Periodic Inspection Standards, Appendix G to Subchapter B of the Federal Motor Carrier Safety Regulations. Motor carriers may perform required annual inspection themselves. The original or a copy of the periodic inspection report must be retained by the motor carrier for 14 months from the report date.
Inspector Qualifications
- Inspectors Must Understand Part 393 and Appendix G - Motor carriers must ensure that persons performing annual inspections are qualified. Inspectors must understand the inspection standards of Part 393 and Appendix G and be able to identify defective components, and have knowledge and proficiency in methods, procedures, and tools.
- Brake inspector qualification - The motor carrier is responsible for ensuring that all inspections, maintenance, repairs, and service to brakes of commercial motor vehicles comply with these regulations. The carrier must ensure that the employees responsible for brake inspection, maintenance, service, or repairs meet minimum brake inspector qualifications.
- Qualifying Brake Training or Experience - Qualifying brake training or experience includes successful completion of a State, Canadian province, Federal agency, or union training program, a State-approved training program, training that led to attainment of a State or Canadian Province qualifying certificate to perform assigned brake service or inspection tasks, including passage of CDL air brake test in the case of a brake inspection, or one year of brake-related training, experience, or combination of both.
- Maintaining Evidence of Brake Inspector Qualifications - Motor carriers must maintain evidence of brake inspector qualification at the principal place of business or the location where the inspector works. Evidence must be retained for the period during which the brake inspector is employed in that capacity, and for one year thereafter.

August 23, 2024 : The Ultimate Guide to Pre-and Post-Trip Inspections
For Trucks & Commercial Vehicles
I’m going to tell you something you already know: safety and compliance are non-negotiable in your industry. Truck trip inspections are not just routine—they’re essential. Mandated by the Department of Transportation (DOT) and Federal Motor Carrier Safety Administration (FMCSA) in the United States and the Canadian Council of Motor Transport Administrators (CCMTA) in Canada, these inspections are designed to catch potential issues before they could lead to breakdowns, fines, or worse—accidents on the road.
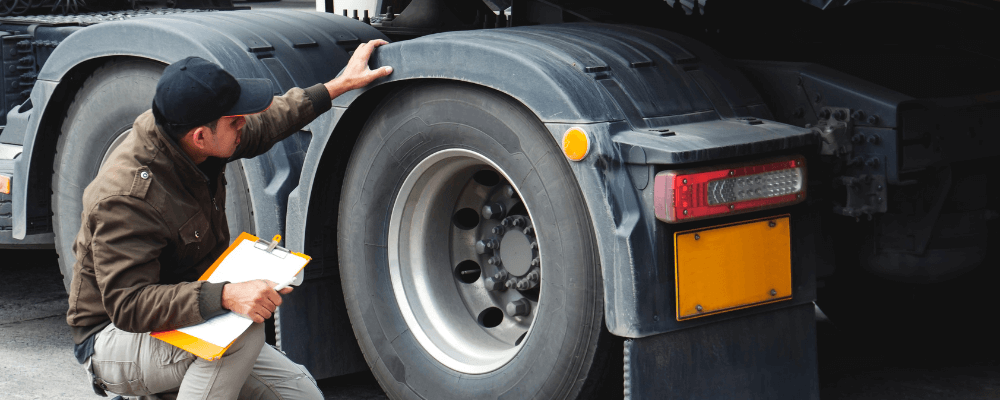
Whether you’re a safety manager or a worker responsible for ensuring the job site vehicles are in safe operating condition, your role is crucial in preventing accidents and maintaining regulatory compliance. One of the key responsibilities in this process is conducting thorough truck inspections and preparing a driver vehicle inspection report (DVIR)—before and after every journey.
In this comprehensive guide, I’ll walk you through everything you need to know about pre- and post- trip inspections and DVIRs, from understanding the legal requirements to implementing best practices that make the inspection process and document management more efficient and reliable.
Read on or skip ahead to one of these sections:
What is a Truck Trip Inspection Are Pre- and Post-Trip Inspections a Requirement? What is a Driver Vehicle Inspection Report (DVIR)? Who is Responsible for Conducting Inspections? How Long Do Pre- and Post-Trip Inspections Take? Key Elements of a Pre-Trip Inspection 5 Best Practices for Trip Inspections Top 10 Defects Found During Pre- and Post-Trip Inspections Fines for Violating Trip Inspection and DVIR Requirements
What is a Truck Trip Inspection?
Pre- and post-trip inspections are checks performed before and after the vehicle hits the road. The primary goal of truck trip inspections is to prevent accidents and breakdowns, which can lead to costly delays, fines, injuries, or worse.
A thorough inspection covers these parts and accessories as a minimum: Brakes, steering mechanism, lighting devices and reflectors, tires, horn, windshield wipers, mirrors, coupling devices, wheels and rims, and emergency equipment.
Are Pre- and Post-Trip Inspections a Requirement?
While pre- and post-trip inspections are essential for identifying potential safety hazards, they are also mandatory to ensure compliance with regulatory standards set by the Federal Motor Carrier Safety Administration (FMCSA) in the United States and the Canadian Council of Motor Transport Administrators (CCMTA) in Canada.
- United States: Code of Federal Regulations (CFR) 396.11 & CFR 396.13
- Canada: National Safety Code (NSC) Standard 13
The CCMTA has strict regulations that require documented inspections. Failing to conduct these inspections—or failing to produce the necessary documentation—can result in hefty fines, legal liabilities, and even the suspension of your vehicle’s operation. Trip inspections must be produced upon demand, and be no more than 24 hours old.
The FMCSA requires that the inspections be carried out, but documentation (in the form of a DVIR) is only required if a safety-related defect is found . However, documenting the inspection process and retaining proof is a highly recommended practice ( and required if crossing the northern border into Canada ).

What is a Driver Vehicle Inspection Report (DVIR)?
The DVIR is a formal document where the results of the vehicle inspections are recorded. It serves as a record that the inspection was completed and identifies any issues found during the inspection.
The DVIR is about documentation and compliance. It ensures there is a record of the vehicle’s condition, helps track maintenance needs, and provides evidence that the company is complying with regulatory requirements. There are also rules around retention of the original documents— 3 months from the date of the initial report for the FMCSA and 6 months for the CCMTA.
As stated in the previous section, a DVIR is only required in the US if the driver is aware of a safety-related defect. Canadian carriers operating in the US may elect to follow either the US or Canadian regulations around reporting.
Who is Responsible for Conducting Inspections?
In most construction settings, the responsibility for truck trip inspections falls on the shoulders of the safety officers and the workers who operate or oversee the vehicles. Safety officers are tasked with ensuring that all inspections are performed and documented according to the required standards, while the workers are responsible for actually conducting these inspections and reporting any issues.
Those carrying out the inspection are required to have certain qualifications, including:
- Training and/or experience as a mechanic or vehicle inspector
- Understanding of the inspection criteria and the tools used to perform the inspections
- The ability to identify defective components
Each member of the team plays a critical role in this process. Safety officers must provide the necessary tools and training, ensuring that inspections are thorough and accurate. Workers must diligently follow the inspection procedures and promptly report any concerns. When everyone understands their role and takes the inspection process seriously, the entire operation runs more smoothly, safely, and compliantly.
How Long Do Pre- and Post-Trip Inspections Take?
The duration of pre- and post-trip inspections can vary based on vehicle complexity and the thoroughness of the inspection process.
Pre-Trip Inspection: 15 to 30 minutes.
- For standard vehicles, a pre-trip inspection usually takes around 15 to 20 minutes. However, for more complex vehicles, such as those with specialized equipment, the inspection may take 30 to 50 minutes.
Post-Trip Inspection: 10 to 20 minutes.
- A post-trip inspection generally takes about 10 to 15 minutes for most vehicles. For larger or more complex setups, the inspection may extend to 20 minutes.
Both inspections are essential for maintaining vehicle safety and regulatory compliance, with the focus on conducting a thorough check rather than simply meeting a time limit.

Key Elements of a Pre-Trip Inspection
Before any vehicle hits the road, a thorough pre-trip inspection is critical. This inspection serves as the first line of defense against potential safety hazards and mechanical issues. By taking the time to carefully check each key component of the truck, you can help ensure that your vehicle is safe, compliant with regulations, and ready to perform its duties without interruption.
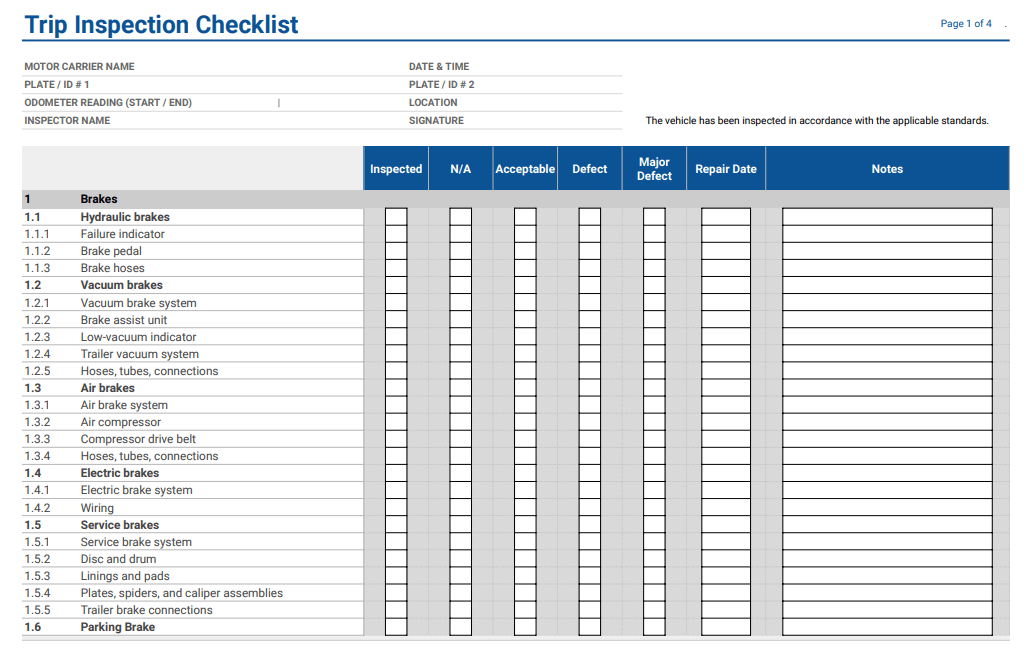
Highlights of a Pre-Trip Inspection Checklist
A comprehensive pre-trip inspection covers several critical areas of the vehicle, ensuring that every part is functioning correctly. While a detailed checklist is essential (and available for download ) , here are some key highlights to focus on:
General Information
- Plate or identification number(s) for the vehicle(s).
- Motor carrier’s name.
- Date and time of inspection, including where the inspection was performed.
- Odometer reading, if applicable.
- Signed statement by the person carrying out the inspection that the vehicle has been inspected in accordance with the standards.
Exterior Inspection
- Brakes: Test the brake system, including the service brake, air brakes, hydraulic brakes, etc. Make sure there are no audible air leaks (for air brake systems), and check that the brake pads are not excessively worn.
- Lights and Reflectors : Ensure that all lights (headlights, brake lights, turn signals) and reflectors are clean, properly aligned, and functioning. Faulty lights can lead to accidents, especially in low-visibility conditions.
- Tires and Wheels: Check the tire pressure, tread depth, and overall condition. Look for signs of wear, damage, or under-inflation. Also, inspect the wheels and rims for any cracks, bends, or other issues that could lead to a blowout.
Interior Inspection
- Steering and Horn: Test the steering wheel, horn, and other controls to ensure they are responsive and working as expected.
- Seat Belts: Inspect the seat belts for wear and tear, and ensure they buckle securely.
- Safety Equipment: Check that all required safety equipment is present and in good condition. This includes the fire extinguisher, emergency triangles, first aid kit, and any other equipment required by law or company policy.
Complex Systems
- Fuel System: Inspect the fuel tanks, lines, and caps for leaks, corrosion, or any signs of wear that could lead to fuel system failure.
- Suspension: Check the suspension system, including shocks, struts, leaf springs, and airbags, for damage or wear that could affect the vehicle’s stability and handling.
- Couplings and Hitches: For vehicles with trailers, inspect the couplings, hitches, and fifth wheel for secure attachment, proper lubrication, and any signs of damage or wear.
- Exhaust System: Examine the exhaust system, including pipes, mufflers, and catalytic converters, for leaks, rust, or damage that could impact vehicle emissions or driver safety.
- Electrical System: Inspect the battery, alternator, wiring, and connections to ensure that the electrical system is functioning correctly and that there are no exposed or damaged wires.
Download a Complete Pre-Trip Inspection Checklist
These are just a few of the essential areas to cover during a pre-trip inspection. To make sure you don’t miss anything, it’s crucial to use a detailed checklist. We’ve created comprehensive pre-trip inspection checklists that align with FMCSA and CCMTA standards, designed to help you streamline the inspection process and ensure full compliance.
This checklist is available for free download and will provide you with step-by-step guidance to keep your vehicles safe and road-ready. Download the Checklist Now .
Helpful Acronyms for Trip Inspections
To simplify trip inspections, several helpful acronyms can keep key checks top of mind.
- For anything mounted to the truck, remember PMS —everything should be Properly Mounted and Secure.
- When inspecting rubber components, use ABC to check for Abrasions, Bulges, or Cuts .
- For metal parts, think CBB —ensure they are not Cracked, Bent, or Broken.
5 Best Practices for Trip Inspections
- Training and Empowering Drivers:
- Provide comprehensive training to ensure all relevant staff are trained on how to perform detailed pre-trip and post-trip inspections correctly and understand the importance of these checks.
- Use Digital Tools for Inspections:
- Digital tools streamline the inspection process , enabling safety officers and drivers to complete and sign forms directly on their mobile devices. This reduces the risk of lost paperwork and ensures regulatory compliance. Digital platforms also allow for quick duplication of previous forms, saving time and maintaining consistency.
- Maintaining Compliance and Safety Records:
- Maintain detailed records of all inspections, including any issues found and actions taken. This documentation is invaluable for tracking maintenance needs and demonstrating compliance.
- Fostering a Safety-First Culture:
- Encourage a culture where safety is a priority by recognizing and rewarding thorough inspections and adherence to safety protocols.
- Consistency is Key:
- Perform inspections consistently, ideally at the same times each day, to develop a routine that becomes second nature for your team.
Top 10 Defects Found During Pre- and Post-Trip Inspections
Identifying and addressing common issues during pre- and post-trip inspections is crucial to maintaining vehicle safety and regulatory compliance. Below are the top 10 defects that safety officers and workers frequently encounter:
- Tire Underinflation:
- Low tire pressure is a frequent issue that can lead to tire failure, reduced fuel efficiency, and increased stopping distances. Regularly checking and maintaining proper tire pressure is essential for safe operation.
- Worn Tread on Tires:
- Tires with worn tread are more susceptible to skidding, hydroplaning, and blowouts, especially in wet or icy conditions. Monitoring tread depth and replacing tires as needed can prevent accidents.
- Faulty Brake Systems:
- Worn brake pads, low brake fluid levels, or air leaks in the brake system can significantly reduce braking performance. Ensuring brakes are in good condition before every trip is critical for safety.
- Non-Functioning Lights:
- Headlights, brake lights, turn signals, and other lights are vital for visibility and communication on the road. Regularly testing and replacing faulty bulbs prevents accidents and keeps vehicles compliant.
- Fluid Leaks (Oil, Coolant, Brake Fluid):
- Leaks from the engine, transmission, or brake system can lead to serious mechanical failures or fires. Inspecting the vehicle for fluid leaks and addressing them immediately is a key part of the inspection process.
- Battery Issues:
- A weak or corroded battery can cause starting problems and electrical failures. Checking battery health and cleaning terminals regularly ensures reliable vehicle operation.
- Suspension System Wear:
- Issues with the suspension system, such as worn-out shocks or broken leaf springs, can affect vehicle handling and stability. Regularly inspecting the suspension prevents these problems from worsening.
- Damaged or Missing Safety Equipment:
- Missing or damaged safety equipment like fire extinguishers, emergency triangles, and first aid kits can delay emergency response during a breakdown or accident. Ensure all safety equipment is present and in good condition.
- Cargo Securement Problems:
- Shifting or improperly secured cargo can lead to dangerous situations, including load spills or vehicle instability. Regularly check that all cargo is securely fastened before and after each trip.
- Undercarriage Damage:
- The undercarriage is often exposed to road debris, which can cause damage to the exhaust system, fuel lines, and other critical components. Inspecting the undercarriage for damage after each trip helps catch issues before they become serious.

Prevent Common Issues with Our Complete Inspection Checklist
Regular inspections can help prevent these common issues from becoming major problems. To ensure thorough and effective inspections, download our comprehensive Pre- and Post-Trip Inspection Checklist. It’s a free resource designed to help you cover all the necessary components and maintain safety and compliance. Download Here.
Fines for Violating Trip Inspection and DVIR Requirements
Fines can vary based on specific state/province regulations and the circumstances of the violation. However, here are some of the fines you could expect:
United States
Pre-Trip Inspection Violations: Range from $500 to $1,500 per instance. Repeated violations or severe safety issues can result in higher fines.
Driver Vehicle Inspection Report (DVIR) Violations: Range from $1,000 to $2,500 per violation. Penalties can be imposed for not documenting defects or not correcting them before operating the vehicle.
Pre- and Post-Trip Inspection Violations: Range from $500 to $1,000, depending on the province. The fine may be higher if safety issues are discovered during enforcement checks.
Driver Vehicle Inspection Report (DVIR) Violations: Range from $500 to $1,500. Penalties may increase if defects reported in the DVIR are not addressed, or if documentation is not maintained as required.
Pre- and post-trip inspections are vital practices that contribute significantly to the safety, efficiency, and longevity of your construction vehicles, including trucks, tractors, and trailers (intermodal equipment). By implementing thorough and consistent inspection routines with the help of technology, you can prevent accidents, reduce costs, and ensure compliance with regulations.
Make these inspections a non-negotiable part of your daily operations, and you’ll see the benefits in both your team’s performance and your bottom line.
Team Member
The Federal Register
The daily journal of the united states government, request access.
Due to aggressive automated scraping of FederalRegister.gov and eCFR.gov, programmatic access to these sites is limited to access to our extensive developer APIs.
If you are human user receiving this message, we can add your IP address to a set of IPs that can access FederalRegister.gov & eCFR.gov; complete the CAPTCHA (bot test) below and click "Request Access". This process will be necessary for each IP address you wish to access the site from, requests are valid for approximately one quarter (three months) after which the process may need to be repeated.
An official website of the United States government.
If you want to request a wider IP range, first request access for your current IP, and then use the "Site Feedback" button found in the lower left-hand side to make the request.
Complete post-trip inspection checklist for CDL drivers

By The Schneider Guy
Estimated reading time: 5 minutes
Performing a post-trip inspection is one of the most important daily tasks a professional truck driver does . Post-trips allow drivers to ensure their tractor and trailer are in good , safe condition after completing a trip .
Keep reading to learn more about post-trip inspections and see what needs to be on your post-trip inspection checklist.
What is a post-trip inspection?
A post-trip inspection is a mandatory inspection performed after driving to ensure nothing went wrong with the equipment while operating it. These inspections must be performed on every piece of equipment a driver operates throughout the day.
A thorough inspection could take anywhere from 30 minutes to one hour and should be logged as on-duty, not driving (line 4).
Post-trip inspection requirements
A driver is required to complete a post-trip inspection :
- Whenever a trailer is dropped.
- At the end of each day.
Post-trip inspections are required by Federal Motor Carrier Safety Association (FMCSA) regulation 396.11 . If any faults or defects are found during the inspection , drivers are required to submit a Driver Vehicle Inspection Report (DVIR) .
Complete p ost-trip inspection checklist
1. passenger - side engine : .
- Air filter housing: Secure mounting, cover in place.
- Windshield washer fluid reservoir: No leaks, proper fluid level.
- Turbo charger: No oil or exhaust leaks.
- Engine air duct work: No cuts, clamps secured.
- Alternator: Mounting secured, no broken or loose wire.
- Accessory drive belt: Not cracked or frayed.
- Air conditioner compressor: Mounting secure.
2. Front brakes (covers all five brake components) :
- Brake drum: No cracks.
- Brake lining: No cracks or damage.
- Inner oil seal (not visible): Check for leaks (look for oil running down brake drum or tire).
- Slack adjuster: Proper angle to the brake chamber, clevis and cotter pin intact.
- Brake air line: No bulges or cuts, fitting tight.
- Brake chamber: Mounting bolts secured, band clamp secured.
3. Front wheel :
- Tire: ABCs (abrasions, bulges, cuts), pressure = 120 PSI, tread depth = 5/32 mins, 4/32 DOT.
- Wheel: Not cracked or bent.
- Hub oil: Not leaking, at proper level – if sealed unit, can’t check level.
- Oil seal (outer): Not leaking.
- Valve cap: Not missing.
- Lug nuts: None missing, no streaks or shiny areas, none loose.
4. Driver side of engine :
- Radiator brace: No cracks, no missing bolts.
- Radiator: Not leaking, secure mounting.
- Water pump: No cracks, not loose or leaking.
- Fuel water separator/filter: Not leaking, secure mounting.
- Pitman arm/drag link: Not cracked, castle nut secured with cotter pin.
- Steering gear box: Secure to frame, not leaking.
- Power steering reservoir: Secured mounting, no leaks, proper level.
- Dipstick: Right level, secured after check.
- Steering shaft: Secure, not loose or damaged.
- Fuel pump: No cracks, not loose or damaged.
- Brake master cylinder: Correct fluid level, no leaks.
- Oil filler cap: Secure, no cracks.
- Engine coolant reservoir: No leaks, proper fluid level.
5. Steer axle suspension :
- U-bolts: No cracks, no loose or missing nuts.
- Leak spring: No cracks, not loose or shifting.
- Tie rod: Secured with castle nuts and cotter pins.
- Shock absorber: Secure mounting, not leaking oil.
- Axle: Not cracked
6. Rear suspension :
- Spring mount: No cracks, secure mounting.
- Tire: ABCs (abrasions, bulges, cuts), pressure = 110 PSI, tread depth = 3/32 min, 2/32 DOT.
- Air bag (bellows): Fully inflated, secure mounting, not ruptured.
7. Side of cab :
- Mirrors: Mounting secure, no broken glass.
- Doors: No damage, glass not broken, hinges secured, opens and closes well.
- Lights and turn signals: Working, not cracked.
- Steps: Mounted, secured to skirting.
- Battery box: Mounting secured, cover latched.
- DEF cap: Cap secured.
- Fuel cap/tank: Gasket in place, vent in place, chain secures cap to the tank secure.
- Side skirting: No damage, panels secure.
- Side box: Secured, safety triangles present.
- Side of sleeper berth: No body damage.
- Sleeper berth window: No cracks.
8. Rear of cab :
- Electrical cord: No bare wire, no corrosion, check plug at end of cord.
- Air line: Not tangled or worn, rubber grommets not worn, fittings tight.
- Cab shock absorber: Secure mounting, not leaking oil.
- Cab air bag (bellows): Not ruptured, securely mounted.
9. Drive shaft/rear frame :
- Drive shaft: Not cracked.
- Universal joint: Not cracked, not missing bolts, no shiny areas.
- Differential: Not leaking oil.
- Frame: Straight, no non-factory welds.
10. Fifth wheel area :
- Pivot pin: Keeper pin and cotter key intact.
- Slider lock pins: Fully engaged.
- Release arm: Not bent.
- Slider rail: No broken welds, no missing bolts.
- Slider stop blocks: Welds not broken, not missing bolts.
- 5th wheel platform: Well-greased, tilted down.
11. Front of trailer :
- Top rail: No cracks or collision damage.
- Clearance lights: Not broken, working properly.
- Registration: Not missing, readable.
- Document box: Not missing or loose.
- Air line /glad hands: No bulges or cuts in air lines, rubber grommets not damaged on glad hands.
- Electric hook up: No broken pins, cover intact.
- PM sticker: Current, legible.
- Height sticker: Legible, legal for route.
- Placard holder: Not broken or missing rivets.
- Tracking device: No cracks or collision damage.
12. Side of trailer :
- Top rail: Not cracked, no collision damage.
- Clearance light: Not broken, operational.
- Bottom light: Not cracked, no collision damage, no missing bolts.
- Landing gear: Legs straight, no broken welds in bracing, sand pads secured and clean handle in cradle.
- Reflector tape: Clean.
- Placard holder: Not broken, all rivets intact.
- Side panels: No holes or cuts, no missing rivets.
13. Rear of trailer :
- Latches: Secured, not damaged.
- Placard holders: Not broken, no missing rivets.
- Lights: Not broken or missing, operational.
- Splash guard: Brackets and guard secured.
- License plate: Secure and clean, light working.
- Bumper: Not damaged, no broken welds.
- Door hooks: Not loose, no missing bolts.
- Hinges: Not cracked, no missing bolts on both sides.
- Door seals: No separation, no rubber tubing sticking out.
14. Trailer suspension :
- Air line: No bulges or cuts, fittings are tight and not rubbing.
- Axle: Not bent or broken.
- Clevis pin/cotter key: Not missing.
- Slack adjuster: Proper angle, clevis pin and cotter pin intact.
- Brake linings: Minimum of ¼ thick, not cracked.
- Brake drum: Not cracked.
- Tire: (ABCs), tread depth = 3/32, air pressure = 110 PSI.
- Spring: Not broken, not shifted.
- Spring mount: No broken welds.
- U bolts: Not loose, not cracked.
- Torque rod: Secure mounting, bushings intact.
- Spring brake chamber: Mounting secure, band clamp secure.
15. Gauges/inside the truck :
- Tachometer: 1000-1500.
- Water temp : 180-205 degrees.
- Fuel: Matches visual when looking in tank.
- Def level: Maintain a minimum of one light bar.
- Oil pressure: 25-50 PSI.
- Speedometer: 0-60 MPH.
- Air pressure: 90-120 PSI.
Get more great driving tips and guides.
Schneider Guy loves the "Big Orange." He's passionate about the trucking industry and connecting people to rewarding careers within it. He's been the eyes and ears of our company since our founding in 1935, and he's excited to interact with prospective and current Schneider associates through "A Slice of Orange."
Related posts

Sliding tandems on a trailer: 16 simple steps to follow

How to safely complete a pre-trip inspection as a truck driver

How to release frozen air brakes on a semi-truck

Pre- and Post-Trip Inspection Dos and Don’ts

Minimizing over-the-road breakdowns and preventing out-of-service violations are two of the many benefits of pre- and post-trip inspections. Use this list of dos and don'ts to complete your inspections the right way.
Don't: Think they're optional.
They're the law. Federal Motor Carrier Safety Administration (FMCSA) regulation 392.7 requires pre-trip inspections, while regulation 396.11 mandates post-trip inspections.
Do: Know what to check.
For a pre-trip inspection, check:
- parking brakes
- service brakes
- tires and rims
- steering system
- fluid levels
- belts and hoses
- electrical and air lines
- coupling devices
- air brake warning system
- emergency kit
- lights, reflectors and signals
- all applicable paperwork
Check the same items for post-trip inspections minus the fluid checks — don't touch anything that might be hot!
Don't: Kick-check the tires.
Thump checks don't work, because a tire sounds empty only if it's nearly 100% out of air. Use a calibrated tire gauge instead. Also, make sure all tires have the proper tread depth and that all lug nuts are tight.
Do: Double-check the brakes.
More than 1 out of every 4 vehicle out-of-service violations in the U.S. during the 2023 Commercial Vehicle Safety Alliance's (CVSA's) International Roadcheck were due to brake system violations.
Don't: Do an inspection differently each time.
Instead, develop a routine, and go in the same order with each pre- and post-trip check. Consider starting at the cab, then inside the cab, the front of the vehicle, then around the truck starting at the driver's side.
Do: Take your time.
There's no rush. Budget 10-15 minutes for a proper pre-trip inspection.
Don't: Forget the interior.
A clean cab tells an inspector that the rest of the vehicle is in good shape. A dirty cab says the opposite.
Do: Check your wheels.
It's the best way to make sure your truck doesn't accidentally move when you're doing a pre- or post-trip check. Forgetting to do so could cause a serious injury — or worse.
Do: Keep accurate logs.
Whether you use electronic or paper logs, keep them updated regularly, and make sure all other paperwork (driver's license, inspection, insurance) is current.
Don't: Ignore potential problems.
If you spot something out of the ordinary during your post-trip inspection, report it to dispatch immediately.
Download and share a PDF of this Safety Bulletin with your drivers.
English Español Français

At this time the Penske website requires that you enable JavaScript in order to take advantage of our website features. Please enable JavaScript and retry.
For assistance with other Penske services, please use the numbers below.
Truck Rental
- Household Rentals: 1-800-GO-PENSKE
- Business Rentals: 1-844-906-3404
Used Trucks
- 1-866-309-1962
Truck Leasing
- 1-888-234-4201
Penske Logistics
- 1-800-529-6531
Competitive fuel discounts and powerful security controls.
Pay drivers instantly — and for less — with AtoB.
Who we serve
For neighborhood, regional, and other short-journey fleets.
For fleets with nationwide and interstate reach.
Partner with AtoB
Launch a cobranded card solution with AtoB
Launch your fuel card program with AtoB
Join the AtoB Discount Network and grow your gallons
Electric Vehicles

Your Post Trip Inspection Checklist: 4 Steps
Whether you’re delivering products directly to customers in your city or transporting larger shipments nationwide, your company's success rests largely on the condition of the vehicles that get your drivers—and the packages they’re carrying—where they need to go.
The best way to ensure that all the vehicles in your fleet are always in tip-top shape and ready to hit the road? In addition to a pre trip inspection , having your drivers perform a thorough post trip inspection at the end of each day will set you up for safe operation.
But what is a post trip inspection required by DOT, and what should be on your checklist? Keep reading for the answers to those questions, plus five steps to successfully tackle post trip inspections.
But what is a post trip inspection checklist, and what should be on it? Keep reading for the answers to those questions, plus five steps to successfully tackle post trip inspections.
What Items Should a Post Trip Inspection Include?
In part, the items on your checklist depend on the type of fleet you’re managing. For example, a checklist for a fleet of vehicles that pull trailers will likely include special items, like checking trailer latches and coupling mechanisms, that aren’t necessary for fleets of vehicles traveling without trailers.
That said, many items remain standard across fleet types, while certain checklist items are required by law.
In other words, a post trip inspection checklist that works for your company might not look exactly like a checklist that works for another company. That’s why it’s important to combine items that are required by law with items that make sense for your specific fleet.
Begin by assessing the needs of your fleet. Are your drivers traveling long distances or making shorter, regional trips? What type of commercial vehicle are they operating?
Follow these four steps to create a failsafe post-trip inspection checklist, ensuring the safety of your fleet and drivers.
Then, follow these four steps to get on the road to a failsafe post trip inspection checklist.
#1 Know What’s Required By Law
When is it appropriate to conduct a post trip inspection, you may ask?
The Department of Transportation mandates that CMV operators perform post trip inspections at the end of each day, on each vehicle that they operate 1 .
Fortunately, the Federal Motor Carrier Safety Administration (FMCSA) provides a clear and comprehensive checklist of its own, so the best place to start devising yours is by making sure that you satisfy the legal requirements for vehicle safety.
The FMCSA requires that you check the following during periodic inspection 2 :
- Brakes – A post trip inspection checklist that’s compliant with FMCSA regulations includes checks for all of the braking systems on a vehicle. This includes standard service brakes as well as hand brakes or parking brakes. If your vehicles tow trailers, you’ll want to check the connections there as well.
- Lights – The FMCSA requires that the lighting systems on each vehicle are checked following operation, so be sure that your post trip inspection checklist includes instructions for checking headlights, tail lights, turn signals, and any reflectors on the vehicles.
- Steering – Operators should perform a visual inspection of the vehicle's steering mechanism. That means checking fluid levels and filter conditions as well as components such as bolts, kingpins, and drag links 2 .
- Tires – Be sure to have your drivers check in on the tires. That could include checking inflation pressures, visually inspecting tires for punctures or debris like nails or glass, and even measuring tread depth 4 .
- Windshield wipers – According to FMCSA regulations, every vehicle in your fleet must feature operable windshield wipers on the front windshield. Wipers should be able to clear away condensation like rain and snow and ensure driver visibility. Your drivers should also check wiper fluid levels and the condition of the defrosting mechanism, which is a requirement for fleets that operate in colder climates 5 .
- Horn – A fully compliant post trip inspection checklist includes checking the vehicle’s horn, which may include checking the horn fuse or ensuring that the horn button works properly 6 .
- Mirrors – Drivers should check the condition of the vehicle’s exterior rearview mirrors. The FMCSA requires that most vehicles have a mirror on each side of the truck so that the driver can see the “blind spots” located along the sides of the vehicles 7 .
- Emergency equipment – In its list of emergency equipment, the FMCSA includes a fire extinguisher, spare fuses, and warning signals like flares or reflective triangles—so it’s important to verify after each trip that these are present and in working order 8 . But to be thorough, have your drivers check the condition of tools like lug wrenches, flashlights, and tire jacks, a first aid kit and other protective equipment for drivers, and other items like jumper cables, engine oil, and coolant.
- Coupling devices – If your drivers are pulling trailers, it’s imperative to check that the coupling mechanisms are in good working order at the end of each trip.
#2 Don’t Overlook the Odometer
It isn’t required by the FMCSA, but you’ll want to have your drivers check and record the odometer reading at the end of each day. Doing so allows you to track important metrics related to your fleet, such as:
- Unauthorized use
Keeping tabs on factors like mileage and fueling after each trip ends is even easier when you unlock the power of fuel cards and fleet tracking. Powered by Visa and available from AtoB, fuel cards enable your drivers to fuel up and make vehicle-related purchases wherever Visa is accepted.
But the best part? They enable you to track and control fuel spending, keep costs down, and streamline the process of managing the finances associated with fleet management.
#3 Have a Standard Post Trip Inspection Form
In addition to requiring a post trip inspection on every fleet vehicle in operation, the FMCSA requires drivers to fill out and sign an inspection form 9 . For that reason alone, you should have a standard form that every driver uses to perform inspections.
But beyond meeting the DOT compliance checklist, having a standard form is a good way to ensure your drivers are individually prepared to conduct proper inspections. This is especially true considering your checklist will likely include items specific to your fleet.
A satisfactory post trip inspection form should be easy for every driver on your team to:
#4 Take Advantage of Technology
If the phrase “standard form” conjures images of a truck driver clutching clipboards and marking off boxes using Bic pens, it’s time to update your thinking. Harnessing the power of technology can simplify the post trip inspection process and help guarantee accurate vehicle inspections every time.
Fleet fuel cards are one example, as they digitize the way your drivers pay for expenses on the road. But why stop there?
You may consider solutions such as upgrading to a fleet management system that includes functions for completing a Driver Vehicle Inspection Report (DVIR). Or, you could have your drivers ditch pen and paper in favor of high-tech gadgets for inputting thorough inspection results, like:
- Smartphones
- Other handheld devices
Why Is a Post Trip Inspection Important?
It’s difficult to overstate the importance of an adequate post-trip inspection when it comes to guaranteeing that your fleet is always road-ready.
Trips to the mechanic for regular vehicle maintenance and special repairs are standard operating procedures for most companies operating commercial vehicles. The success of a trip depends on every part—from the brakes to the taillights—to operate as it should. And when they don’t, you don’t hesitate to take the vehicle in for repairs.
But by implementing a post trip inspection system, you gain up-to-the-minute insight into the condition of your fleet vehicles. In turn, you’re better able to:
- Keep tabs on the vehicles in your fleet – The old adage that prevention is better than any treatment holds true when it comes to the vehicles that your drivers operate. When every vehicle is checked after every trip, you’re more likely to spot small problems before they become big ones and keep your vehicles in good condition.
- Keep your drivers safe – A post trip inspection can go a long way toward ensuring that your drivers are safe on the open road by helping to spot mechanical problems. Otherwise, those issues could put safety at risk and interrupt operations.
- Remain compliant – A post trip inspection of all vehicles is required of most companies by law. As we mentioned earlier, the United States Department of Transportation requires all drivers of commercial motor vehicles (CMVs) to inspect their vehicles at the end of each day 10 . They must also fill out and sign a Driver Vehicle Inspection Report (DVIR), which must be kept on file with the motor carrier for at least three months 11 .
How to Ensure Proper Post Trip Inspections for Your Fleet
You go the extra mile to ensure that your drivers are well-trained in every aspect of their job, from being properly licensed to knowing how best to handle the materials that your company ships. But it’s important that their training includes instruction on how to perform a post trip inspection.
So, how can you ensure all of your drivers are adequately equipped to assess the condition of the vehicles in your fleet and meet DOT compliance ? It may be as simple as implementing procedures for training drivers on post trip inspections along with the other training they receive. This training may occur at the following times:
- During onboarding
- At regular intervals during employment
- On an “as-needed” basis
In addition, make sure any thorough inspection training includes a comprehensive procedure for managing issues that may arise. Your drivers should know how to act when headlights fail or brakes get squeaky.
Fuel Up Your Fleet With Fuel Cards from AtoB
If you’re looking for ways to optimize how you manage your fleet, you’ve come to the right place. At AtoB, our fuel cards are making fleet expenses management easier than ever—and offering you a chance to save on fuel.
Backed by Visa and accepted nationwide, our fuel cards offer a simple solution for fuel tracking, spending, and managing your transportation expenses. Whether your drivers are traveling across the country or just across town, turn to AtoB for competitive discounts, transparent pricing, and top savings on vehicle-related expenses. Contact us to get enjoy all the potential fleet card benefits today!
1 Federal Motor Carrier Safety Administration. The Motor Carrier Safety Planner. https://csa.fmcsa.dot.gov/safetyplanner/MyFiles/SubSections.aspx?ch=22&sec=65&sub=148
2 Federal Motor Carrier Safety Administration. The Motor Carrier Safety Planner. https://csa.fmcsa.dot.gov/safetyplanner/MyFiles/SubSections.aspx?ch=22&sec=65&sub=148
3 Trucking Info. What to Know About Steering System Maintenance. https://www.truckinginfo.com/10157876/what-to-know-about-steering-system-maintenance
4 Trucking Info. How to Test Truck Tires in Your Fleet. https://www.truckinginfo.com/329037/tire-testing-heres-help
5 GovInfo.gov. Code of Federal Regulations (CFR-2001-title49-vol4-sec393-82). https://www.govinfo.gov/content/pkg/CFR-2001-title49-vol4/pdf/CFR-2001-title49-vol4-sec393-82.pdf
6 Your Mechanic. Symptoms of a Bad or Failing Horn Switch. https://www.yourmechanic.com/article/symptoms-of-a-bad-or-failing-horn-switch_2
7 GovInfo.gov. Code of Federal Regulations (CFR-2001-title49-vol4-sec393-82). https://www.govinfo.gov/content/pkg/CFR-2001-title49-vol4/pdf/CFR-2001-title49-vol4-sec393-82.pdf
8 Federal Motor Carrier Safety Administration. Emergency Equipment. https://csa.fmcsa.dot.gov/safetyplanner/MyFiles/SubSections.aspx?ch=22&sec=64&sub=133
9 Code of Federal Regulations. Driver vehicle inspection reports. https://www.ecfr.gov/current/title-49/subtitle-B/chapter-III/subchapter-B/part-396/section-396.11
10 Federal Motor Carrier Safety Administration. The Motor Carrier Safety Planner. https://csa.fmcsa.dot.gov/safetyplanner/MyFiles/SubSections.aspx?ch=22&sec=65&sub=148
11 Code of Federal Regulations. Driver vehicle inspection reports. https://www.ecfr.gov/current/title-49/subtitle-B/chapter-III/subchapter-B/part-396/section-396.11
Get started with AtoB

Reviewed by
Vedant Khamesra is the driving force behind product management at AtoB. Specializing in strategic partnerships, SMB solutions, and new product development, Vedant seamlessly navigates P&L responsibilities while leading product execution and strategy. He is fueled by AtoB's mission to empower truckers and fleets with intelligent financial tools and services, making their lives easier and more rewarding.
Start saving today

Log in Log in Get started Get started
IMAGES
VIDEO
COMMENTS
Drivers are required to complete a daily written post-trip inspection report at the end of each driving day. The inspection report must identify the vehicle and list any defects or deficiencies discovered by or reported to the driver, which could affect the safety of operation of the vehicle or result in a mechanical breakdown.
A carrier may well require a driver pre-trip inspection report, but isn’t required to do so by law. For post-trip reports, on the other hand, 49 C.F.R. 396.11 mandates that a motor...
Pre-Trip Inspection: 15 to 30 minutes. For standard vehicles, a pre-trip inspection usually takes around 15 to 20 minutes. However, for more complex vehicles, such as those with specialized equipment, the inspection may take 30 to 50 minutes. Post-Trip Inspection: 10 to 20 minutes.
Any driver who receives a roadside inspection report is required to deliver it to the motor carrier within 24 hours. If a vehicle is declared “out-of-service,” violations or defects must be corrected before a vehicle may operate again.
Are you properly documenting your post-trip inspections? According to 49 CFR §396.11, each commercial motor vehicle driver (whether passenger-carrying or property-carrying ) must prepare and submit a report if a “defect or deficiency is discovered by or reported to the driver.”
(c) Post-trip inspection. Motor carriers shall maintain practices to ensure that following completion of any trip in driveaway-towaway operation of motor vehicles in combination, and before they are used again, the tow-bars and saddle-mounts are disassembled and inspected for worn, bent, cracked, broken, or missing parts.
Post-trip inspections are required by Federal Motor Carrier Safety Association (FMCSA) regulation 396.11. If any faults or defects are found during the inspection, drivers are required to submit a Driver Vehicle Inspection Report (DVIR).
Federal Motor Carrier Safety Administration (FMCSA) regulation 392.7 requires pre-trip inspections, while regulation 396.11 mandates post-trip inspections.
Remain compliant – A post trip inspection of all vehicles is required of most companies by law. As we mentioned earlier, the United States Department of Transportation requires all drivers of commercial motor vehicles (CMVs) to inspect their vehicles at the end of each day 10 .
It’s at the end of the day, during the post-trip inspection, that finding a defect triggers the legal requirement from the Federal Motor Carrier Safety Administration to file a DVIR. “At...