
How to change the location on iPhone in 4 different ways
Here're all the ways to change your location on your iPhone, including altering Apple ID, tweak Location Services, switch to VPN location server, and spoofing GPS location.

Overview of iPhone location changing
It should be no surprise that your location is being tracked thanks to iPhone Location Services. However, there might be times when you want to stop your phone from tracking or sharing your physical location , access geo-restricted content, change your IP address for unrestricted access to games or social media apps, or avoid attack with malware and targeted ads. This is where shifting your location on your iPhone comes into handy.
If you'd like to change location on iPhone, you can quickly trick geolocation by changing your IP with a VPN service. Or you can adjust iPhone's location settings, change your Apple ID country or region. You can even employ an iPhone location spoofer, such as iPhone Location Changer , to fake GPS location and change your current location to any place you like.
Thus, there are four feasible routes to change iPhone location. Pick the one that is mostly for your situation to fake or switch the phone's location.

It's easy to know how to change location on an iPhone if you find a right way.
Table of contents
Change iPhone's location by changing your Apple ID country or region
Change the location by modifying iphone location settings.
- Change iPhone location by faking GPS location with a GPS spoofing app
How to change location on an iPhone with a VPN
Vpn cannot change your location on your iphone. what to do next.
If changing your device location is emerging when an app is not available for countries/ regions you visit due to localization restrictions, then you need to switch your Apple ID region. Important note: Remember that making Apple Store country switch does not actually change the GPS location on iPhone to set a spoofed coordinate , and location-based apps or services will know your real location.
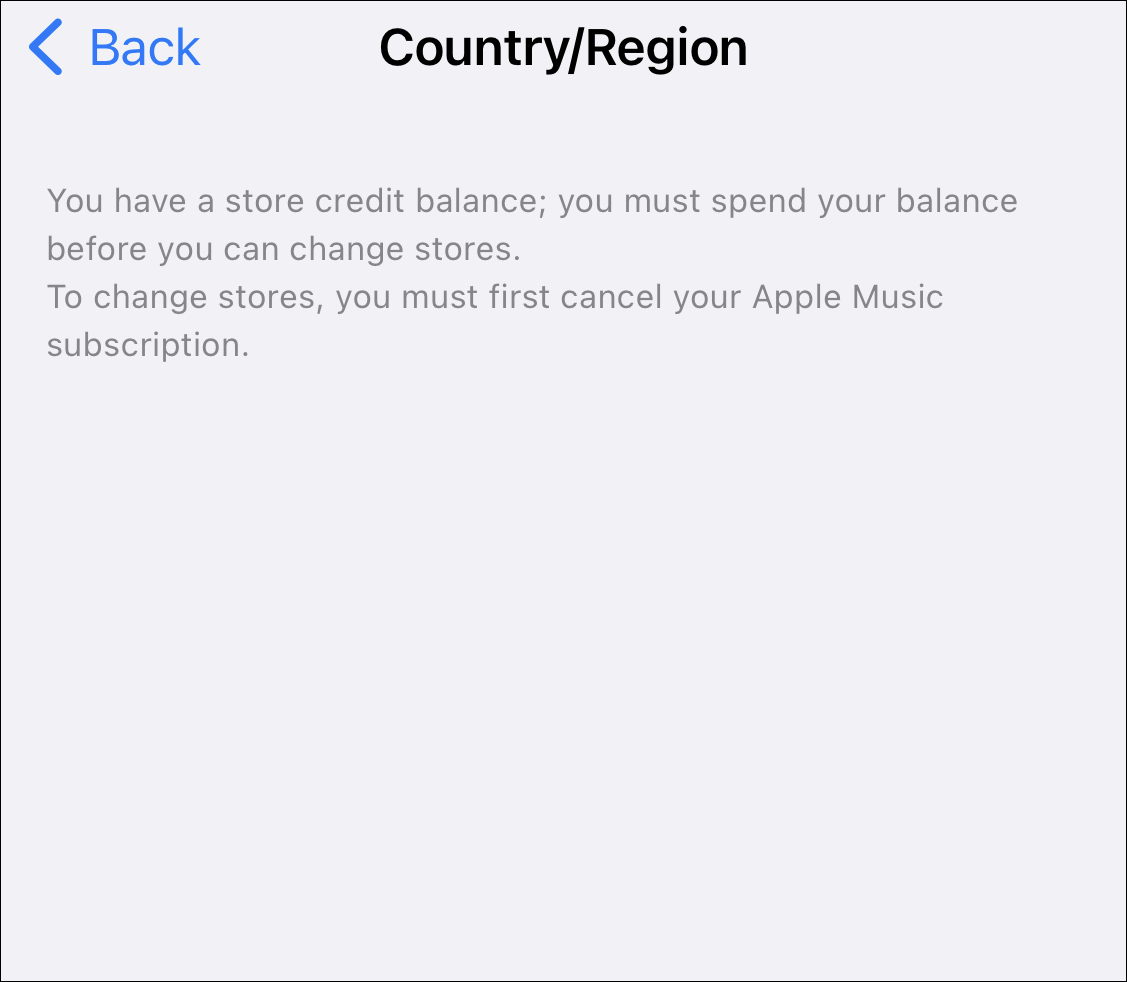
Before we begin, there are several things you should consider first. You'll need to use up any remaining credit balance in your account, cancel all of your active paid subscriptions, as well as enter a valid form of payment and a valid billing address based in that new country or region.
To change Apple ID country/ region through an iPhone (or iPad):
1. Make sure that your device is connected to the Internet.
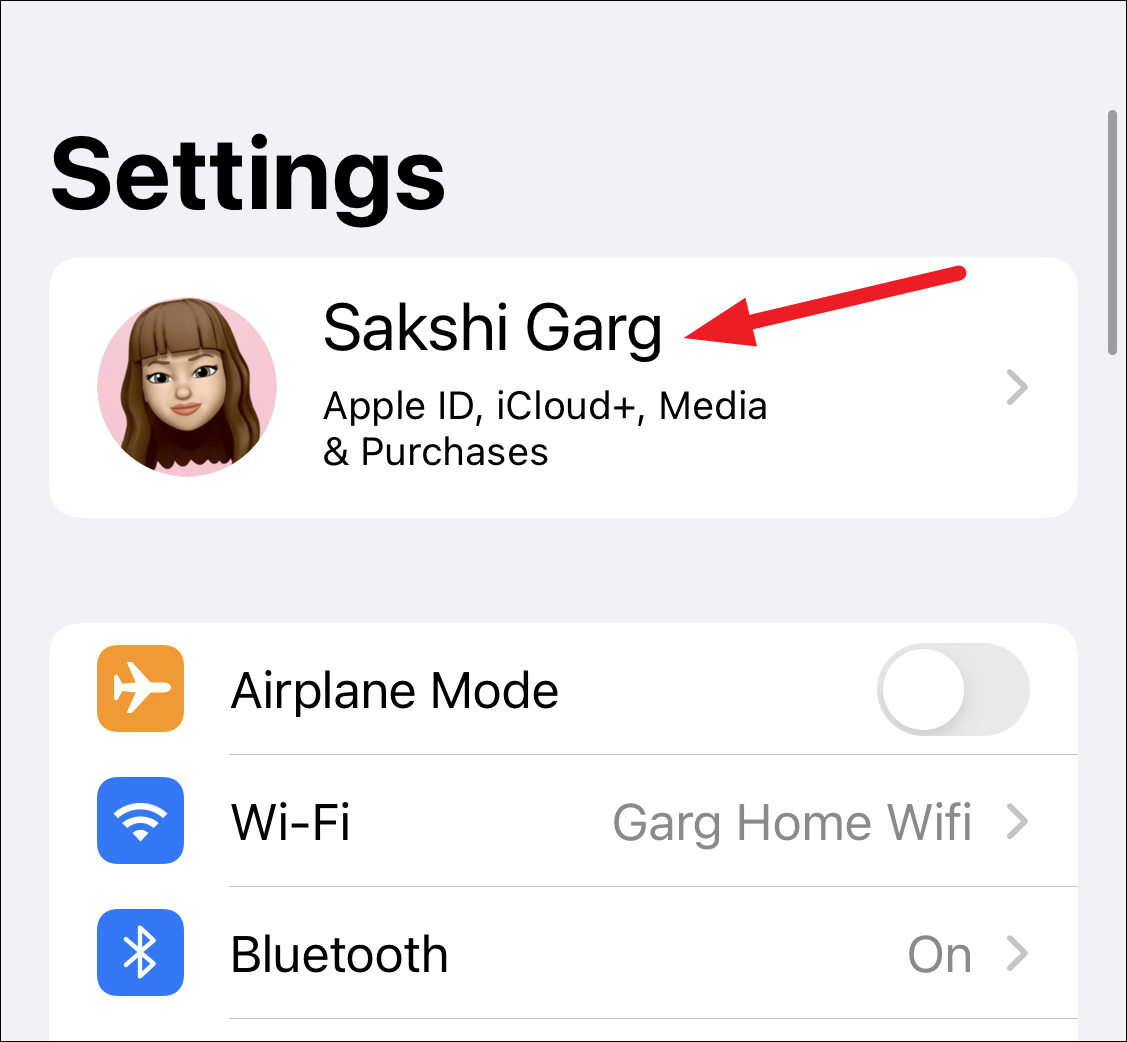
2. On your iPhone, tap Settings > [your name] .
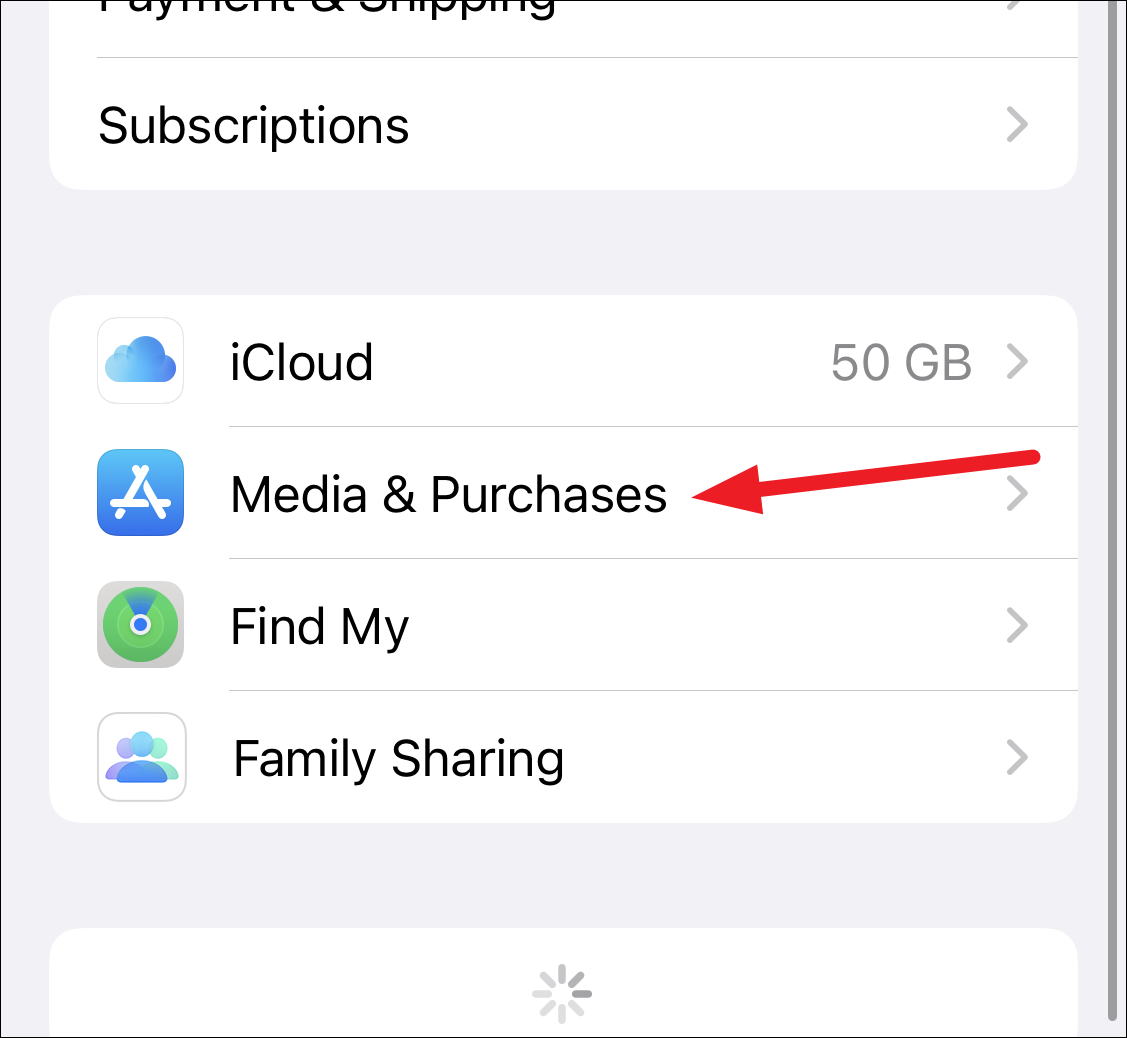
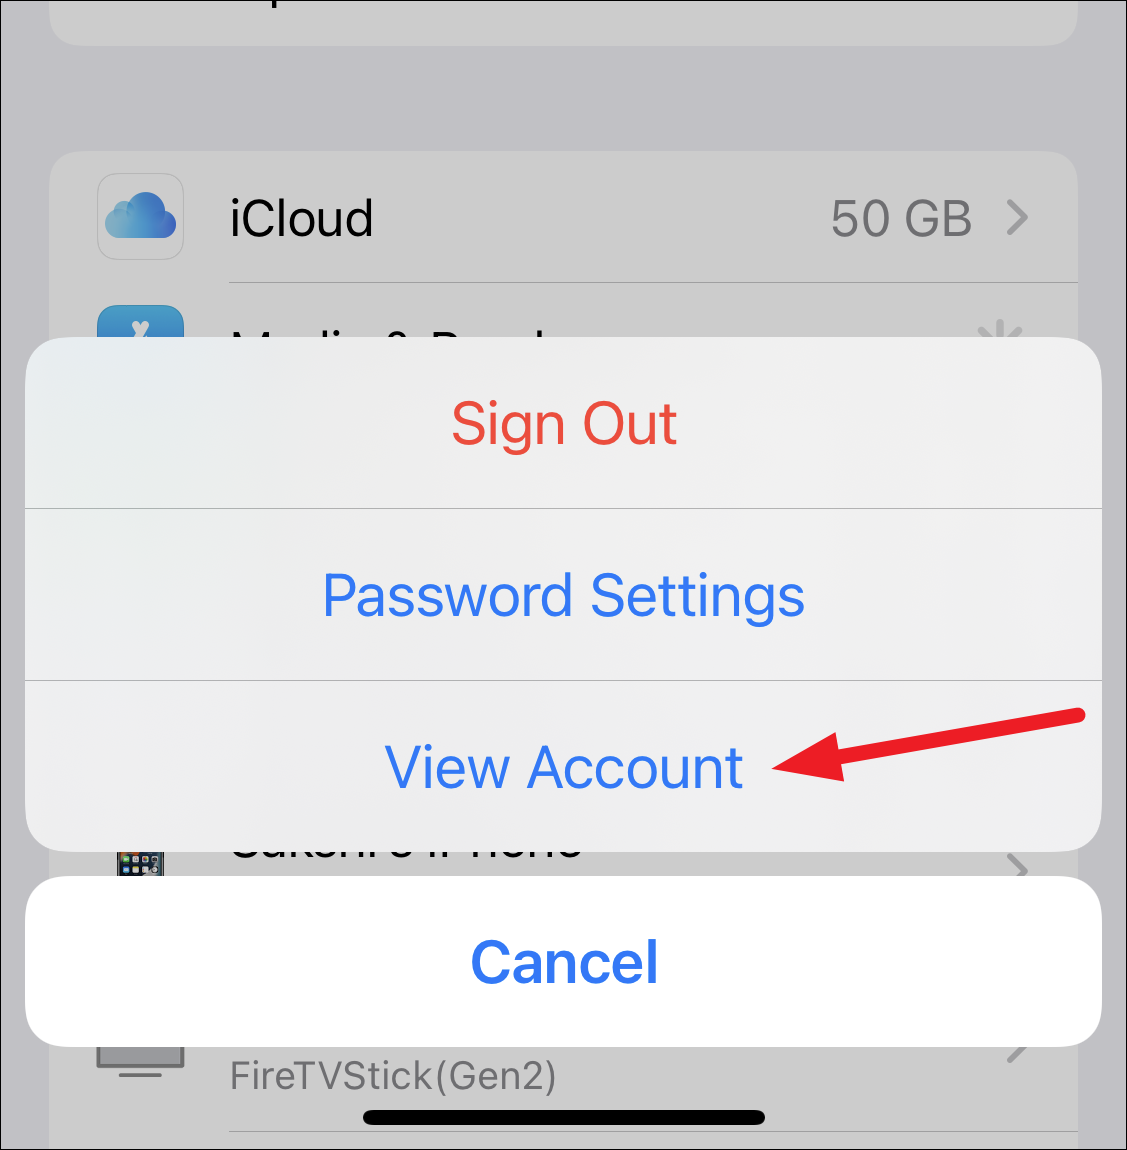
3. Choose Media & Purchases and tap on View Account , then unlock your account for accessibility.

4. Tap Country/Region .

5. Tap Change Country or Region .

6. From the list, select your new country or region you wish to switch to.
7. Check Terms & Conditions and tap Agree at the top-right position of the screen. To confirm, tap Agree again.
8. Add your new payment method and billing address.
Save your changes and exit. Now you've successfully changed your location in the App Store on an iPhone.
To change App Store country or region online:
If you prefer to switch over the location of your iPhone online, then head to appleid.apple.com and sign in with your Apple ID and password. Then click Personal Information , choose Country/Region , change to your new country you desired, accept the terms and conditions, and input your new payment information and billing address of your new location.
Customizing location settings to turn off Location Services is another option. Location Services in iPhone's Settings menu is a means of using location data from GPS, Wi-Fi networks, Bluetooth and cellular data networks, so Apple and other third-party location-based apps are supposed to track your whereabouts to deliver you GPS-reliant services.
Here's how to tweak location services settings on iPhone and control what Apple and app developers to use your location information.
Turn off Location Services on iPhone
Switching Location Services off is quick and easy on iOS.
- Go to iPhone Settings app, scroll down and choose Privacy & Security .
- Tap on Location Services at the top of the screen.
- Slide the switch for Location Services to OFF.
- On the popup at the bottom of the screen, select Turn Off to confirm.
Once Location Services is toggled off, most geo-based services and apps will be disabled as well. This diminishes your overall experience. For example, Apple Map, Google Map, or other navigating apps won't be able to pinpoint your exact location or get directions somewhere, and location-based games like Pokemon GO won't be able to use your location for some features to behave correctly.

CAUTION: Disabling Location Services will not make your iPhone change or fake the location, but it should block Apple and certain apps from accessing your phone's approximate location to maintain a higher level of security & privacy.
Change Location Services for specific apps
Instead of entirely deactivating Location Services, you have options to make control of which apps could utilize location tracking, and when. To change location access for individual apps:
- In iPhone, tap Settings > Privacy & Security > Location Services .
- Select an app from the list and change the location permission to Never . This way the app will lose the location tracking access to know where you are.
Change iPhone location by faking GPS location via a GPS spoofing app
Chances are you need to change phone location on iPhone for the purpose of tricking any apps that use your location into deeming you're somewhere else you're not, or accessing region-restricted content, apps, games, websites, etc. It's possible to alter your location in the iPhone, and this typically involves downloading a third-party program to fake the GPS coordinates, like iPhone Location Changer .
for Windows | for macOS
It's considered a reliable and risk-free iPhone location spoofer that can handle situations of fake iOS GPS without jailbreak or VPN . You can hide your whereabouts, change the location to anywhere to your liking without travelling there, and manage the GPS location by simulating movements between two or more places at a customized speed via walking, cycling, driving.
Follow the step-by-step guide below and you'll quickly understand how to change location on iPhone using the iOS GPS spoofer. Make sure to download iPhone Location Changer on your PC or Mac and install it properly.
Step 1. Run the software on your computer.
Step 2. Connect your iPhone to the computer with a USB cable.

Step 3. On the software screen, click Modify Location tab for changing your current iPhone location.

Step 4. On the Modify Location dialog box, specify the fake GPS coordinates. You can manually fill in the place you want to change to, or just use your mouse to move to anywhere and click on the location on the map.
Step 5. Once done, hit Confirm Modify button to spoof your location .
See, with a few simple clicks, your iPhone location has been changed. Any location-based apps installed on your iPhone should display the fake location rather than your real-time location.

Changing your iPhone location without jailbreak or computer is simple with a VPN. Overall, location tracking by iPhone devices is done by using GPS satellites, cell towers, Wi-Fi signals and Bluetooth, but some regional apps just determine your location through your IP address.
As such, hiding your real IP address of iPhone and replace it with another one can change/ spoof your location, effectively making it appear you're located somewhere else. This encrypts your internet traffic and routes it through an intermediary server in different location.
Use these steps to change location on iPhone with a VPN by simply changing IP address. This helps access region-specific content, bypassing blocks on certain websites/ game/ apps/ social media, and protecting your privacy.
1. Search for a reliable VPN service from App Store on your iPhone. In this case, we use NordVPN which has a range of servers for location faking.
2. Once you download NordVPN, open it, create an account for login and set up a subscription.
3. If VPN asks for allowances to add VPN configurations to your iPhone, tap Allow.
4. Tap on a server location of a country, region or city, and connect to it.

Once your iPhone is connected to the VPN server, the location is changed as well, masking your real IP. To ensure your IP address has been changed successfully, visit an IP checker website such as "What Is My IP Address" to confirm your new fake geolocation.
Tip: Always remember to disconnect your iPhone from VPN server location when you're done browsing region-specific contents so as to save your battery life and maintain optimal device performance.
There's no denying that VPNs are the most direct iOS location changer apps to alter or spoof the iPhone's location without a computer . However, sometimes your live location isn't changed - even your iPhone is connected to a VPN server.
The reason of why VPN cannot change location on an iPhone is mostly that some apps or browsers have other geolocating methods that can decipher where you are, than just changing the IP address. They might be working with Location Services.
The solution to this is to manage the master location settings of iPhone by turning off Location Services for the device completely, or for specific apps. Or, you can try fully-featured risk-free iPhone Location Changer from AppGeeker to spoof your location in iOS with ease.
FAQs - How to change location in an iPhone
Q: will turning off location services change gps location on iphone.
Location Services works to estimate location by using several inputs, including GPS, Bluetooth connections, Wi-Fi hotspots, and cellular tower triangulation, and report your position to apps and services on the device that required location access permission.
If you disable Location Services, you'll stop iPhone from knowing where it is. GPS location does not change, though. To change the GPS location, you can use a VPN or an iOS location changing app to achieve the purpose.
Q: Can your fake GPS location on your iPhone?
It's possible to fake iPhone location using iOS location spoofer software, and it's legal when you're sure to comply all terms and conditions of your service provider.
AppGeeker's iPhone Location Changer is one of the best, safe location fakers for iOS, and is dedicated to teleport your location to anywhere on the world, and even simulate your movement route between multiple spots.
- Launch iPhone Location Changer program on your computer.
- Plug your iPhone into computer.
- Choose Modify Location mode.
- Specify a location to wherever you want.
- Click Confirm Modify to change your location.
Q: How can I change my current location on iPhone?
You can change your current location by getting your Apple ID country or region changed on iPhone. To do this:
- Open Settings app.
- Tap [your name], and choose Media & Purchases.
- Select View Account.
- Tap Country/Region > Change Country or Region.
- Select a country or region you prefer.
- Agree the Terms & Conditions and confirm.
- Fill in your payment method and billing address. Done.

How to Restore iPhone Messages from iCloud

iPhone Unavailable? How to Unlock

How to Recover Data on iPhone without Backup

Transfer Videos from Window PC to iPhone
How Can I Transfer Music to iPhone without iTunes
How to Fake GPS Location on iPhone Easily
Factory Reset iPhone 14 with or without Passcode
How to Fake Location on Find My iPhone

How to Change Location on iPhone
Want to change your iPhone's location to access apps not available in your region or to trick an app? Here's how you can do it.

Our phones these days have constant access to our location. Whether it’s the App Store on the iPhone that needs your region to work properly or several apps that use the GPS location to provide their services, location has a huge role to play.
But sometimes, we need to change our location. Maybe you’re concerned about your privacy or need to access content that’s not available in your region, or you’re playing a game like Pokemon Go and need to trick the app into believing you’re miles away to catch that Pokemon. It’s also a possibility that you want to fake your location to hide your real location from friends/ family in Find My. Whatever your reasons may be, it’s not entirely easy to change your location.
If you simply want to access apps from App Store not available in your region, then, sure it’s a piece of cake. But spoofing your location? That’s a different matter since there’s no such built-in functionality. But it isn’t impossible either. Hop on and we’ll see how to do both.
Change your Apple ID Region
If you want to access the App Store for any other country than your own, you can easily change the location or region for your Apple ID. But there are a few things to keep in mind before you change your region:
- If there is any balance in your Apple ID, spend it before changing your location. You cannot change your location until you have funds in your Apple ID.
- You also have to cancel your subscriptions and wait till the end of the current subscription period to change your region.
- Before you change the region, also make sure you have a valid payment method for the new region.
- If there are any pre-orders, memberships, rentals, etc., wait until their end or cancel the pre-order. And also wait if there is any store credit refund to be processed since it won’t after you change the region.
Once you decide to change the location, open the Settings app and tap your name at the top.
Then, go to ‘Media & Purchases’.
Now, tap ‘View Account’. from the overlay menu that appears at the bottom of the screen.
You may have to sign in to your account. Then, tap the option for ‘Country/ Region’.
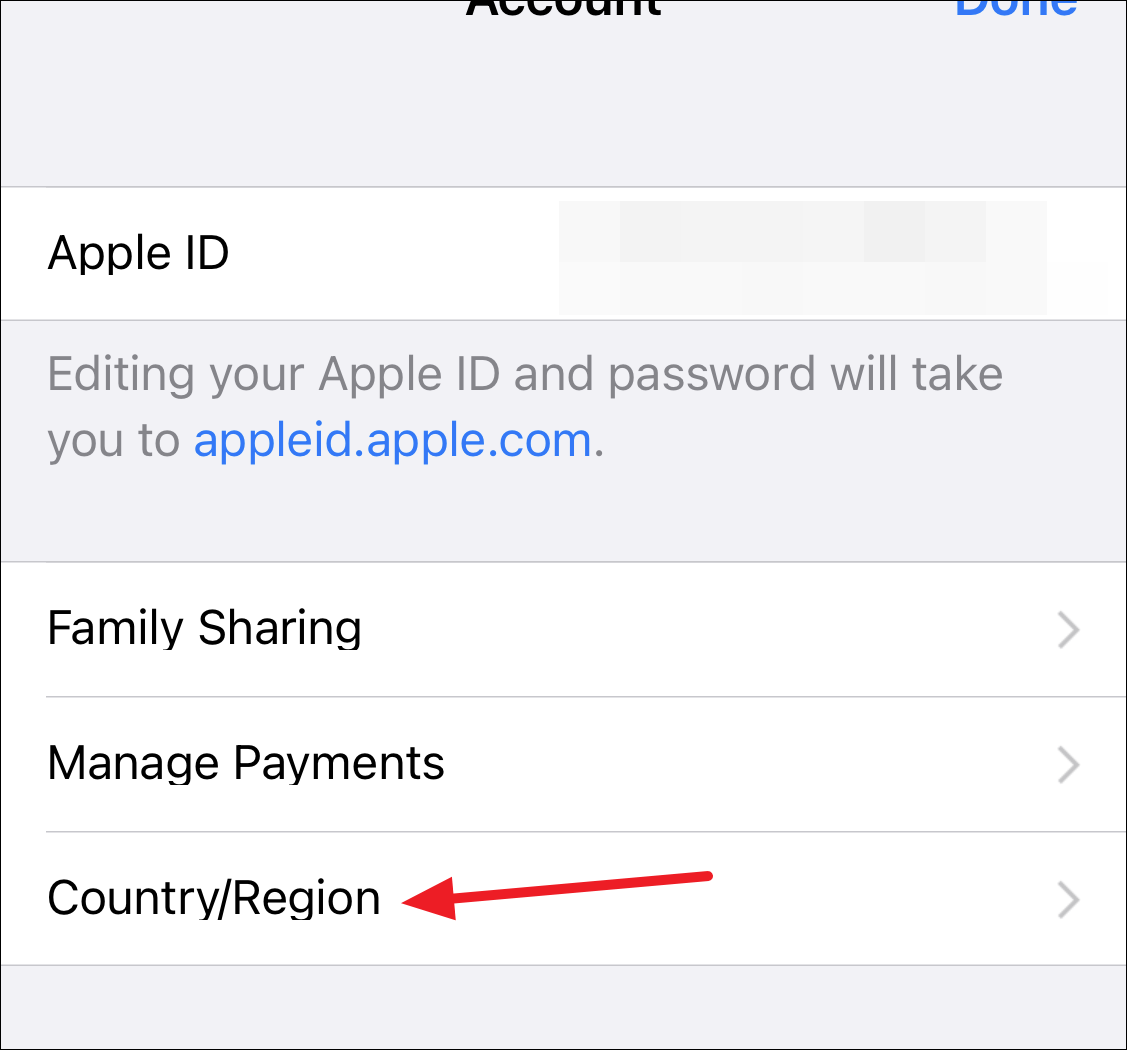
Then, tap ‘Change Country/ Region’.
Select the new country or region from the list.
Terms and conditions will appear. Tap ‘Agree’ in the top-right corner of the screen after reviewing them. A confirmation prompt will appear; tap ‘Agree’ again to confirm.
Then, select a payment method and enter the details for the new payment information and your billing address and tap ‘Next’.
Faking a GPS Location
If your motive was to change the location for the Apple Store, it’s done and dusted. But if you wanted to fake your GPS location, the above section helps you achieve nothing.
Now, faking your GPS location is tricky. But there are a few tools at your disposal. The only catch is that there is no app that you can download on your phone to fake your location, you’ll need to use a computer.
Why Change your Location?
But first, why might you want to fake your GPS location? Generally, when an app needs to access your location, it’s paramount that it accesses the correct location. After all, the service will depend on it. For example, a food delivery app needs your location to make the delivery to the right location. So, why on earth the need for faking your GPS location? There could be plenty of scenarios.
As discussed above, maybe you play a game like Pokemon GO where the experience depends on the location. So, you can fake your GPS location to trick the game into believing you’re at a certain place without actually being there.
You could also want to change your location for a dating app to think you’re in a certain city if you’re planning to move there and want to get ahead in the game. You can also want to spoof your GPS location to fake a check-in or hide your real location from friends or family in the Find My app. If you do have any of these reasons in mind, you’ve come to the right place.
Do you need a VPN or a GPS Spoofer?
The goal of using a VPN (Virtual Private Network) is to hide your IP address. VPN works by hiding the websites you’re requesting from your ISP, while it also masks your IP address from the websites by acting as an intermediary. You can also use it to access any websites that may be banned in your country by using a server placed in another.
If your agenda is to either hide your browsing history from your Internet Service Provider or the government or to access any websites not available in your country, VPN is the service you want.
But when you use a GPS, it only hides your virtual location. It does not hide your location from apps that use GPS for location pinpointing. So, if your agenda is to trick those apps, what you need is a GPS Spoofer.
Now, that you’re clear that you need a GPS spoofer for your nefarious or not see nefarious purposes, let’s see the tools that’ll come to your aid without the need for any jailbreak.
Use 3u Tools
3u Tools is a software you can install on your Windows computer and then spoof the location of your iOS device. It offers many others features as well that you can check out. The best part about it is that it is completely free to download and use. And it is also compatible with the latest iOS 15.
It is an easy enough tool to use, but it has a few drawbacks. For starters, the location modification it offers is pretty rudimentary. You can only set your location to a new location. There are no options to go from one spot to another, for example. It’s also not available for other platforms, like Mac. But if you don’t have any of these requirements, you can go for it without another thought.
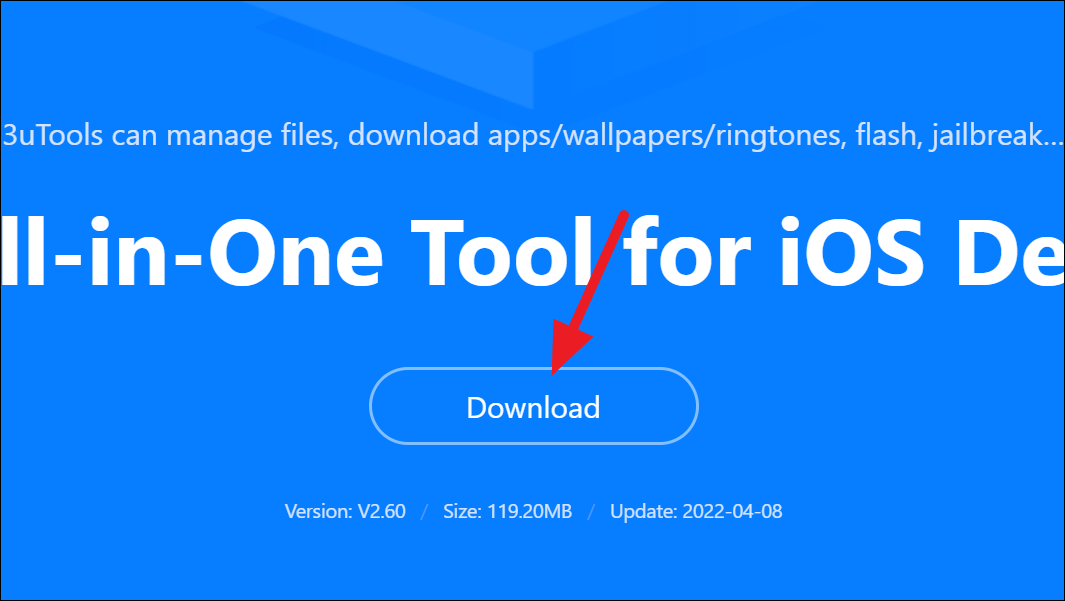
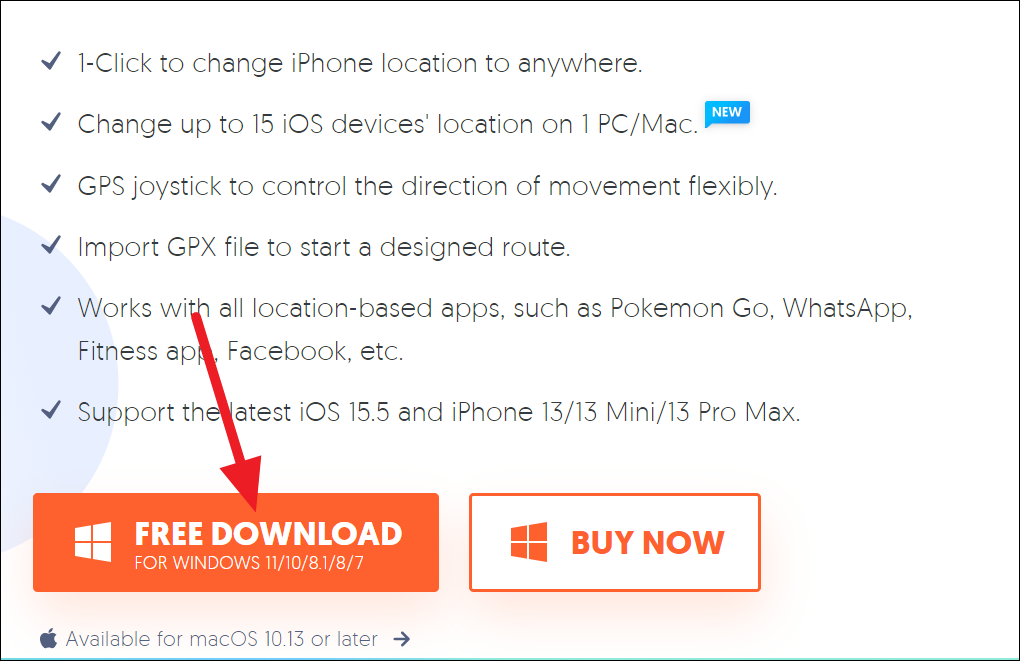
To get started, go to the official website and download the tool for your Windows PC.
Then, run the EXE file to install the tool. Click the ‘Install’ button on the setup window.
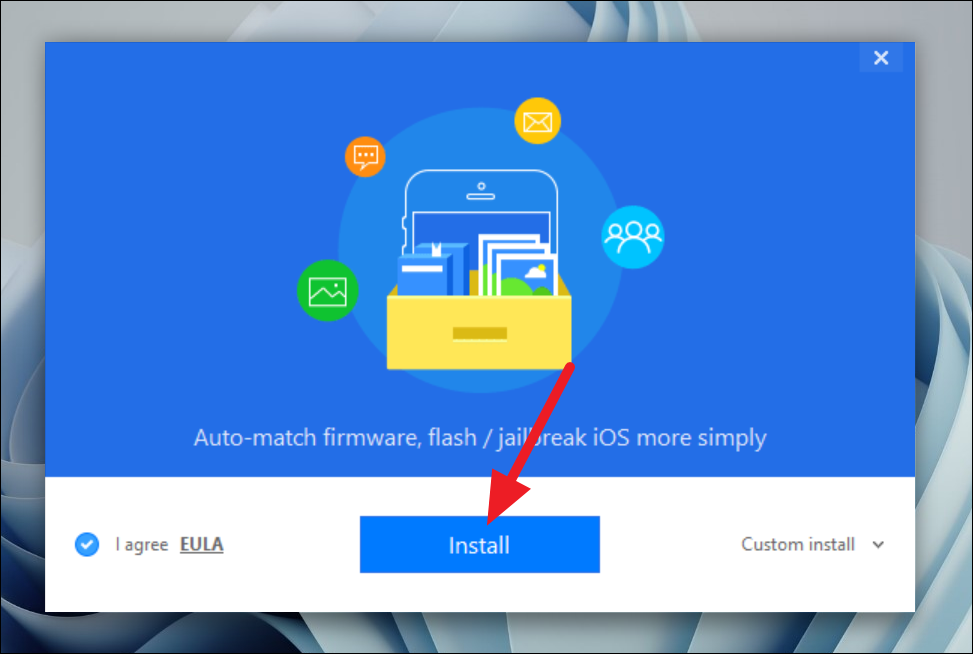
It’ll take a couple of seconds to install the software.
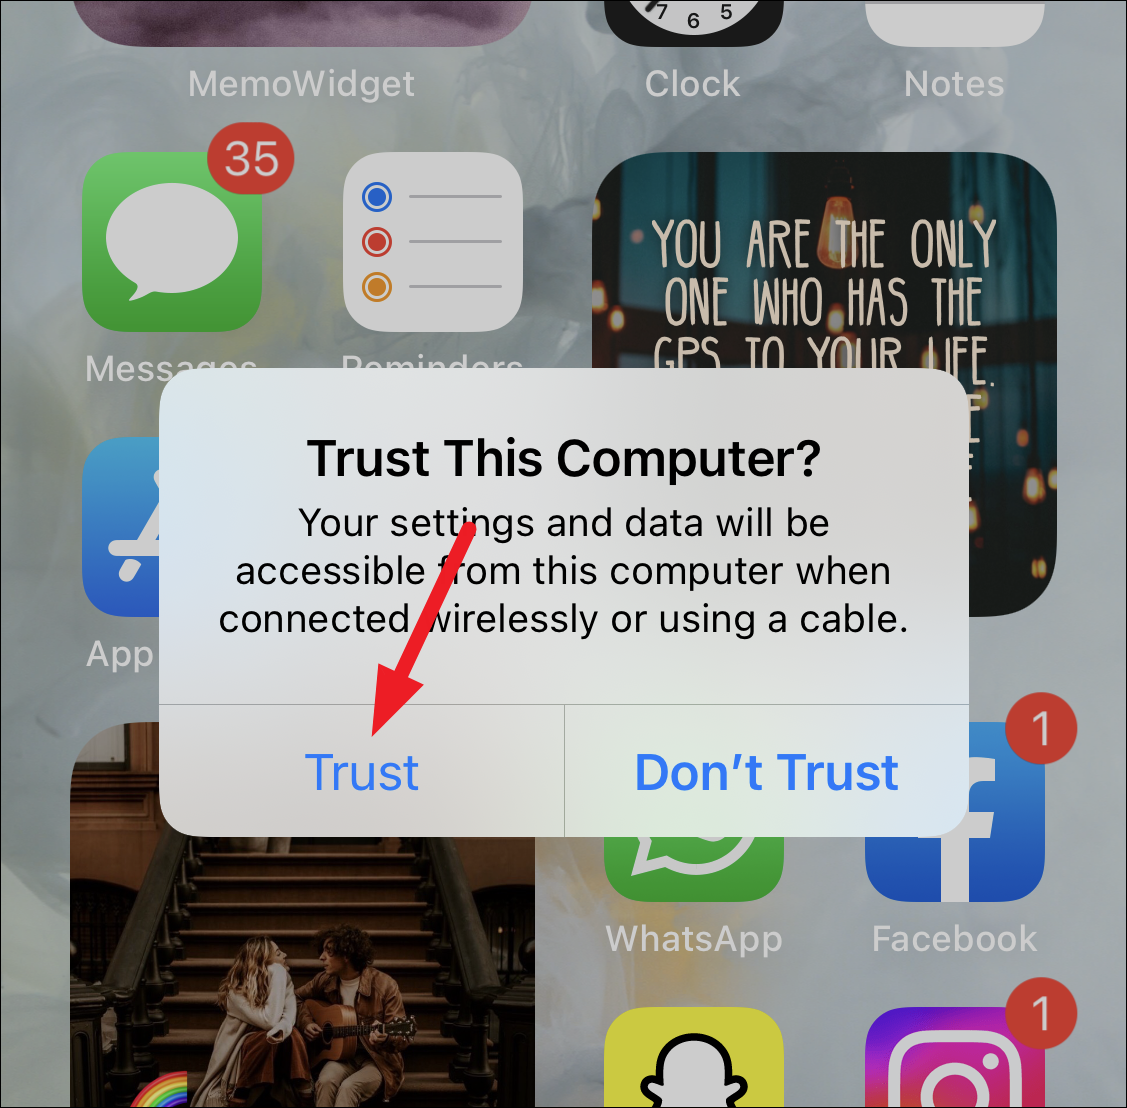
Once it installs, connect your iPhone to the computer using the USB cable. Keep your phone unlocked and tap the option for ‘Trust’ on your phone if the prompt appears.
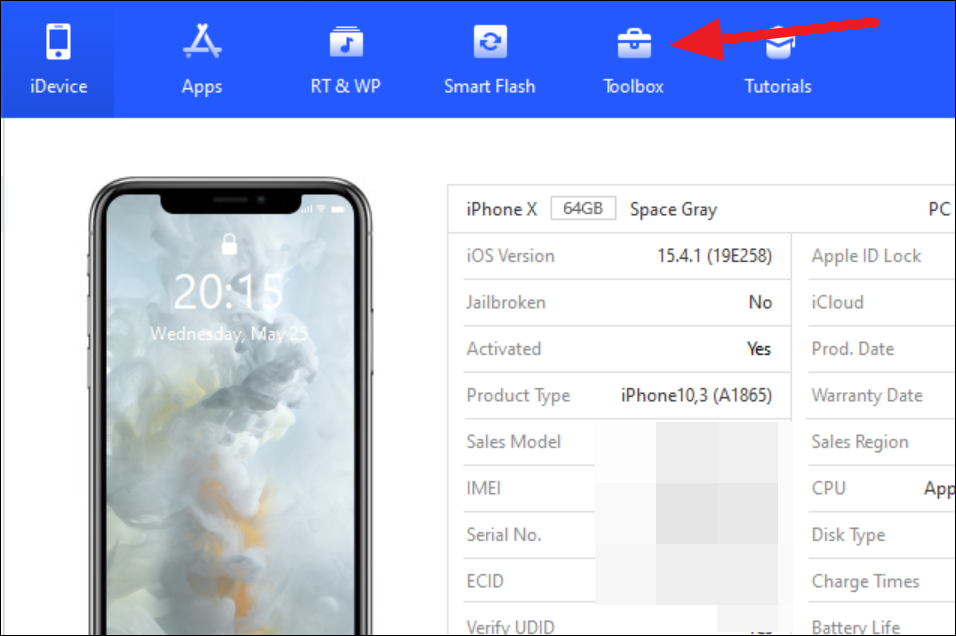
Then, from the tool window, go to the ‘Toolbox’ tab.
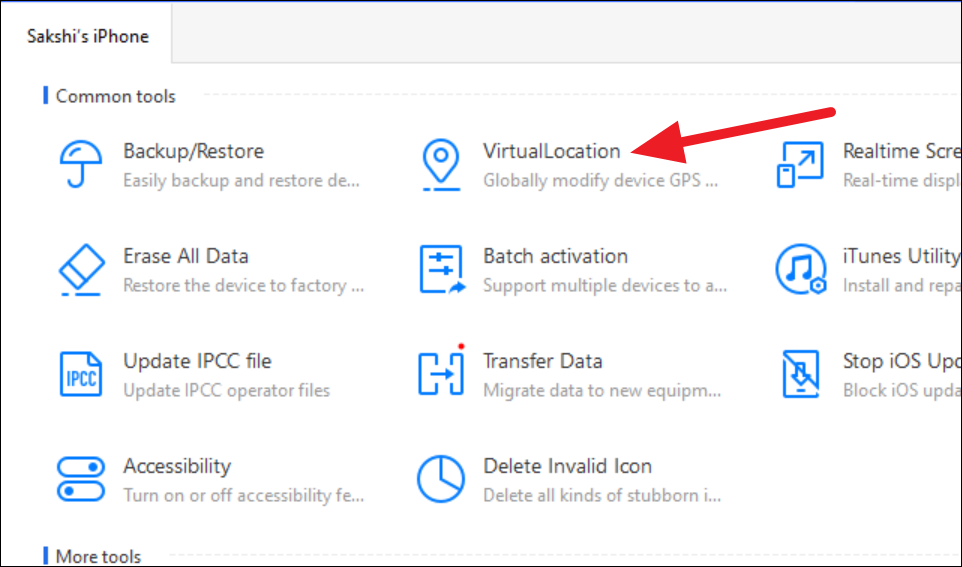
From the toolbox screen, click the option for ‘VirtualLocation’.
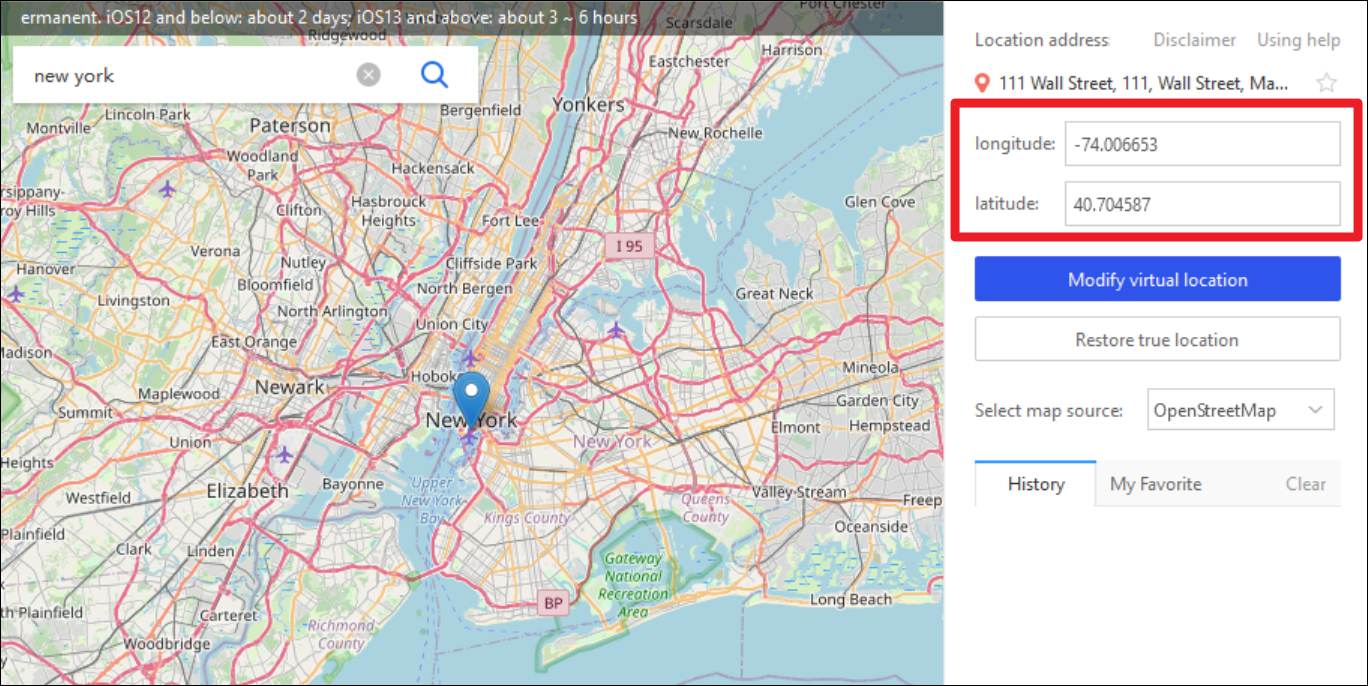
Then, choose the location from the map or use the search bar. Even after using the search bar, click the location on the map to get the longitude and latitude for it. You can also directly enter the longitude and latitude in the respective text fields if you have them.
Finally, click the option for ‘Modify Virtual Location’ and click ‘OK’ on the confirmation prompt.
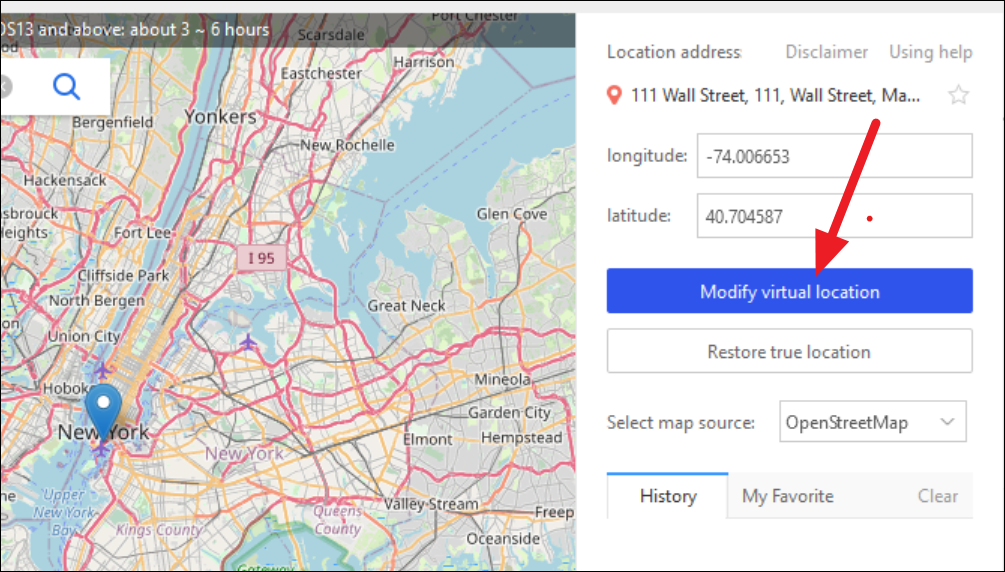
Your location will be modified to the new location globally. You must remember that modifying your location does it for all the apps, and not any specific app you might have wanted.
Location modification using 3u Tools is temporary. On iOS 13 and newer versions, it stays modified for about 3-6 hours, while on older iOS versions, it stays for about 2 days.
To reset your location to your real location at any time, click the ‘Restore True Location’ button. It’ll reboot your iPhone and reset its location. You can also restart your iPhone yourself to reset the location.
Use Tenorshare iAnyGo
If your location changing needs are more extensive, the above tool might prove limited for you. Tenorshare iAnyGo has more options that might suit your needs. It’s available for both Windows and Mac. But unlike 3u Tools, it doesn’t offer any other features. It specializes only in location spoofing services. The only drawback is that after an initial free period that offers 2 free trials for each feature to change your location, you’ll have to buy a license for the product.
To get started, go to the official website and download the software for your computer (Windows/ Mac).
On a Windows computer, run the EXE file to install the software. A User Account Control prompt will appear asking if you want to allow the software to make changes. Click ‘Yes’ to proceed.
Click the ‘Install’ button from the setup window. It’ll take a couple of seconds for it to install. Then click ‘Get Started’ to start the app once the install completes.

Now, connect your phone to the computer using the USB cable and unlock your iPhone. If a prompt appears on your phone asking to trust the computer, tap ‘Trust’.
Now, there are 4 ways to use the app to change your GPS location.
Change Location
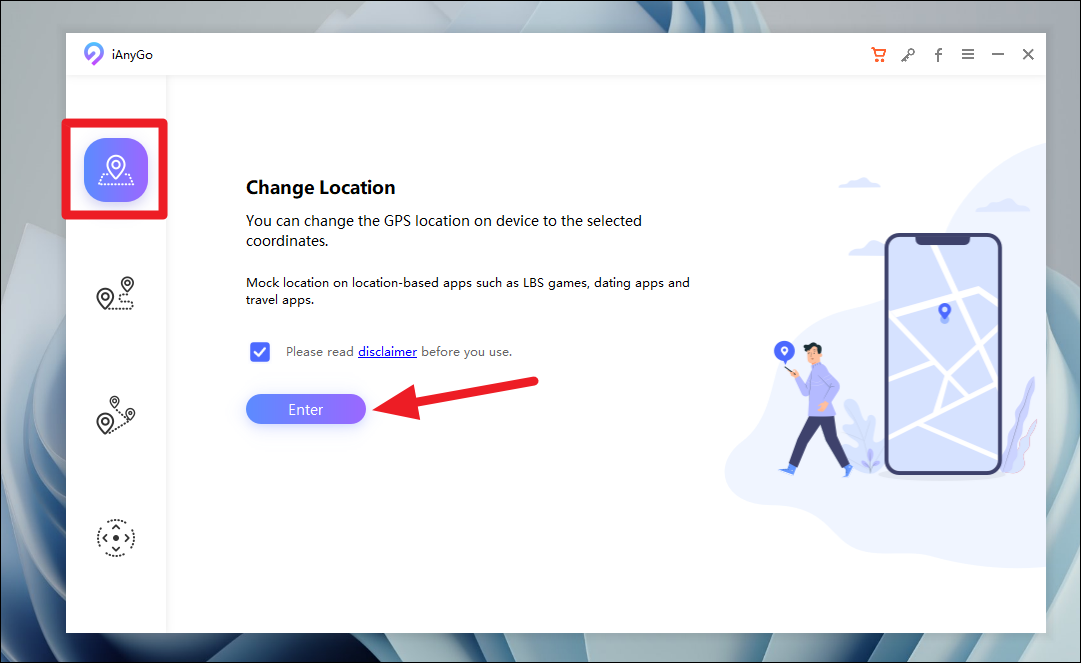
If you only want to set your location to any other place to trick any location-based apps such as dating apps or travel apps, the ‘Change Location’ feature of the app is what you’re looking for. It sets your location to any selected coordinates.
From the app, make sure you’re on the first option on the left sidebar. Then, from the right part of the screen, click ‘Enter’.
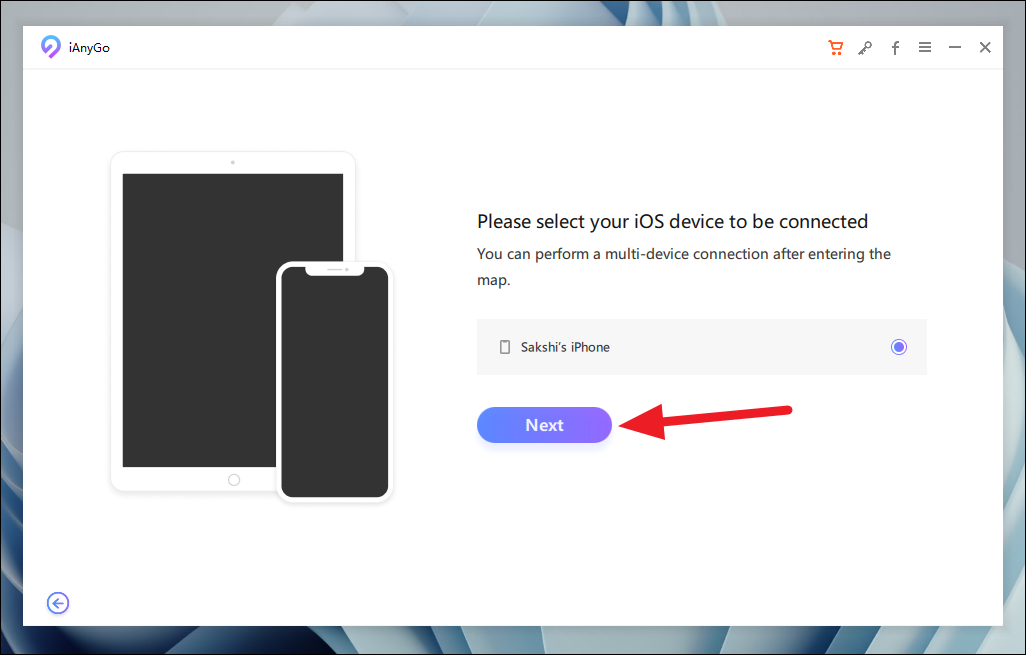
Then select the device for which you want to fake the GPS location (if there is more than one device connected) and click ‘Next’. iAnyGo also supports multiple connections at the same time, but if you want to make a multi-connection, you can choose the other devices after entering the map.
You’ll have to keep your iPhone unlocked while using the software to spoof the location.
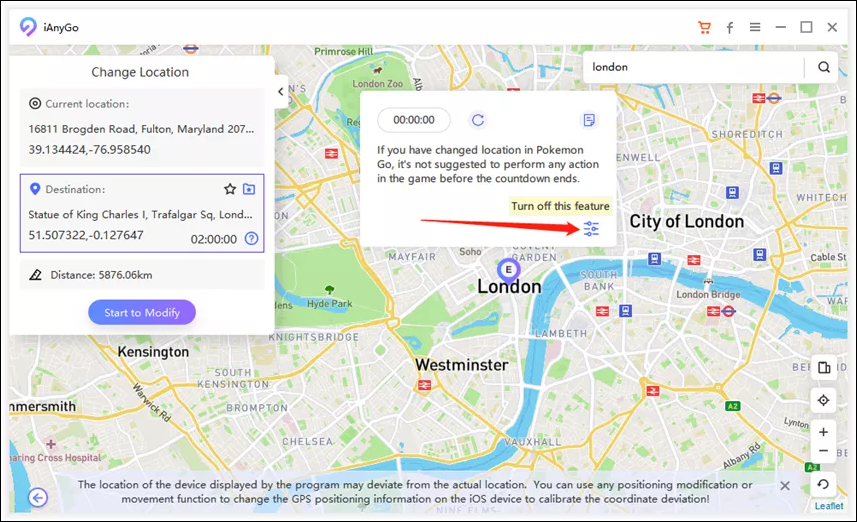
Once you reach the map, select the location from the map to which you want to set the GPS. You can also use the search bar to search for a place. Then, click ‘Start to Modify’.
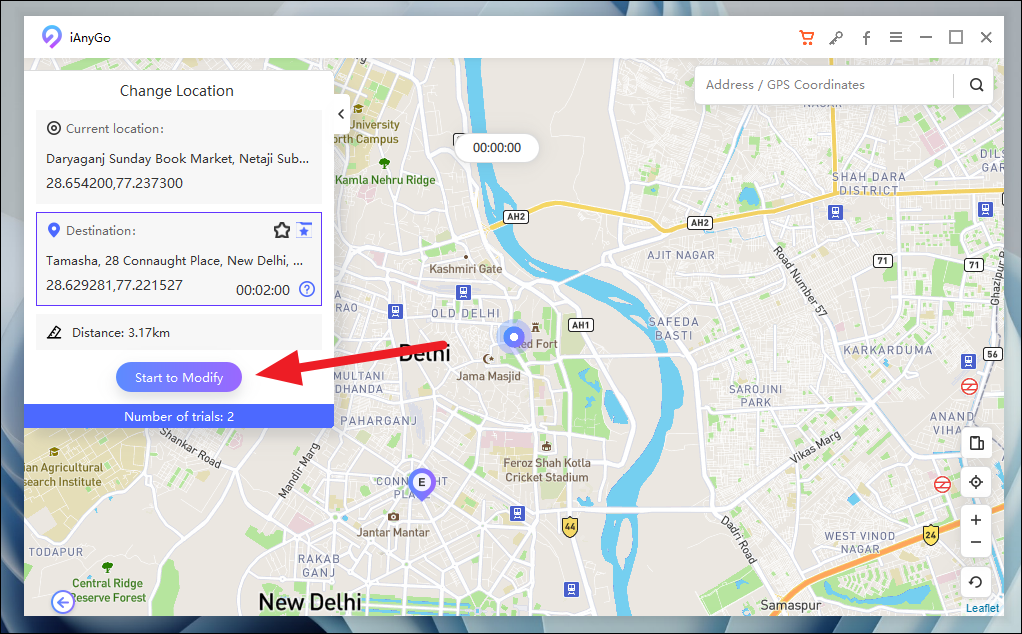
A tip might appear asking you to close any geolocation-based apps on your iPhone to avoid any warnings because of the coordinate jump. Click ‘Continue’ on the prompt.
The location will change immediately on your iPhone.
The app also has a cooldown timer, which is specifically designed with Pokemon Go players in mind. To avoid a softban in the game, it is recommended to not change the GPS location too frequently and the timer is there to remind you of that. Until the timer expires, you shouldn’t change your location again if you’re playing the game.
If not, you can make the timer disappear. Simply click the controls under the ‘Turn off this feature’ option from the timer window.
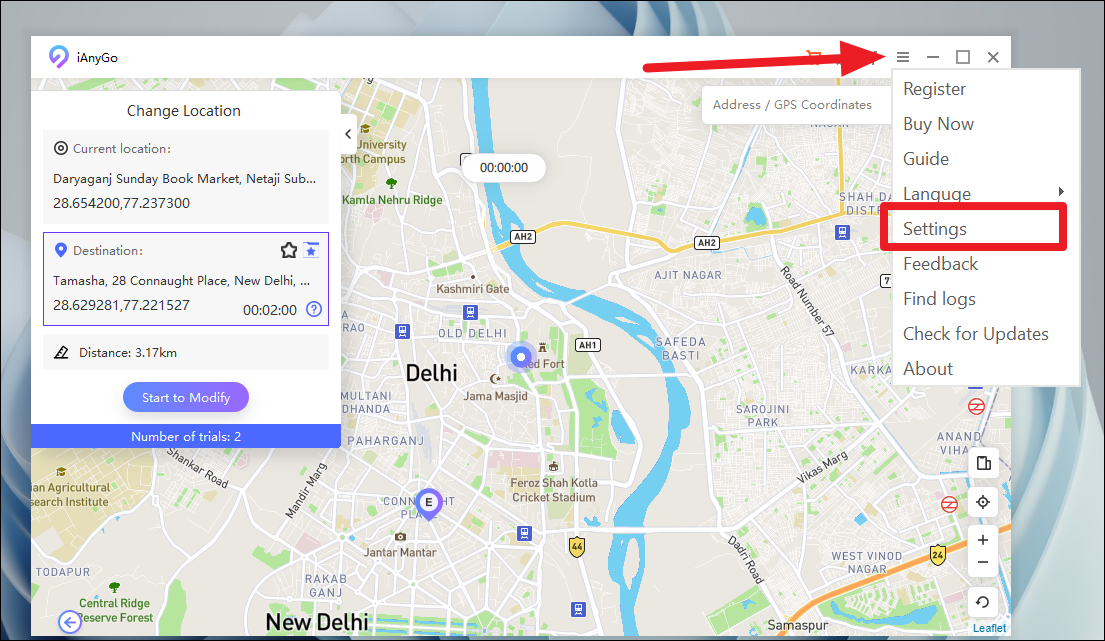
To enable it again, click the hamburger menu in the title bar of the app. Then, click ‘Settings’ from the menu that appears.
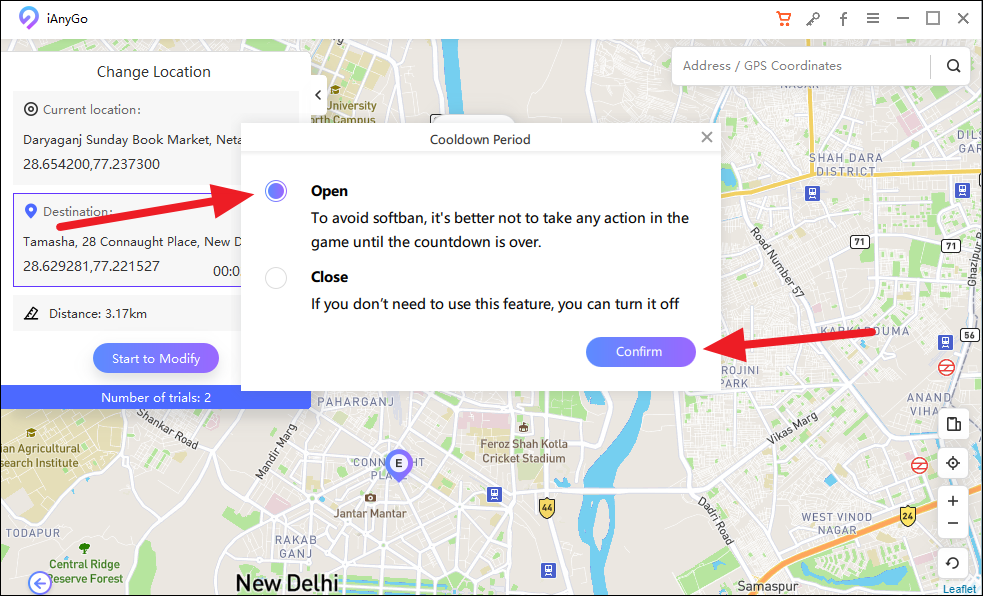
Select ‘Open’ from the menu and click ‘Confirm’ to enable it again.
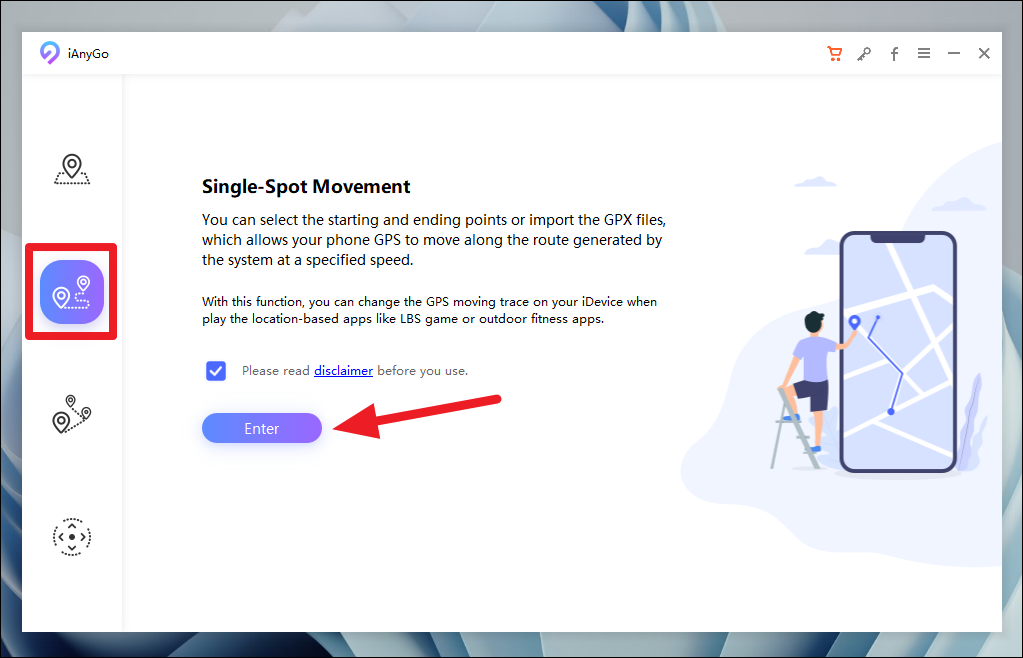
Single-Spot Movement
This mode can simulate GPS movement along any route you select on the map without you ever having to move. Single-spot movement simulates movement at a specified speed along any two points, A and B that you select on the app. Pokemon GO Players can move across the map and play the game using this feature without even leaving their homes. You can also import the GPX files, but this feature is only available when you buy the license and not with the free trial.
To get started, select the ‘Single-Spot Movement’ mode (the 2nd tab) from the navigation menu on the left of the app window. Then, connect your phone using a USB cable and keep it unlocked. Click the ‘Enter’ option on the desktop app.
Select the device you want to stimulate the movement for (if there is more than one device connected) and click ‘Next’. To select more than one device, wait till you enter the map.
The map will open. By default, the starting point is set as your location. If you want to move from your location to another, all you have to do is select a destination. Either click the location on the map, search for it using the address bar, or enter the coordinates in the address bar.
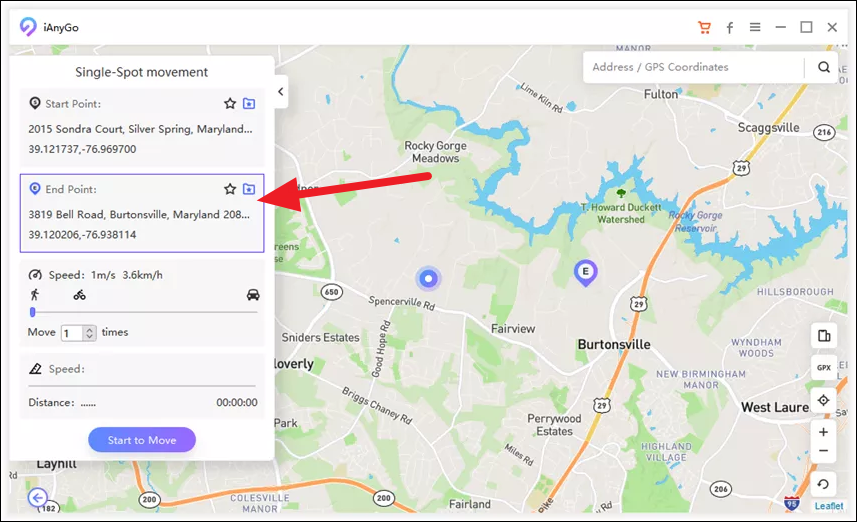
To alter the starting point, click it to select it and then choose the location from the map similarly.

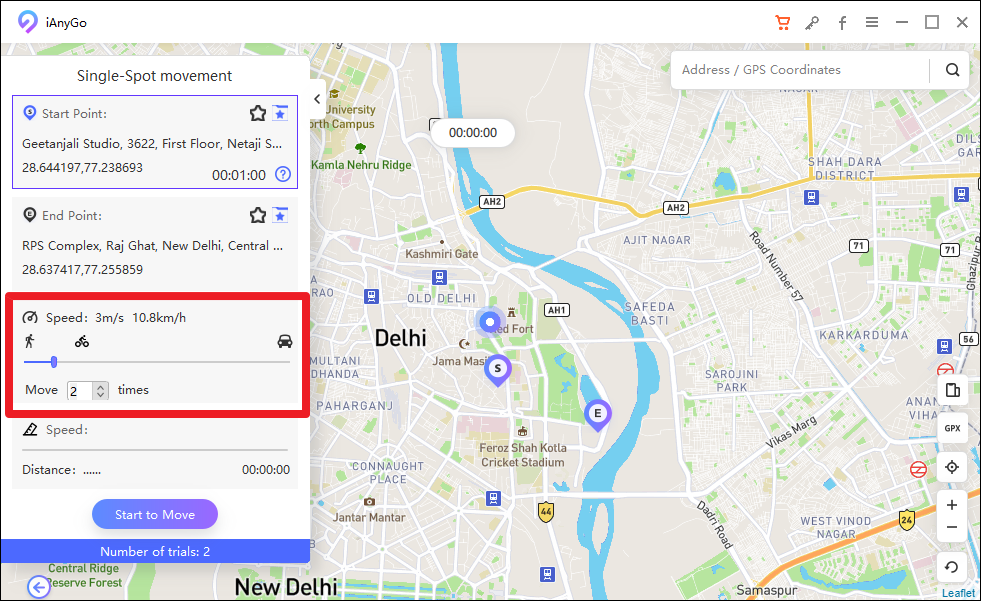
Then, choose the speed by dragging the speed bar and also select the number of moves. Depending on the number of moves you select, it’ll stimulate movement accordingly. For example, if you chose 2, iAnyGo will stimulate movement between A to B two times.
Finally, click the ‘Start to Move’ option to stimulate back and forth movement between the two points.
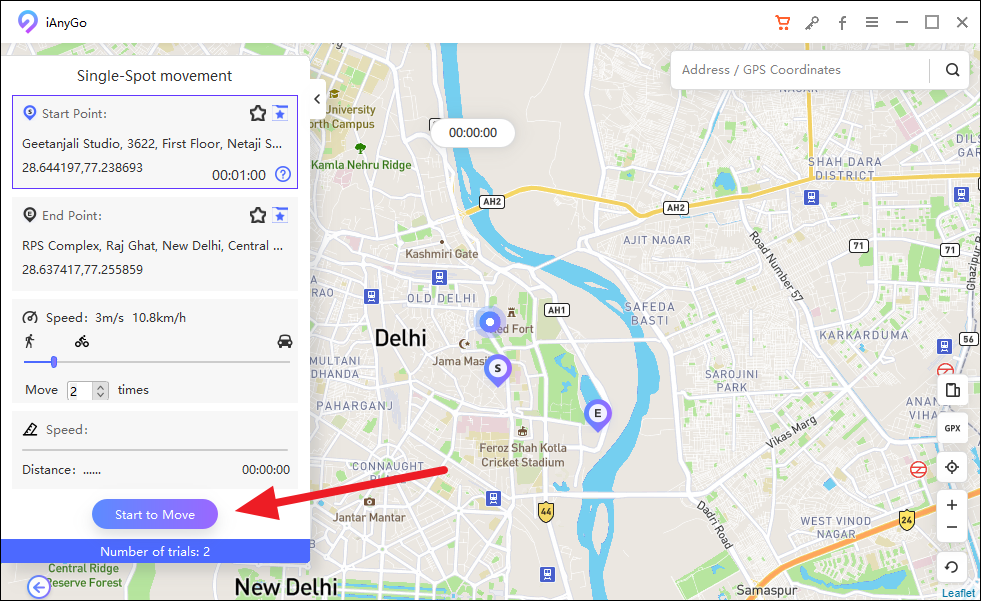
Click ‘Continue’ on the prompt asking you to close any geolocation apps open on your phone.
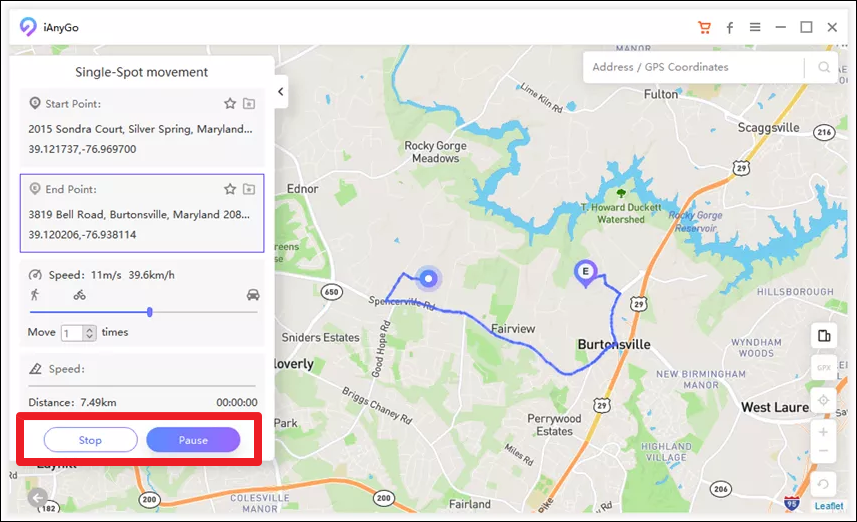
You can pause and continue the movement at any time. Click ‘Pause’ from the app interface. Click ‘Sop’ to terminate the movement altogether.
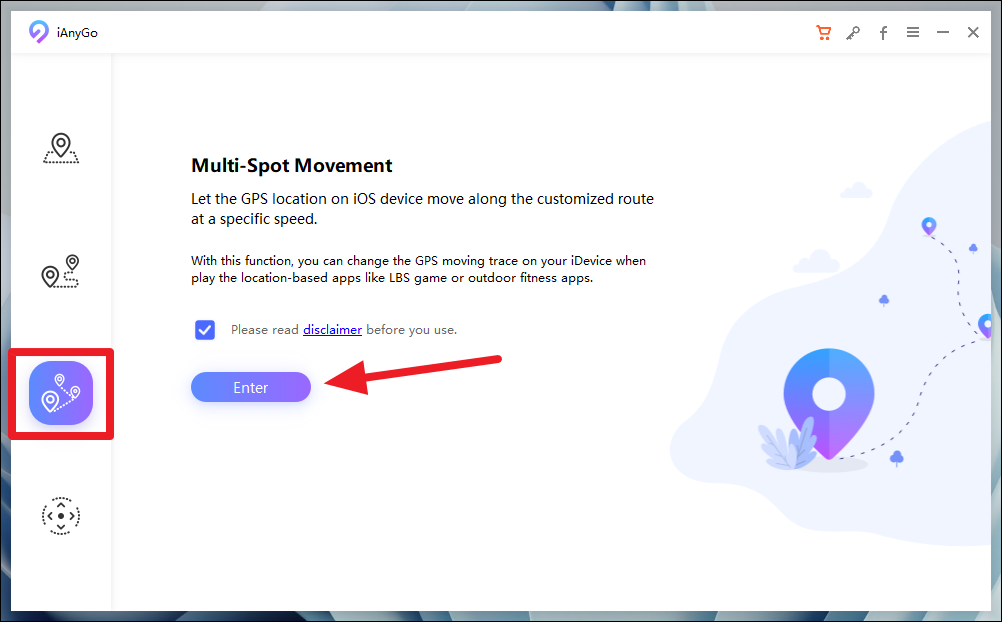
Multi-Spot Movement
You can also simulate movement across multiple points with the Multi-Spot movement feature. Switch to the ‘Multi-Spot Movement’ tab (the 3rd one) from the left sidebar and click ‘Enter’ from the right section.
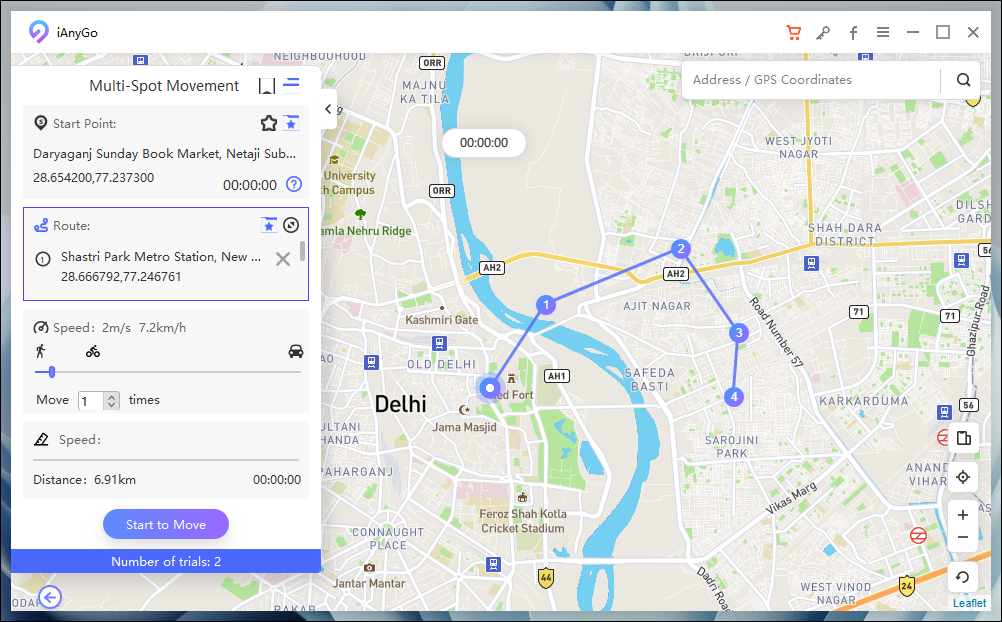
Then, select the device you want to change the location for and click ‘Next’.
From the map, click on each point you want to add across the route. You can add as many stops as you want. To adjust a location, drag the point using the mouse pointer on the map.
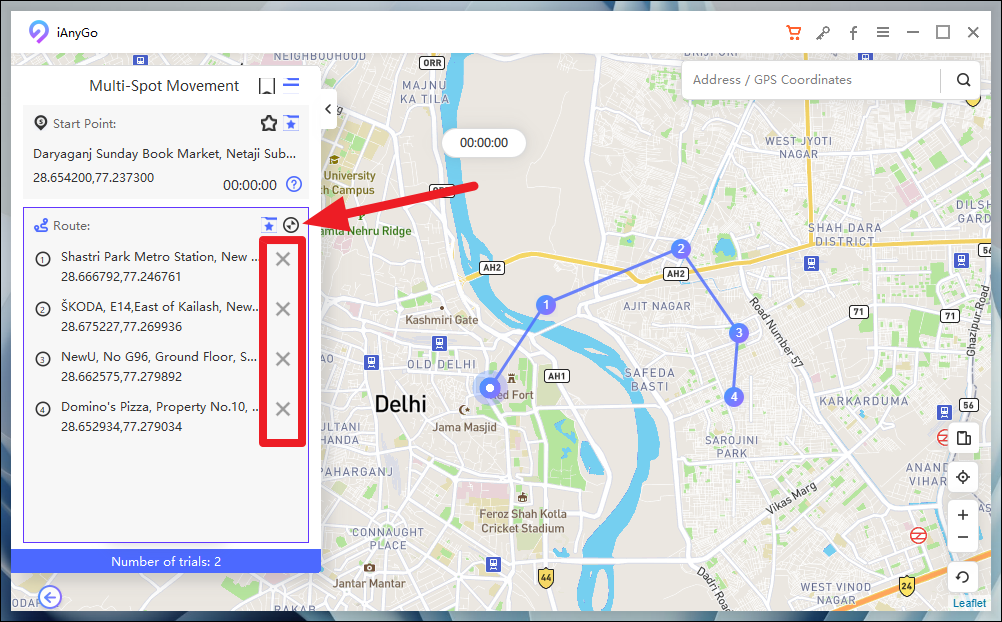
To delete a point, click the ‘Expand’ option next to Route. All the points will expand. Click the ‘x’ next to the point you want to delete.
Then, select the speed and number of moves (round-trips) you want to take across the route. Finally, click ‘Start to Move’.
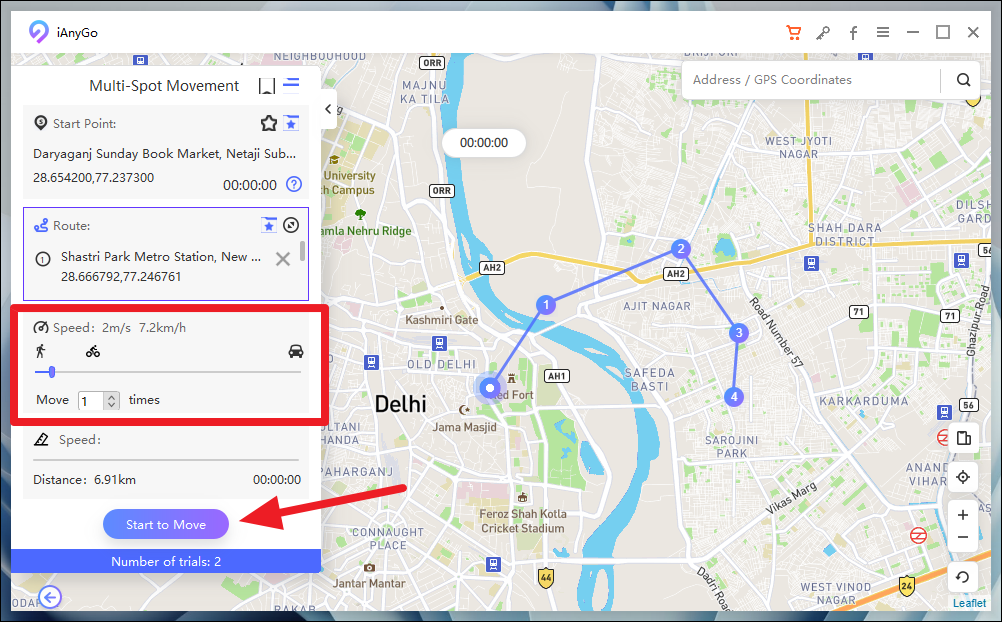
The location will be simulated across the selected route on your iPhone.
Joystick Movement
The Joystick feature lets you freely control the movement across the map using a joystick or a keyboard. You can easily change your direction at any time using this feature.
Switch to the ‘Joystick Movement’ mode (the 4th tab) from the left sidebar of the window and click ‘Enter’ from the right section of the window.
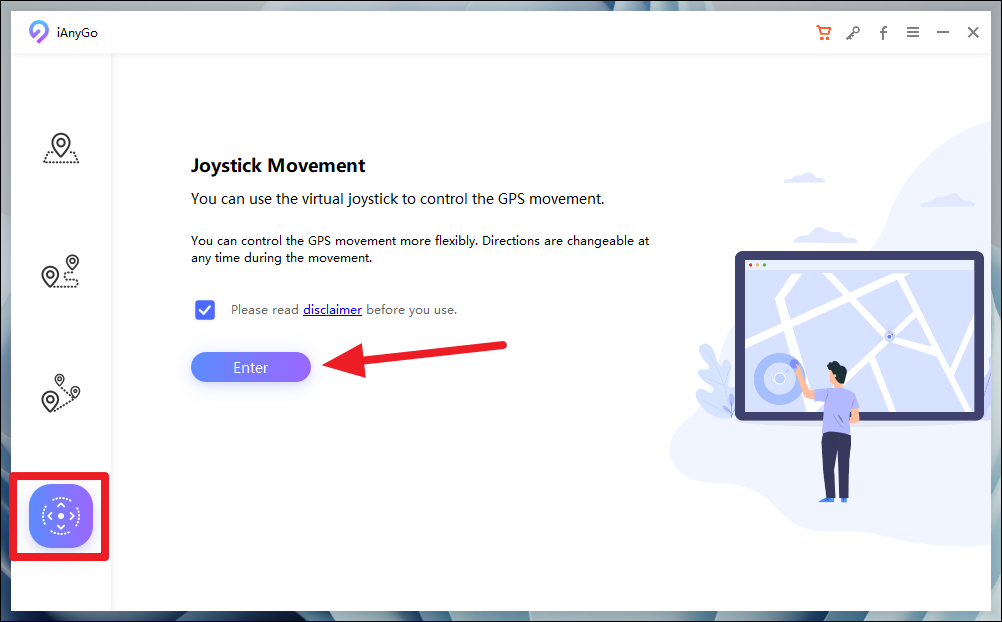
Then, select the connected device and click ‘Next’.
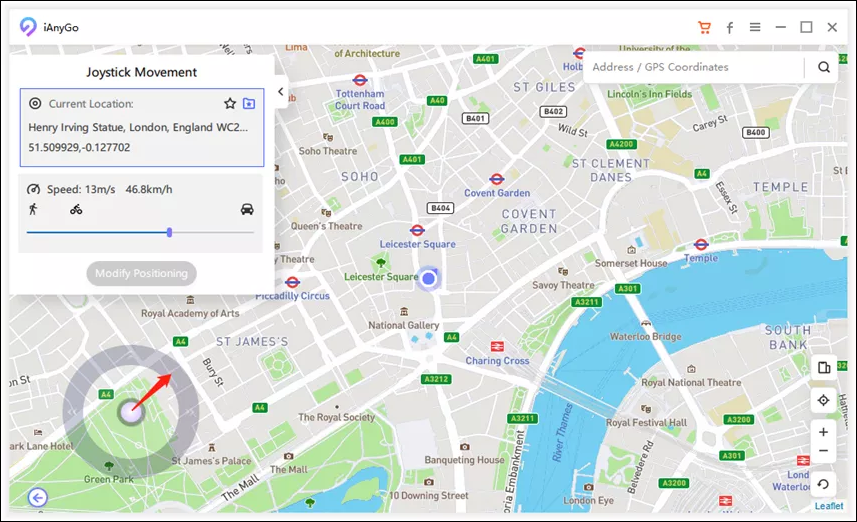
Adjust the speed for the simulated movement by dragging the slider. There are different speeds, like walking, cycling, or driving. You can also change the starting location by first selecting the ‘Current Location’ option and then selecting a location on the map.
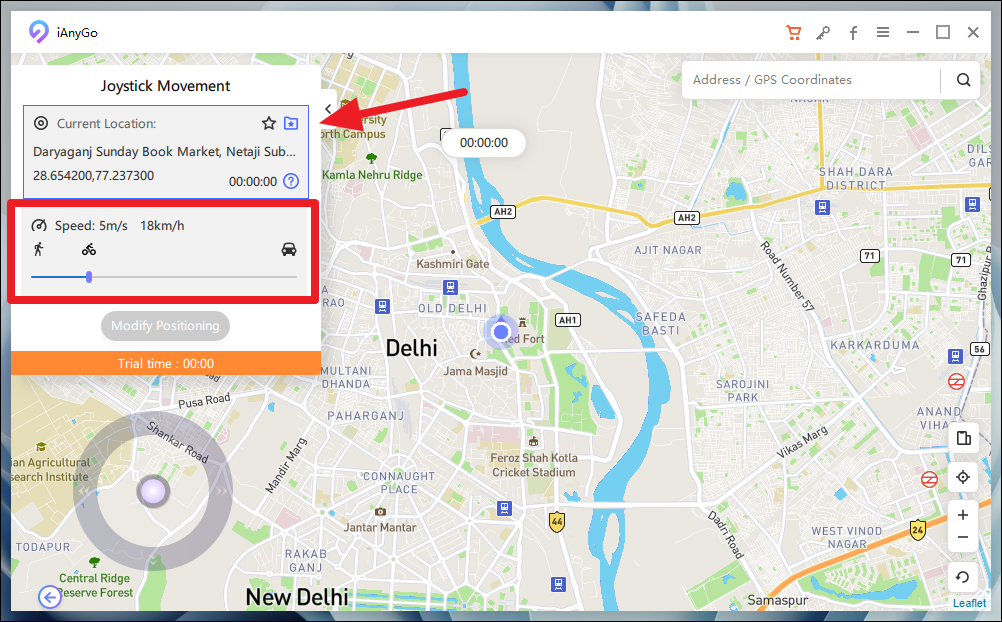
The joystick will appear in the lower-left corner of the screen. Drag the middle button of the joystick towards the circle and release it. The GPS will start moving automatically at the set speed in that direction. At any time, you can change the direction freely in 360 degrees by dragging towards that direction.
Note: Your mouse pointer should be in the circle when you drag the middle button.
You can also use the arrow keys on your keyboard to control the movement.
Reset to the True Location
At any time, if you want to reset your phone to the real location, click the ‘Restore the true coordinate’ in the lower-right corner of the screen.
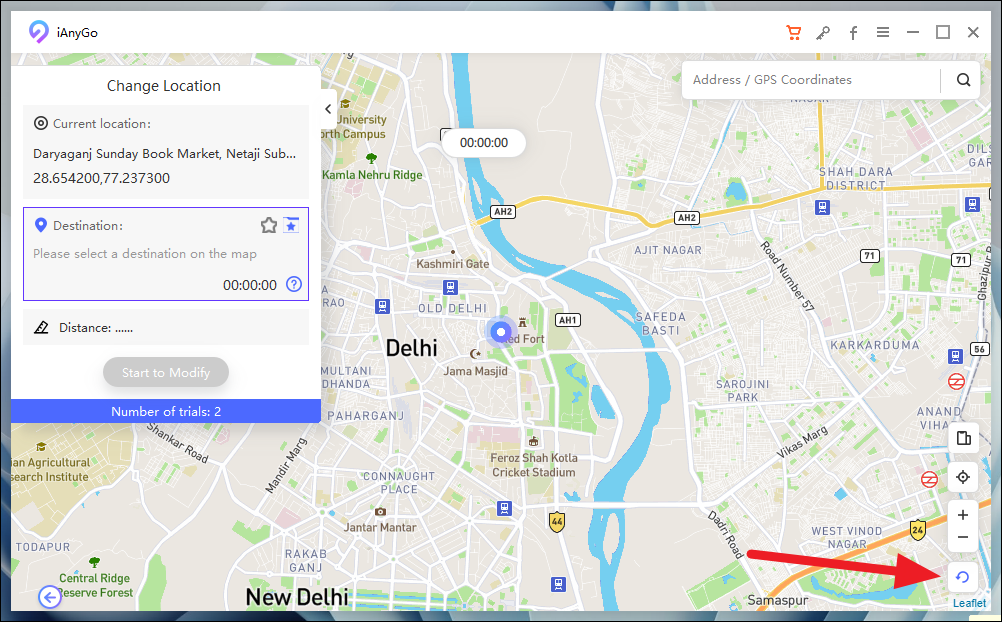
A confirmation prompt will appear on the screen that your device needs to restart to restore the true location. Click the ‘Restart’ button.
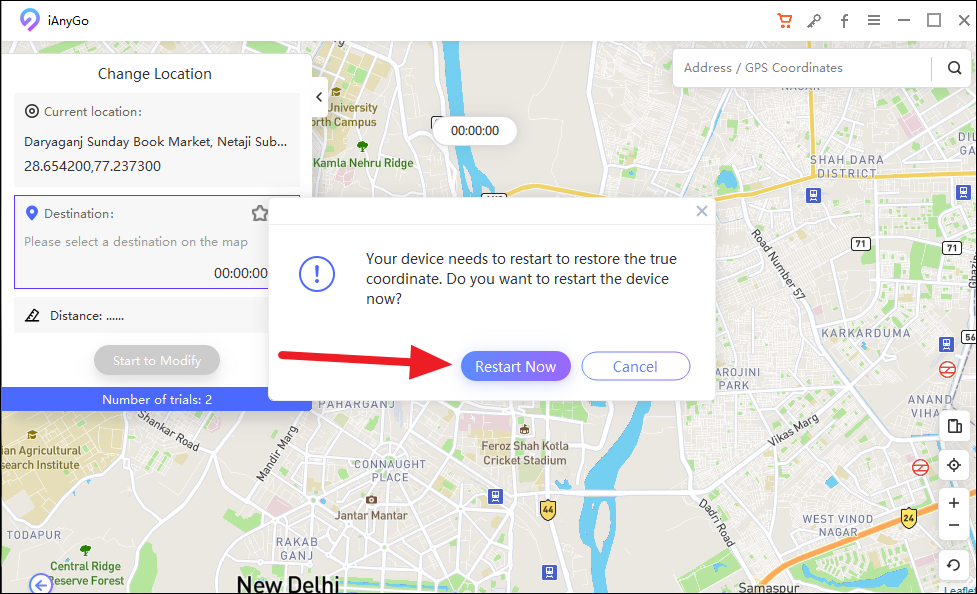
If your phone is not plugged into the computer anymore, you can restart it yourself to restore the true GPS location.
Changing the GPS location of your iPhone can be tricky business. Hopefully, with the help of this guide, you’ll be able to fake your location without too much trouble.

Claude Sonnet 3.5 vs. ChatGPT-4o: Which is better?

5 best AI Web Browsers in 2024

7 best AI search engines in 2024
Get all the latest posts delivered straight to your inbox., member discussion.

iOS 18 Photos app review: It just works (differently)

How to change icon color on iPhone in iOS 18

Genmoji isn't available in iOS 18 yet: Everything you need to know

PSA: You can't make Emojis on all iOS 18 supported iPhones

Apple's Visual Intelligence will bring visual search with intelligence to the iPhone 16 series
How to turn iPhone location services on or off
You don't need to know where I'm at, Apple

Location services have plenty of uses. They help apps give you more relevant results to searches, enable Find My Phone, assign location tags to photos, adjusts your time zone, and perform other useful tasks you probably take for granted. They also drain your battery and give companies personal data about you.
Thanks to iOS 14 , iPhones have robust privacy settings that make all apps ask you for permission before activating location tracking. But you may end up giving that information to an app only to regret it later, or decide that you don't want any app tracking you.
Whatever your reasons, we're here to explain all the tools at your disposal for protecting your location privacy. Here's how to turn iPhone location services on or off for individual apps, or turn off iPhone tracking altogether.
How to turn off location services for all iOS apps
Whether you want to temporarily disable all iPhone location tracking or only shut it off for certain apps, we've got you covered.
To start, open your Settings and enter the Privacy menu (below Battery, above App Store). Your first menu option will be 'Location Services,' where you can toggle a switch to turn off tracking completely.
This nuclear option aside, many of you will instead want to reset location privileges for individual apps. In the Location Services menu, you can scroll down to see the individual permissions for each app – Never, Ask Next Time, While Using, or Always – and tap that app to change its setting.

In that same menu, you'll see that 'Precise Location' is enabled by default for every app that tracks you. You can turn that setting off individually for each app, which will ensure the app only knows your 'approximate location.'
Get daily insight, inspiration and deals in your inbox
Sign up for breaking news, reviews, opinion, top tech deals, and more.
If you've decided that too many apps are following you around but don't want to reset them one by one, your other option is to navigate to Settings > General > Reset and tap 'Reset Location & Privacy.' That way, all apps will once again give you the menu prompt asking if you will permit them to track you. You can then give (or deny) permission naturally over time.
Another option would be to reset these permissions, then go to Settings > Privacy > Tracking and deselect 'Allow Apps to Request to Track.' This will prevent those permission prompts from ever appearing again.
How to turn off location tracking for Apple System Services
Apple deserves credit for making apps ask you for permission before tracking your every move. But it does track you by default for many of its own services, some of which you may not need or want.
Assuming you don't want to turn off tracking entirely, scroll to the bottom of the Location Services menu to find System Services. Inside that submenu, you'll see every service that Apple uses your personal location data to provide. Next to each service, you'll see arrows that indicate if it has used your location recently or in the last 24 hours.
You can untoggle certain Services to reduce the amount of location data Apple uses. Apple doesn't say in the menu what these services do, however, so we'll quickly summarize them below, so you know if you really need it or not.

- Apple Pay Merchant Identification: This setting is specific to people with physical Apple Cards. It identifies local vendors based on your location. It won't track you otherwise.
- Cell Network Search: It tracks your location relative to local cell towers so Apple can collect data on usage and congestion. It's entirely optional for your purposes.
- Compass Calibration: This helps the electronic compass stay accurate, which is probably useful when using a map app.
- Device Management: Enables mobile device management (MDM) tracking
- Emergency Calls & SOS: Tracks your location during a 911 call so emergency responders know where you are. We suggest leaving this on.
- Find My iPhone : This constantly tracks your phone's location so you can find it at any time.
- HomeKit : If you have HomeKit-compatible devices, this will help trigger automations when you leave or return home.
- Location-Based Alerts : Apple will use your geographic data to let you know when it's time to leave for a Calendar event or give you specific reminders tied to locations.
- Location-Based Suggestions : Apple will suggest results while browsing in Safari or other apps based on where you are. It can be turned off for greater privacy.
- Motion Calibration & Distance : It helps make your workout results as accurate as possible via GPS tracking.
- Networking & Wireless : This setting disables automatic tracking used to determine if you're eligible for certain networks like ultra-wideband.
- Setting Time Zone : It ensures your phone clock stays accurate. It could be turned off if you don't plan on travelling anytime soon.
- Share My Location : If you choose to share your location with friends in certain apps, this setting enables that.
- System Customization : This automatically changes certain settings on your phone based on whether or not it thinks you're at home.
- Significant Locations : This tracks which locations you go to often and determines if they may be significant to you, in order to improve Apple Memories or for other uses. Apple says these locations are 'end-to-end encrypted', so it cannot read them.
- iPhone Analytics : This optional feature compares your location data with whatever you're using your phone for at that moment and sends it anonymously to Apple.
- Popular Near Me : Apple tracks where you use or download certain apps to determine which are relevant to particular locations.
- Routing & Traffic : Apple anonymously sends your location data when walking or driving to improve its own traffic data, meaning it's entirely optional to you.
- Improve Maps : As you drive somewhere, Apple compares your movement against its traffic estimates to improve its predictive ETAs. This is also optional.
- How to reset your iPhone
Michael Hicks began his freelance writing career with TechRadar in 2016, covering emerging tech like VR and self-driving cars. Nowadays, he works as a staff editor for Android Central, but still writes occasional TR reviews, how-tos and explainers on phones, tablets, smart home devices, and other tech.
Apple confirms every iPhone 16 model comes with 8GB of RAM inside – matching the iPhone 15 Pro and Pro Max
I just canceled my Pixel 9 Pro Fold order and bought the iPhone 16 Pro Max instead – here's why
Meta Connect 2024: 5 things I want to see at the rumored Meta Quest 3S launch event
Most Popular
- 2 You could say goodbye to low mood and negative thinking with the Moodfit app
- 3 Samsung's massive sale ends today: save over $1,000 on TVs, watches and phones
- 4 Flappy Bird reboot will never match the awfulness of the original and that's a problem
- 5 Google Pixel 9 Pro vs Samsung Galaxy S24 Ultra: two AI champions compared
How to Manage Location Settings on Your iPhone

Your changes have been saved
Email is sent
Email has already been sent
Please verify your email address.
You’ve reached your account maximum for followed topics.
Key Takeaways
- You can individually control location access for each app or turn off Location Services completely.
- You can check which apps are actively accessing your location by looking at the status bar on your iPhone.
- You can also disable location access for core iOS functions, but we don't recommend it.
If you're concerned about your privacy, it's important to check which apps can access your location on your iPhone. You can then revoke access to any apps you don't want to share this information with. Here's how you can do it.
How to View Your Location Services Settings
Open the Settings app and go to Privacy & Security > Location Services to see all the apps that have asked to access your location.
You can disable Location Services at the top of the page to turn this feature off for every app at once, but I don't recommend this since some apps like Maps need to access location data from your iPhone to work properly.
Instead, scroll through the list and inspect the location settings for each app individually.
Manage Location Access for Each App
As you scroll down this list of apps, you'll notice that a different arrow appears next to each app, which represents how recently the respective app accessed your location. Here's what each arrow means:
- Gray Arrow: The app has used your location in the last 24 hours.
- Solid Purple Arrow: The app is accessing your location right now.
After tapping an app, you can choose from multiple location access options. The best option for each app varies based on how you plan to use it. Here's what each option means:
- Never: This app can never access your location.
- Ask Next Time Or When I Share: This app asks for one-time location access each time you use it.
- While Using the App: This app can only access your location while you're using it.
- Always: This app can always access your location, even when you aren't using it.
You can also disable Precise Location for the app in this menu. By doing this, you only give it access to your approximate location rather than a precise reading.
Find Out Which Apps Are Tracking You
Your iPhone shows an arrow in the status bar whenever an app accesses your location. If you see an arrow with a blue background, it means an app is actively accessing your location. However, if you only see an arrow without a background in the status bar, it means that the opened app can access your location if needed.
You can also view a list of which apps have recently accessed your location by opening the Control Center and tapping the Location Services icon at the top. However, this option will only appear if an app has recently accessed your location or is currently using your location.
As you use different apps, your iPhone occasionally shows an alert to warn you if a particular app has been accessing your location in the background. When this happens, you can see the location data given to that app and choose whether to let it keep tracking you in the background or not.
Don't Forget About Apple's System Services
By default, the location services arrow doesn't appear in your status bar for core iOS functions like setting your time zone. To view these settings, tap System Services at the bottom of the Location Services settings on your iPhone.
This lists all of Apple's location-based services, showing which ones have recently used your location as well. It also allows you to disable any services you don't want to use. I recommend keeping all these options enabled because they're extremely helpful for locating your iPhone if you lose it , assisting in emergency situations, and more.
Although your iPhone has many built-in security features , you should also be mindful of which apps you allow to access your microphone, camera, photos, and Bluetooth settings. You can manage all these options through your iPhone's privacy settings, giving you complete control over your digital privacy.
- iPhone Tips
- Location Data
Dr.Fone Virtual Location
Change GPS location on Android easily
Dr.Fone – Phone Unlock&Clean
Unlock your devices in 3 steps
Dr.Fone – Data&Photo Recovery
Recover data in 3 steps
Dr.Fone Basic

- Data Recovery iPhone Data Recovery Android Data Recovery
- Data Eraser iPhone Data Eraser Android Data Eraser
- System Repair iPhone System Repair Android System Repair
- iTunes Repair Fix iTunes Errors
- Phone Transfer Phone to Phone Transfer
- Password Manager Recover and keep all your passwords in one place
- Dr.Fone - Data & Photo Recovery Recover lost or deleted data from Android
- MobileClean - Phone Cleaner Free up storage on iPhone in one-tap
- Dr.Fone Air Online phone data management and screen mirror

- Video Tutorial
- Download Center
- Remove iCloud Activation Lock Without Password!
- How To Unlock Samsung Phone Without Losing Data?
- WhatsApp Marketing & WhatsApp Transfer Tips
- Forgot the Apple ID and Password?
- How to Bypass Google Account Verification (FRP)?
- How to Fix iOS/iPadOS 17 Update Problems?
- How To Get into Locked iPhone/iPad/iPod Touch?
- How To Remoce MDM from iPhone and iPad?
- How To Transfer Data from Android to iPhone 15?
- Forgot iPhone/iTunes Backup Password?
- How To Unlock a SIM Locked iPhone?
- How to Sell Your Old Phone Safely?
- How To Bypass Screen Time Passcode?
- Best AI Tools for All Use Cases AI
- Find More Topics
- Back up Phone Data
- Delete Phone Data
- Phone Data Transfer
- Manage Phone Data
- Fix Device Issues
- Mirror Phone Screen
- iOS & Android Tips
- DOWNLOAD DOWNLOAD DOWNLOAD
- Pricing Pricing
- Change your device's GPS location.
- Simulate GPS movement flexibly in AR games.
- HD and large map view to check location.
- Suitable for gaming, app testing, and privacy protection.

How to Enable, Disable, and Change Safari Location on iPhone

James Davis
Jul 12, 2024 • Filed to: Virtual Location Solutions • Proven solutions
It is quite a common experience where everyone would have gone through “Annoying pop-ups during your serious search’. It is a natural phenomenon but it becomes a distracting one at the time of emergency works.
Simone was surfing through job opportunities in the online job portal and the unrelated pop-ups direct her to different platform displaying false information. She was completely lost and frustrated. This situation occurs due to the sharing of your data with websites you log in. You can protect your private data like location, values entered in the website, time spent on each web page etc by modifying certain settings in the device’s privacy portfolio.
Explore the techniques in how to change safari location on the iPhone.
Part 1: How to enable/disable Safari Location on iPhone
Part 2: how to prevent safari from asking for your location on iphone.
Tips: Enhance your iPhone privacy with Dr.Fone - Virtual Location! Change your location to protect your privacy, and prevent your iPhone from being tracked. Get it now!
What is the need to enable or disable the Safari location on the iPhone?
The concept is simple if you expose the location details on the cyber world you can find out all sorts of ‘Near me’ searches accurately. For example, if you are caught in a strange place and looking for any restaurants, then immediately you will make a search by just adding keywords like ‘ restaurants near me’. The results will direct you with the hotels closer to your current location. This type of search holds good for all facilities like hospitals, theatres, malls etc. By enabling the location settings you can make the search ease and precise.
The other side of exposing your location details on the internet space is that you are under threat by strangers. When you step into any websites, the built-in programs can sense your location data and flashes pop-ups related to your location. The pop-ups are not reliable mostly it contains false information. Thereby leading you into unwanted issues and therefore it would be a better practice to disable location details on iPhone to overcome further problems in future.
A stepwise guide to learn how to enable /disable Safari location on iPhone
Step 1: Reach for the ‘Privacy’ options
Go to the ‘Settings’ in the home screen of your iPhone and proceed with the ‘Privacy’ option.

Step 2: Choose Safari to modify the settings
In the ‘Privacy’ window, you have to select ‘Location Services’ option and tap ‘Safari Websites’ from the list

Step 3: Alter the Safari location services
You have to tap the ‘Safari Websites’ option to select from the expanded list. If you want to enable/disable the location services in Safari websites then you have to choose ‘While using’ option. This feature enables location service of the Safari websites when it is active and the location service becomes inactive if the Safari is not in use.

Why do iPhone users want to stop the Safari from asking the location?
The foremost reason for many iPhone users is that they want to manage their privacy. They do not want to risk their privacy by sharing their location details with apps and Safari websites. It is a safe practice to step into the internet platform concealing your identity to avoid cybercrimes.
Follow the below steps to stop iOS Safari Location Services
Step 1: Reach the ‘Privacy’ screen
In your iPhone, tap ‘Settings’ then select the ‘Privacy’ option.

Step 2: Modify the options in Location Services
In the ‘Privacy’ window, choose ‘Location Services’ and tap ‘Safari Websites’ from the displayed list.

Step 3: Stop the location services
In the pop-up screen, tick the ‘Never’ option to completely stop the ‘Location Services’ for Safari. This modification will prevent Safari from requesting to share the location details of the device.

Part 3: How to change Safari location on iPhone
It would be great fun with your friends when you change the Safari Location on iPhone. You can bring jealous amidst your colleagues by registering your location details at holiday spots. By changing the location details, you can skip from unwanted false advertisements related to your real location while surfing through the internet space for your needs.
Track the steps to bring changes in the Safari Location on iPhone below
Step 1: Go for an eminent program
Change the location details of your iPhone using the incredible software Dr.Fone. Download this app at its official web address ‘ https://drfone.wondershare.com/virtual-location-changer.html ’ or click the Download button below directly. Install it on your computer by following the wizard carefully. Tap the icon to explore the functionalities on the home screen.

Step 2: Establish a Virtual location
In the home page of this program, select the ‘Virtual Location’ option. In the next screen, tap the ‘Get Started’ button to trigger the procedure.

Step 3: Quick look at the map view
The next window displays the current virtual location details of the device.

Step 4: Enter your favourite spot
Select the ‘Teleport mode’ in the map view. You can find this icon at the top right of the screen. Choose the first image from the horizontal list of symbols. Then enter your favourite spot worldwide in the text box near the ‘Go’ button. It is high time to press the ‘Go’ button and fix your admirable spots as your default device location.

Step 5: Authenticate the changes
The next map view shifts to the new location with a pop-up message ‘Move Here’. You must authenticate the changes by tapping this ‘Move here’ button.

Step 6: Check the default location
Open the current location in your iPhone and verify it displays your favourite spot.

Thus, concealing the location details of your device protects you from unwanted cyber issues. Instead of turning on and off the iOS Safari location services, you can straightaway modify it into a fake zone. This approach would greatly help when you install any apps or enter into websites at this online platform. You can make use of the cyberspace efficiently if you make such modification in your iPhone. Choose Dr.Fone - Virtual Location to make desired changes in your default location of your iPhone.
You Might Also Like

staff Editor
Virtual Location
- 1. Best iOS Location Changers
- 2. Fake iPhone GPS Location
- 3. Change iPhone Home Address
- 4. Change iPad Weather Location
- 5. See Someone's Location on iPhone
- 6. iPhone GPS not Working
- 7. iPhone “No Location Found”
- 8. iPhone “Location Not Available”
- 9. iTools Alternatives
- 10. DoPokeGo++ Alternatives
- 11. 3uTools Alternatives
- 12. Foneazy MockGo Alternatives
- 13. "No Location Found" Vs."Location Not Available"
- 1. Best Android Fake GPS Apps
- 2. Free Android Location Spoofers
- 3. Fake Android GPS Location
- 4. Android Location Settings
- 5. Fake GPS No Root
- 6. Fake GPS on Huawei
- 7. Fake GPS without Mock Location
- 1. Change Location on Find My iPhone
- 2. Fake Location on Find My Friends
- 3. Stop Google Tracking Your Location
- 4. Fake Location on Google Maps
- 5. Spoof Location on Life360
- 6. Turn Off Life 360 Without Knowing
- 7. Stop Life360 from Tracking You
- 8. Life360 Circle: Tips & Tricks
- 9. Google Maps Giving Voice Directions
- 10. Stop From Being Tracked
- 11. Can Life360 Track You When Your Phone is Off
- 1. Play Pokémon Go Without Moving
- 2. Celebrate National Pokémon Day
- 3. Fake GPS on Mobile Legends
- 4. Spoof Ingress Prime Location
- 5. Spoof Location on Jurassic World Alive
- 1. Fake Location on Whatsapp
- 2. Fake Location on Facebook
- 3. Fake Location on Telegram
- 4. Fake Location on Tiktok
- 5. Fake Location on YikYak
- 6. Fake Location on Snapchat
- 7. Add Location Filters on Snapchat
- 8. Change Location on Twitter
- 9. Change Instagram Business Location
- 10. Change Instagram Region/Country
- 11. Stop mSpy from Spying You
- 12. Change Location On Linkedin
- 1. Fake Hinge GPS
- 2. Top Funny Hinge Prompts
- 3. Apps Like Tinder
- 4. Enjoy Tinder Gold
- 5. Fake Tinder GPS
- 6.Tinder Keeps Crashing
- 7. Find People on Tinder
- 8. Use Grindr on a PC
- 9. Grindr Web app explained
- 10. Fake Grindr GPS
- 11. Grindr Unable to Refresh
- 12. Fake Bumble GPS
- 13. Bumble Snooze Mode Guide
- 14. Tinder vs Bumble vs Hinge
- 1. Hola Fake GPS Alternative
- 2. Change Netflix Location
- 3. Bypass MLB TV
- 4. Change Location on YouTube TV
- 5. Change Play Store Country
- 6. Change Facebook Marketplace Location
- ● Teleport GPS location to anywhere
- ● Play AR games without moving
- ● Spoof Location on the popular Apps
Join Our Pokemon Go Community at Discord
- PRO Courses Guides New Tech Help Pro Expert Videos About wikiHow Pro Upgrade Sign In
- EDIT Edit this Article
- EXPLORE Tech Help Pro About Us Random Article Quizzes Request a New Article Community Dashboard This Or That Game Happiness Hub Popular Categories Arts and Entertainment Artwork Books Movies Computers and Electronics Computers Phone Skills Technology Hacks Health Men's Health Mental Health Women's Health Relationships Dating Love Relationship Issues Hobbies and Crafts Crafts Drawing Games Education & Communication Communication Skills Personal Development Studying Personal Care and Style Fashion Hair Care Personal Hygiene Youth Personal Care School Stuff Dating All Categories Arts and Entertainment Finance and Business Home and Garden Relationship Quizzes Cars & Other Vehicles Food and Entertaining Personal Care and Style Sports and Fitness Computers and Electronics Health Pets and Animals Travel Education & Communication Hobbies and Crafts Philosophy and Religion Work World Family Life Holidays and Traditions Relationships Youth
- Browse Articles
- Learn Something New
- Quizzes Hot
- Happiness Hub
- This Or That Game
- Train Your Brain
- Explore More
- Support wikiHow
- About wikiHow
- Log in / Sign up
- Computers and Electronics
- Internet Browsers
- Safari Browser
How to Change Safari Settings on iPhone or iPad
Last Updated: November 4, 2019 Tested
This article was co-authored by wikiHow staff writer, Nicole Levine, MFA . Nicole Levine is a Technology Writer and Editor for wikiHow. She has more than 20 years of experience creating technical documentation and leading support teams at major web hosting and software companies. Nicole also holds an MFA in Creative Writing from Portland State University and teaches composition, fiction-writing, and zine-making at various institutions. The wikiHow Tech Team also followed the article's instructions and verified that they work. This article has been viewed 39,258 times. Learn more...
This wikiHow teaches you how to customize the behavior of the Safari web browser on your iPhone or iPad. If you're using iOS 13 or later, you now have the option to choose display options for individual websites in addition to making global changes.
Changing Web Preferences by Website

- Changes you make with this method will only affect the currently-open website. If you want your preferences to affect all websites rather than just for those you customize, see the Changing Web Preferences for All Websites section instead.

- Select Ask on a feature if you'd like to be asked each time the site tries to access the feature (default).
- Select Deny if you never want the site to access the feature.
- Select Allow to always allow the site to access the feature.

Changing Web Preferences for All Websites

- It is also possible to customize these settings on a per-website basis. See this method to learn how.
- Changing your web preferences using this method will not affect sites you've customized individually.

- Select Ask on a feature if you'd like to be asked each time any site tries to access the feature (default).
- Select Deny if you never want websites to access the feature.
- Select Allow to always allow websites to access the feature.
Changing General Safari Settings

- Use the sliders in the "IN SAFARI" section at the top to choose whether Siri has access to Safari.
- Use the sliders in the "IN SEARCH" section to customize whether Safari options show when searching your iPhone/iPad or using the Shortcuts app.
- Tap the back button when you're finished.

- Tap AutoFill to adjust which information appears automatically in form fields, such as your name, address, phone number, email, and credit card info.
- Pop-up ads are blocked in Safari by default. If you'd like to see pop-up ads on websites, slide the "Block Pop-ups" switch to the Off (gray) position.
- Tap Downloads to choose where to save files and media you download from websites. You'll have the option to choose a cloud storage service or your iPhone/iPad.

- To allow sites and services to track your browsing anywhere on the web, slide the "Prevent Cross-Site Tracking" switch to the Off (gray) position. To retain your privacy, you can leave this switch in the On (green) position.
- Cookies are used by websites to keep track of your visits, preferences, and login information (for sites that require username/password access). [2] X Research source The "Block All Cookies" switch is Off (gray) by default, but you can enable it by toggling it to the On (green) position.
- Safari will display a warning message if a website you visit is deemed fraudulent in some way. If you don't want to see these messages, you can toggle the "Fraudulent Website Warning" switch to the Off (gray) position.
- Adjust the "Check for Apple Pay" switch to reflect your desired Apple Pay behavior on all websites.

Expert Q&A
You might also like.

- ↑ https://www.cultofmac.com/636450/how-to-use-safaris-amazing-new-settings-in-ios-13/
- ↑ https://us.norton.com/internetsecurity-privacy-what-are-cookies.html
About This Article

1. Go to a website in Safari. 2. Tap the Aa button. 3. Tap Website Settings . 4. Make your changes. 5. Tap Done . Did this summary help you? Yes No
- Send fan mail to authors
Is this article up to date?

Featured Articles

Trending Articles

Watch Articles

- Terms of Use
- Privacy Policy
- Do Not Sell or Share My Info
- Not Selling Info
wikiHow Tech Help:
Tech troubles got you down? We've got the tips you need
📢 Newsroom Update
Apple Intelligence comes to iPhone, iPad, and Mac starting next month. Learn more >
Apple introduces iPhone 16 and iPhone 16 Plus. Learn more >
Apple debuts iPhone 16 Pro and iPhone 16 Pro Max. Learn more >
Looks like no one’s replied in a while. To start the conversation again, simply ask a new question.
My Safari location is on and it still won’t show me things near me/still unable to read my location
is there somewhere else to turn it on from
iPhone 14 Pro Max, iOS 16
Posted on Oct 31, 2022 6:20 AM
Similar questions
- how can i fix my location on safari?? shows im in a different state how can i fix my location on safari?? shows im in a different state 6704 0
- Why does my Safari have me in a complete different city Why does my phone show me in a complete different city when I ask Safari to find something near me 2042 5
- Safari location wrong on iPhone 8 Hi, I’ve read the previous posting for this subject and the answer did not work for me. Safari thinks I’m in a city 350 miles away from where I live and this phone has never been there. I’ve got the date, time and location settings correct, but no success. Maybe uninstall/reinstall Safari? 1139 9
Loading page content
Page content loaded
Nov 2, 2022 2:35 PM in response to lota0214
Hello lota0214,
Welcome to Apple Support Communities!
We can help you turn on Location Services for the Safari app so it can determine your location.
We see you viewed the Apple Support page for Clear the history and cookies from Safari on your iPhone, iPad, or iPod touch - Apple Support
Use these steps to allow access for Location Services on your iPhone:
"How to turn Location Services on or off for specific apps
- Go to Settings > Privacy > Location Services.
- Make sure that Location Services is on.
- Scroll down to find the app.
- Tap the app and select an option:
- Never: Prevents access to Location Services information.
- Ask Next Time: This allows you to choose Always While Using App, Allow Once, or Don't Allow.
- While Using the App: Allows access to Location Services only when the app or one of its features is visible on screen. If an app is set to While Using the App, you might see your status bar turn blue with a message that an app is actively using your location.
- Always: Allows access to your location even when the app is in the background.
From here, apps should provide an explanation of how the app will use your location information. Some apps might offer only two options."
This Apple Support page has the full details: Turn Location Services and GPS on or off on your iPhone, iPad, or iPod touch - Apple Support
We hope this helps to resolve the issue so Safari can determine your location to show nearby things.
- Apple Watch
- Accessories
- Digital Magazine – Subscribe
- Digital Magazine – Info
- Smart Answers
- Back To School
- Apple’s Big September
- Apple Watch 2024
- New AirPods
- M4 Mac mini
- 11th-gen iPad
- Best Mac antivirus
- Best Mac VPN
When you purchase through links in our articles, we may earn a small commission. This doesn't affect our editorial independence .
How to stop Safari asking for your location

Browsing the web can be a frustrating experience these days, with pop-ups asking you for permission for websites to use data about you, including your location. There’s not much you can do about the frequency of the privacy pop-ups relating to cookies as these are required by law, but you can at least stop Safari from asking if it can use your location data. We’ll show you how below.
Beware though, one of the disadvantages of stopping Safari from asking for permission can be that your Google searches will get stuck in whatever location you were when you changed this setting. So, if you are wondering why your Safari location is wrong, or how you can reset your Safari location to make searches more relevant, we’ll answer that too.
Why does Safari ask for my location?
Before we tell you how to stop Safari asking for your location you might want to know exactly why it does so, because that may affect your choice when it comes to turning it on or off.
Most frequently you are likely to see the request when you search for something in Google. If you are just searching for the latest Apple news your location may not matter so much (although it could give preferential treatment to websites based in the same country as you).
However, if you are searching for local information, such as restaurant reviews, whether schools near you are closed, or opening hours for your local Tesco, for example, then having the search be specific to you can be a good thing.
Why does Safari ask for your permission though? That’s a privacy feature added by Apple to ensure that you can determine whether information about you is made available to Google, and other websites, and that you are aware if this information is requested.
If you don’t want websites to have your data, which can be used to target you with advertising, or even show alternative prices to you, you can use privacy settings in iOS and macOS to make sure that your data isn’t shared. We explain how to surf the web privately here.

How to stop Safari asking for location on iPhone/iPad
If you are fed up with Safari asking you to confirm your location on your iPhone every time you search in Google, or when you visit some sites, here’s what to do:
If you want Safari to stop bugging you do this:
- Open Settings on your iOS device.
- Scroll down to Privacy.
- Tap on Location Services.
- Scroll to Safari Websites.
- Tap on Never.

Note that Safari will still use the location data that’s in its memory the next time you perform a search though. So, if you then change location and want to make your searches more relevant you may want to look at the section below about changing your location .
How to stop sharing your location data
One way to search without sharing your location data, or to search with different location data is to use DuckDuckGo.
- Go to DuckDuckGo.com .
- Perform your search.

Note results will still be based on your country location – but if you want to change that you can, here’s how:
- Tap on the drop down menu beside regional information at the top (in our case it says United Kingdom).
- Choose a different region.
This should return results based on the country selected (when we changed it to the US though the map at the top of the page inexplicably showed Coventry).
The only way to completely stop using your location when searching is to use a VPN. Read about the best VPNs for iPhone here .
How to change your location in Safari
If you have stopped Safari asking you to confirm your location you may find that Google searches get stuck in the location you were previously in. Here’s how to change the location to the one you are in now.
- Open Safari on your phone and go to Google.
- Scroll to the bottom of the page you will see details of your last location, or it will say Unknown.
- If you search now you will find that the search results are linked to the location that is stored in your search history.

- If it says “Location Unavailable” head back to Settings > Privacy > Location Services
- Find Safari Websites again and switch to When Using the App.
- Now search once more and agree to share your Location Data.
- Now that your location is switched to the one you are in you can go back to Location Services and switch Safari Websites back to Never.
How to search the web privately
If you want to browse incognito then you could open a Private window in Safari, here’s how to do that:
- Tap on the two squares in the bottom right.
- Tap on Private.
- Tap on the +.
- Enter your search in the new window, which will be darker than usual.
However, Safari is still going to base the search on a recent location though.
There are alternatives to Safari on iOS that can allow you to browse the web privately, such as Firefox Focus which is a privacy browser with tracking protection and content blocking.
How to stop Safari asking for Location Data on a Mac
On desktop macOS Safari, you can have the browser remember your preference for up to one day, but this still might prove frustrating if you frequently see the message.
If you want to stop Safari using your Location Date follow these steps:
- Open Safari.
- Choose Preferences from the Safari menu.
- Click on Websites.
- Click on Location.
- You can set this on a per website basis, or you can change the setting for all websites. You have the choice of Ask, Deny or Allow. Choose Deny if you don’t want your location data to be accessed.
- Alternatively, if you are ok with the data being used, but don’t want to be asked, choose: Allow.

Author: Karen Haslam , Managing Editor, Macworld

Karen has worked on both sides of the Apple divide, clocking up a number of years at Apple's PR agency prior to joining Macworld more than two decades ago. Karen's career highlights include interviewing Apple's Steve Wozniak and discussing Steve Jobs’ legacy on the BBC. Having edited the U.K. print and online editions of Macworld for many years, more recently her focus has been on SEO and evergreen content as well as product recommendations and buying advice.
Recent stories by Karen Haslam:
- iOS 17 superguide: What you need to know
- How to update iOS on your iPhone
- iPhone 16 (2024) guide: Shipping dates, features, specs and more
How-To Geek
How to check which websites can access your location in safari.

Your changes have been saved
Email is sent
Email has already been sent
Please verify your email address.
You’ve reached your account maximum for followed topics.
Quick Links
Check which sites can access your location on mac, see how sites can access your location on iphone and ipad.
By default, Apple devices come set up to protect your privacy, but occasionally, you need to share location data to make certain sites work. Here's how to keep an eye on who you're sharing with.
If you've left your Mac set up running relatively default settings, Safari shouldn't automatically share your location with sites without asking you first. From here, you can allow certain sites to access your location data without asking, but this shouldn't be the default behavior.
To check this, open Safari, then go to the Safari menu and choose "Preferences" here.
Once the preferences window opens, click the "Websites" tab and select "Location" from the menu on the left.
Unlike Google Chrome , which has a menu setting showing you what sites are always allowed to see your location, Safari hides this if you aren't using it. Instead, you'll see an empty window reading "No Configured Websites" if you have no tabs open. If you have tabs open, you'll see the setting for each of these.
Related: How to Check Which Websites Can Access Your Location in Google Chrome
You have three options for location access for each website: Ask, Allow, and Deny. The "Ask" option will always ask you before accessing your location data, while the other two options will always allow or deny location data for a given website.
To set this for a website, simply open the website you want to configure, then open Safari preferences. Go to the Websites tab, select "Location" from the menu on the left, and you'll see the website under the "Currently Open Websites" menu heading. Here, set the website permission to whichever option you prefer.
Once you configure a website, this will always show in the "Location" section of the "Websites" tab, even if it isn't open. This lets you easily see which websites you've configured custom location data settings for.
Related: How to Check Which Websites Can Access Your Location in Mozilla Firefox
Similar to Google Chrome on iPhone and iPad, there is no way to see a list of sites that you've enabled sharing location data with all in one place. Instead, you can either disable location sharing entirely or manage each website individually.
Related: How to Turn Off GPS Location Tracking on an iPhone
If all you want to do is turn off location data for Safari, that's simple. Just keep in mind that this will make certain websites like Google Maps act strangely. This won't affect apps though, so if you have the Google Maps app installed, that will continue to function normally.
Open the Settings app, then scroll down to Privacy, then here, select Location Services. Scroll down until you see "Safari Websites" and tap the icon. Here, under "Allow Location Access" you can choose from three options.
The "Never" option will never share your location. "While Using the App" will turn off location access whenever you're not actively using the app, while "Ask Next Time or When I Share" is the equivalent of the "Ask" setting on macOS.
You can also choose whether to enable "Precise Location." This will let apps see exactly where you are, while they only get your approximate location if Precise Location is turned off .
Finally, to set permissions on a per-website basis, open Safari and go to the website you want to manage settings for. Tap the website options icon (it looks like "aA" next to a puzzle piece) and select the "Website Settings" option.
At the bottom of this menu, under the "Location" option, choose from the Ask, Deny, or Allow settings.
Keeping a close eye on who you share your location data with can go a long way toward increasing your personal privacy, but that's not all you can do. If you want to make sure you're being safe with your information, take a look at our guide to other privacy features you should be using on your iPhone .
- Web Browsers
🔥 Get official iPhone 16 wallpapers now!
How to customize and share website settings in Safari on iPhone
Updated on:

Safari browser on iPhone lets you customize website settings to ensure a comfortable experience. For example, you can change text size, use Reader Mode, request the desktop version of a site, set permissions, etc. With iOS 16, you can also share Safari settings across your devices. Here, I will explain each feature and help you access, edit, manage, and share website settings in Safari.
- How to access website settings in Safari
- What are the different website settings on iPhone?
- How to change Safari settings for a specific website on iPhone
- How to share Website settings in iOS 16
How to access website settings in Safari on iPhone
- Open iPhone Settings and tap Safari .

What Safari settings can you change on the iPhone?
- Page Zoom : If you have difficulty seeing standard webpage text and images, you can set the zoom level for all the websites. Note: If you had individually set the zoom for a page, it would be listed here. You may tap Edit to clear that and set a page zoom level for all websites you visit.
- Request Desktop Website : This lets you access the computer version of a website. You may have to pinch out with two fingers to see the content. Note: Several websites do not let you access the desktop version even if you use this feature.
- Reader : Websites are full of ads and distractions like email popups, offer banners, and more. Reader Mode removes all these and lets you focus on the meaningful text and images on a website. From here, you can enable it for all websites.
- Profiles: If you have customized any websites under a profile, you can them here.
- Camera , Microphone , Location : From here, you can allow, deny, or force all websites to ask your permission before accessing the iPhone camera, microphone, or your current location.
You can either customize the Safari settings from iPhone Settings or do it directly from Safari.
How to change Safari settings for each website on iPhone
In the above steps, you see how to apply these settings for all websites. But for most people (including me), it does not make much sense to use these for all the sites. Thus, Safari lets you set these settings on a per-website basis. Let me show you how.
- Launch the Safari app and visit the website.
- Tap Website Settings .

Notably, this will set the default for the active website. If you want to change or set the default page zoom for the current website, tap the ‘ A ‘ from the bottom of the options menu.
How to share Safari website settings on iPhone
Now that we have set all the website settings you need, you can also ensure that the customization is shared across all your devices.
- Open Settings and go to Safari .
- Scroll down to Settings For Websites .

And just like that, your website settings are now shared across all devices synced via iCloud.
Signing off…
This is how you can manage and share website settings in Safari on iPhone and iPad. These ensure that you have a pleasant experience browsing the web via Apple’s in-house mobile browser. If you have any further questions, I am just a comment away.
You might like :
- How to translate web pages in Safari on iPhone and iPad
- How to delete frequently visited sites from Safari on iPhone
- How to prevent websites from tracking you in Safari on iPhone
- Safari tips and tricks for iPhone
Want to read more like this?
Join 15,000+ Apple enthusiast to get the latest news and tips from iGeeksBlog+.
We won’t spam, and you will always be able to unsubscribe.
Leave a Reply Cancel reply
Your email address will not be published. Required fields are marked *
Save my name, email, and website in this browser for the next time I comment.
Similar posts you might also like

No Service on iPhone after iOS 18 update? Try these 12 fixes!

How to fix iPhone apps freezing after iOS 18 update

iOS 18 Wi-Fi not working? 10 Ways to fix it
Editorial Guide
Review Policy
© 2024 iGeeks Media Private LTD. All rights reserved.
Privacy Policy
Let’s Enable Safari Location Services on iPhone [iOS 17]

Location Services are used to provide the best user experience depending on their location and queries they enter. When you turn on Location Services, the safari stores your information and offers you location-based services. This means you’re all locations will automatically be shared with Apple whenever you turn on your internet. If you’re still interested in changing your current location, follow this guide to know how to enable location on the safari iPhone.
How to Allow Safari to Access Location on iPhone
Most applications might not work unless Location Services are turned on. If you’ve installed a new app then it’s easy for you to give permission as the app will ask you for Location Services permission. So, you need to tap on the Allow button to enable the use of Location Services Information. You can tap on the Don’t Allow button to prevent access.

Turn Location Services ON/Off
You need to perform the following steps to turn Location Services on or off for a particular app such as Safari:
- Head to Settings > Privacy > Location Services.
- Please ensure the Location Services option is toggled on.
- Scroll down and look for Safari.

How to Enable Location Services for Hulu on Safari?
When you access Hulu on your favorite devices, you may be asked to allow Location Services for easy access. If you’re wondering, “How to enable location services for Hulu on Safari?” then you need to perform the following steps:
- Click on the Apple menu option located at the top left corner of your Mac.
- Now, select the System Preferences in the Apple menu.
- Click on the Privacy tab (you may be asked for authentication to unlock the padlock icon. Enter your Computer ID and password to continue)
- Select the Location Services option.
- Now, tick the check box located against Enable Location Services. Please make sure to select the Safari from the list.
Extra Tips: How to Change Safari Location on iPhone [iOS 17/16.5]
Safari always asks users to allow Location Services permission for the best user experience. Therefore, you might need to change your device’s location to continue using Safari. For changing the location of your iOS device, you can use iToolab AnyGo .
168,282 people have downloaded it.
- Change GPS location on iPhone/iPad in clicks (No Jailbreak).
- Simulate GPS movement along any custom path with joystick.
- Collect and import popular GPX route files for next use.
- Mock GPS location on up to 15 devices simultaneously.
- Works well with location-based social apps and AR games.
- Fully support the latest iOS 17/Android 14.
This tool is effective for everyone who wished to read/play restricted content, games, and other stuff. Changing Location with iToolab AnyGo is quite easy and simple. All you need to do is to perform the following steps:
Step 1. Connect your iPhone device to the computer. Now, open the program and click on the “Start” button in the main window.

Step 2. On the map, you’ll see your current location. The map will appear on the next page. However, if your location is incorrect then you need to tap on the “Center on” icon to get the accurate location.

Step 3. Click on the “Teleport” icon located in the top right corner of the screen. Now, enter your preferred location and click on the “Search” button.

Step 4. The map will move to the new location, you entered in the search bar. Now, click on the “Go” button to change the location.

By using Anygo, you can easily fake GPS location on your iOS device. No complicated steps and 100% safe. If you are looking for a location spoofer, this one is the best choice.
Also Read: Top 5 Pokémon Go Spoofing Apps for iOS Devices
Related Questions You May Want to Know
Q1: How to enable Location on Safari Mac
Turning location on your Mac is quite easy. You just need to implement the following steps:
- Tap on the Apple menu located on the main Mac screen.

- Then click on the Network option available under System Preferences.

Q2: how to enable location services on chrome

- Open Settings, click on the Privacy and Security option located at the left-hand sidebar.

- Scroll down and click on the Location button.

In this guide, we’ve discussed how to enable location on safari iPhone and Mac. We brought light to different methods through which you can enable Location Services. Sometimes, you might need to change your current location to enjoy restricted features or content. For spoofing location , iToolab AnyGo is a perfect tool to consider. With this tool, you can change the current location of your iOS device with any other in the world.
FREE DOWNLOAD for Windows 11/10/8/7
FREE DOWNLOAD for Mac 10.0 or later
- Fake GPS Pikmin Bloom Guide for Beginner [iOS & Android]
- Full Guide of Pikmin Bloom GPS Joystick for iOS & Android
- Uber GPS Spoofing on iOS & Android
- Explained! How to Follow Routes in Pokemon Go
- (NEW) Atlas Earth Beginner’s Guide: Atlas Earth Spoofer
Leave a Comment Cancel reply
Your email address will not be published. Required fields are marked *
Save my name, email, and website in this browser for the next time I comment.
- [Updated] Best Coordinates for Pokemon Go in 2024
- [Full Guide] How to Turn Off Location without The Other Person Knowing
- 6 Ways to Pause Life360 without Anyone Knowing – 2024
- Best 5 Pokémon GO Spoofer for iOS/Android Free Download
- How to Change Location on Tinder for Free without Paying

- Smartphones
How To Change Your Home Address On Google Maps (iPhone & Android)

Whenever you're away from home and are unfamiliar with the commute back, you almost always turn to Google Maps to help you find the right way. It is, after all, one of the most popular and reliable map apps for Android and iPhone thanks to its location accuracy and real-time traffic data.
However, what also makes Google Maps really handy for navigation is its ability to save your home address. This means you won't have to go through the hassle of manually typing your home location every single time you're commuting — you can simply tap on your address from the saved locations and you're good to go.
What if you've decided to move across the country? What happens to your saved home address then? Google Maps allows you to easily change your home address to a brand-new location. We'll walk you through how to do so on both iPhone and Android devices.
Updating your Google Maps home address

Editing the home address you've previously set on Google Maps is pretty straightforward. Here's the step-by-step guide on your iPhone and Android:
- Launch Google Maps.
- Switch to the "You" tab on the bottom.
- Under the Saved tab, select "Labeled."
- Tap on the More icon (three dots) next to the Home address.
- Choose Edit home from the menu that appears.
- Press the crossmark (X) next to the address at the top to delete it.
- Type your new home address on the empty field. Then, choose your correct address from the search results.
- Dictate your new address by tapping on the mic icon in the upper right corner. Pick the search result that matches your right address.
- Select Choose on map. Drop the pin icon on your new address on the map. Pan and zoom in as needed. Once you found the location, hit OK or Save. Google Maps will then tell you the exact address of where you dropped the pin. Press Done to exit. If you mistakenly dropped the pin in the wrong location, simply re-do the steps to set a new home address.
- (On iPhone) If you've set a home address for a contact before, and want to use this location as your Google Maps home address, select Choose from Contacts. Then, simply tap on your contact from the list.
- (On Android) If you're currently in your new home address, press Use your current location. Hit Continue on the "Get an address for your current location" page and wait for Google Maps to find your Android's location . Check whether the address found is correct, and then, press Save.
You should now see your new address set as the Home address.
Customizing your Google Maps settings for your new home address

With your new home address set, you might also want to update your other Google Maps settings, such as the Home address icon and Saved trips. To change the icon for your Home address, follow these steps on both iPhone and Android:
- With Google Maps opened, go to the You tab.
- Open Labeled.
- Press the More icon to the right of Home.
- Select Change icon from the menu.
- Pick an icon from the available options.
- Hit Save to use the new icon.
If you often travel from specific places, like your work or favorite hangout spot, to your new home, another handy Google Maps feature you should also update is the Saved trips. To save directions from a certain location to your new home address, here's what you need to do:
- In Google Maps, tap the search field at the top.
- Select Home.
- Change the From field to your other location (e.g., work, school, restaurant).
- Press on your usual mode of transportation (e.g., car, motorcycle, train).
- Tap on Save at the bottom.
The directions will then be saved in You > Saved trips. To use it, simply press Start.
Recommended
iOS 18 is available today, making iPhone more personal and capable than ever

More Customization Than Ever

The Biggest Photos Redesign

Powerful Ways to Stay Connected in Messages and Phone

Intelligent Categorization in Mail

Distraction-Free Browsing with Safari

The Brand-New Passwords App
Privacy Features Designed to Empower Users
The First Set of Apple Intelligence Features Available Next Month

Additional Features
- In Apple Maps , users can browse thousands of hikes across U.S. national parks and easily create their own custom walking routes, which they can access offline. Users can also save their favorite national park hikes, custom walking routes, and locations to an all-new Places Library, and add personal notes about each spot.
- Game Mode enhances the gaming experience with more consistent frame rates, especially during long play sessions, and makes AirPods, game controllers, and other wireless accessories even more responsive.
- Users get new ways to pay with Apple Pay online and in apps on iPhone and iPad. Starting today, eligible U.S. users will be able to redeem rewards with Discover credit cards, 5 as well as apply for loans directly through Affirm, and eligible U.K. users will be able to access installments with Monzo Flex right at checkout when they use Apple Pay. 6 With Tap to Cash, users can send and receive Apple Cash by simply holding their iPhone near another iPhone or Apple Watch. 7 And with the new ticket experience in Apple Wallet , fans can access even more information about their events, such as venue maps, local weather forecasts, recommended Apple Music playlists, and much more. 8
- In the Notes app , math formulas and equations entered while typing are solved instantly. New collapsible sections and highlighting make it easier to emphasize what’s important.
- Calendar becomes even more helpful by showing both events and tasks from Reminders . Users can create, edit, and complete reminders right from Calendar, and the updated month view provides an overview of events and tasks at a glance.
- In Journal , an all-new insights view helps users keep track of their journaling goals, the ability to search and sort entries makes it easy to enjoy past memories, and a Journal widget lets users quickly start an entry from the Home Screen or Lock Screen. Time spent journaling can be saved as mindful minutes in the Health app, and users can log their state of mind right in Journal.
- The Home app introduces guest access, providing users with easy ways to grant guests control of locks, garage doors, and security systems; set schedules for when guests can access the home; and more. With convenient updates to the Energy category, the Home app also makes it easier for eligible users to access, understand, and make more informed decisions about their home electricity use.
- Emergency SOS Live Video allows users to share context through streaming video and recorded media. In the middle of an emergency call, participating emergency dispatchers can send a request for a user to share live video or media from the user’s camera roll over a secure connection, making it easier and faster to get help.
- Updates coming to AirPods will transform the way users take calls, respond to Siri, and immerse themselves in their favorite games with AirPods 4, AirPods 4 with Active Noise Cancellation, and AirPods Pro 2. Voice Isolation helps the caller’s voice be heard in loud or windy environments, while Siri Interactions allow users to nod or shake their head to respond to Siri announcements. AirPods updates also provide the best wireless audio latency Apple has ever delivered for mobile gaming, and add Personalized Spatial Audio for all AirPods models for even more immersive gameplay.
- Later this fall, AirPods Pro 2 add a clinical-grade, over-the-counter Hearing Aid capability for users with perceived mild to moderate hearing loss. Based on results from an intuitive, clinically validated Hearing Test users can take from the comfort of their own home using AirPods Pro 2 and a compatible iPhone or iPad, this new feature seamlessly transforms AirPods Pro into a personalized hearing aid set to meet the specific needs of the user, making access to hearing assistance easier than ever at an approachable price point. 9
- In the Health app , Medical ID has been redesigned to make it even easier for first responders to find the most important information in an emergency. The Health app helps users better understand their data during pregnancy by making adjustments and recommendations to reflect changes in their physical and mental health.
- The Fitness app on iPhone now offers users the ability to customize the Summary tab, and Apple Fitness+ has been redesigned with personalized workout and meditation recommendations in For You, more powerful search, and enhanced awards for extra motivation.
- New accessibility features include Eye Tracking, a built-in option for navigating iPhone with just eyes; Music Haptics, a new way for users who are deaf or hard of hearing to experience music using the Taptic Engine in iPhone; Vocal Shortcuts that enable users to perform tasks by making a custom sound; and Vehicle Motion Cues, which helps reduce motion sickness for passengers using iPhone in a moving vehicle. Accessibility features are now available for CarPlay, including Voice Control, Sound Recognition, Color Filters, and Bold Text.

Text of this article
September 16, 2024
iOS 18 is now available, bringing iPhone users around the world new ways to personalize their iPhone with deeper customization to the Home Screen and Control Center; the biggest-ever redesign to Photos, making it even easier to find and relive special moments; and major enhancements to Messages and Mail. Starting next month, iOS 18 will introduce Apple Intelligence, the personal intelligence system that combines the power of generative models with personal context to deliver intelligence that is incredibly useful and relevant while protecting users’ privacy and security. 1
In iOS 18, users can customize their Home Screen in exciting new ways by placing app icons and widgets to frame the wallpaper or create the ideal layout on each page. Users can also choose how the app icons and widgets are presented — light, dark, or with a colored tint — or make app icons appear larger for a new streamlined look. Control Center is redesigned to be even more flexible. Powerful groups of controls — including favorites, media playback, Home controls and connectivity, and the new controls gallery featuring options from third-party apps — can be organized so that they’re always just a swipe away. Users can also access their favorite controls from the Action button, and for the first time, users can change the controls on the Lock Screen or remove them entirely.
The biggest-ever update to Photos makes it easier to find and relive special moments. The beautiful, simplified layout puts the library into a unified yet familiar view. New collections like Recent Days, People & Pets, and Trips automatically keep the library organized with on-device intelligence, so users can spend less time searching and more time enjoying their memories. Users can personalize their experience with a customizable layout that reflects what is most important to them and pin favorite collections to keep them easily accessible.
Messages offers major updates to the ways users express themselves and stay connected. Formatting options like bold, italic, underline, and strikethrough let users better convey tone; all-new text effects bring words, phrases, and sentences to life; emoji and sticker Tapbacks give users endless ways to react in a conversation; and users can compose an iMessage to send later. For times when cellular and Wi-Fi connections aren’t available, Messages via satellite connects users to a satellite in space right from the Messages app to send and receive texts, emoji, and Tapbacks over iMessage and SMS. 2 When messaging contacts who do not have an Apple device, the Messages app now supports RCS for richer media and more reliable group messaging compared to SMS and MMS.
The Phone app helps users stay organized with the ability to record and transcribe live calls, making it easier to recall important details later. 3 Call participants are notified before a recording begins, and transcripts are conveniently saved to the Notes app, allowing users to quickly search and review what was discussed.
Available later this year, categorization in Mail organizes messages to help users stay on top of their inbox. The Primary category lets users focus on the messages that matter most or contain time-sensitive information. Transactions, Updates, and Promotions are grouped by sender in a new digest view that pulls together all relevant emails from a business, allowing users to quickly scan for what’s important in the moment.
Safari is the world’s fastest browser, and with iOS 18, it offers even more capabilities for browsing the web. 4 Highlights intelligently surface key information — like a location’s address, a summary, or more information about a movie, TV show, or song — after a webpage is loaded. The redesigned Reader brings more ways to enjoy articles with a streamlined view, a summary, and a table of contents for longer articles. With Distraction Control, users can hide items on a webpage that they may find disruptive to their browsing, such as sign-in banners or content overlays within a website.
Passwords is a new app built on the foundation of Keychain that makes it even easier for users to access their passwords and see all their credentials — like passwords, passcodes, and verification codes — all in one place. Passwords is backed by incredibly secure end-to-end encryption; seamlessly syncs across devices; and alerts users when a password could be easily guessed, has been used multiple times, or has appeared in a known data leak.
iOS 18 gives users tools to manage who can see their apps, how their contacts are shared, and how their iPhone connects to accessories. Locked and hidden apps offer users peace of mind that information they want to keep private, such as app notifications and content, will not inadvertently be seen by others. Users can now lock an app, and for additional privacy, they can also hide an app, moving it to a locked, hidden apps folder. When an app is locked or hidden, content like messages or emails inside the app are hidden from search, notifications, and other places across the system. In addition, iOS 18 lets users share only specific contacts with an app, and developers can offer users a more seamless and private experience when connecting third-party accessories with iPhone.
Apple Intelligence is deeply integrated into iOS 18, harnessing the power of Apple silicon to understand and create language and images, take action across apps, and draw from personal context to simplify and accelerate everyday tasks — all while protecting users’ privacy and security. The first set of Apple Intelligence features will be available next month, delivering experiences that are delightful, intuitive, easy to use, and specially designed to help users do the things that matter most to them.
With Writing Tools, users can refine their words by rewriting, proofreading, and summarizing text nearly everywhere they write, including Mail, Notes, Pages, and third-party apps. In Photos, the Memories feature now enables users to create the movies they want to see by simply typing a description. In addition, natural language can be used to search for specific photos, and search in videos gets more powerful with the ability to find specific moments in clips. The new Clean Up tool can identify and remove distracting objects in the background of a photo — without accidentally altering the subject. And in the Notes and Phone apps, users can record, transcribe, and summarize audio. When a recording is initiated while on a call in the Phone app, participants are automatically notified, and once the call ends, Apple Intelligence generates a summary to help recall key points.
Siri becomes more natural, flexible, and deeply integrated into the system experience. It has a brand-new design with an elegant glowing light that wraps around the edge of the screen when active on iPhone. Users can type to Siri at any time on iPhone, and can switch fluidly between text and voice as they use Siri to accelerate everyday tasks. With richer language-understanding capabilities, Siri can follow along when users stumble over their words and can maintain context from one request to the next. In addition, with Siri’s extensive product knowledge, it can now answer thousands of questions about the features and settings of Apple devices.
With many Apple Intelligence models running entirely on device, as well as the introduction of Private Cloud Compute — which extends the privacy and security of Apple devices into the cloud to unlock even more intelligence — Apple Intelligence represents an extraordinary step forward for privacy in artificial intelligence.
Availability
iOS 18 is a free software update that is available starting today for iPhone Xs and later. For more information, visit apple.com/ios/ios-18 . Some features may not be available in all regions, all languages, or on all iPhone models. For more information, visit apple.com/ios/feature-availability .
- Apple Intelligence will be available as a free software update. The first set of Apple Intelligence features will be available in beta next month as part of iOS 18.1, iPadOS 18.1, and macOS Sequoia 15.1, with more features rolling out in the months to come. It will be available on iPhone 16, iPhone 16 Plus, iPhone 16 Pro, iPhone 16 Pro Max, iPhone 15 Pro, iPhone 15 Pro Max, and iPad and Mac with M1 and later, with device and Siri language set to U.S. English. Additional languages and platforms are coming over the course of the next year. Later this year, Apple Intelligence will add support for localized English in Australia, Canada, New Zealand, South Africa, and the U.K. In the coming year, Apple Intelligence will expand to more languages, like Chinese, French, Japanese, and Spanish.
- Apple’s satellite features are included for free for two years starting at the time of activation of a new iPhone 14 or later. For Emergency SOS via satellite availability, visit support.apple.com/en-us/HT213426 . Messages via satellite will be available in the U.S. and Canada in iOS 18. SMS availability will depend on carrier. Carrier fees may apply. Users should check with their carrier for details. Satellite network provided by Globalstar Inc. and its affiliates or third-party network providers.
- Call recording and transcription will be available later this year. Transcription will be available in English (U.S., Australia), Spanish (U.S., Mexico), Mandarin Chinese (China mainland), Cantonese (Hong Kong), and Korean (South Korea).
- Testing was conducted by Apple in August 2024. See apple.com/safari for more information.
- Redemptions used with Discover credit cards will be reflected as a statement credit on a customer’s account.
- These new Apple Pay features are offered by participating lending providers in certain markets. Subject to eligibility and approval. More issuers and lenders to come in the future.
- Apple Cash services are provided by Green Dot Bank. Member FDIC. Apple Payments Services LLC, a subsidiary of Apple Inc., is a service provider of Green Dot Bank for Apple Cash accounts. Neither Apple Inc. nor Apple Payments Services LLC is a bank. Learn more about the Terms and Conditions . Only available in the U.S. on eligible devices.
- Ticket enhancements in Apple Wallet are available for events from participating ticket issuers.
- Coming this fall, the Hearing Test and Hearing Aid features will be available in more than 100 countries and regions — including the U.S., Germany, and Japan — where marketing authorization has been received. The Hearing Test and Hearing Aid features are intended for people 18 years old or older, and the Hearing Aid feature is intended for people with perceived mild to moderate hearing loss. The Hearing Test and Hearing Aid features will be supported on AirPods Pro 2 with the latest firmware paired with a compatible iPhone or iPad with iOS 18 or iPadOS 18 and later.
Press Contacts
Nadine Haija
Tania Olkhovaya
Apple Media Helpline
Images in this article
iPhone User Guide
- iPhone models compatible with iOS 18
- R ' class='toc-item' data-ss-analytics-link-url='https://support.apple.com/guide/iphone/iphone-xr-iph017302841/ios' data-ajax-endpoint='https://support.apple.com/guide/iphone/iphone-xr-iph017302841/ios' data-ss-analytics-event="acs.link_click" href='https://support.apple.com/guide/iphone/iphone-xr-iph017302841/ios' id='toc-item-IPH017302841' data-tocid='IPH017302841' > iPhone X R
- S ' class='toc-item' data-ss-analytics-link-url='https://support.apple.com/guide/iphone/iphone-xs-iphc00446242/ios' data-ajax-endpoint='https://support.apple.com/guide/iphone/iphone-xs-iphc00446242/ios' data-ss-analytics-event="acs.link_click" href='https://support.apple.com/guide/iphone/iphone-xs-iphc00446242/ios' id='toc-item-IPHC00446242' data-tocid='IPHC00446242' > iPhone X S
- S Max' class='toc-item' data-ss-analytics-link-url='https://support.apple.com/guide/iphone/iphone-xs-max-iphcd2066870/ios' data-ajax-endpoint='https://support.apple.com/guide/iphone/iphone-xs-max-iphcd2066870/ios' data-ss-analytics-event="acs.link_click" href='https://support.apple.com/guide/iphone/iphone-xs-max-iphcd2066870/ios' id='toc-item-IPHCD2066870' data-tocid='IPHCD2066870' > iPhone X S Max
- iPhone 11 Pro
- iPhone 11 Pro Max
- iPhone SE (2nd generation)
- iPhone 12 mini
- iPhone 12 Pro
- iPhone 12 Pro Max
- iPhone 13 mini
- iPhone 13 Pro
- iPhone 13 Pro Max
- iPhone SE (3rd generation)
- iPhone 14 Plus
- iPhone 14 Pro
- iPhone 14 Pro Max
- iPhone 15 Plus
- iPhone 15 Pro
- iPhone 15 Pro Max
- iPhone 16 Plus
- iPhone 16 Pro
- iPhone 16 Pro Max
- Setup basics
- Make your iPhone your own
- Take great photos and videos
- Keep in touch with friends and family
- Share features with your family
- Use iPhone for your daily routines
- Expert advice from Apple Support
- What’s new in iOS 18
- Turn on and set up iPhone
- Wake, unlock, and lock
- Set up cellular service
- Use Dual SIM
- Connect to the internet
- Sign in and manage your Apple Account
- Subscribe to iCloud+
- Find settings
- Set up mail, contacts, and calendar accounts
- Learn the meaning of the status icons
- Charge the battery
- Charge with cleaner energy sources
- Show the battery percentage
- Check battery health and usage
- Use Low Power Mode
- Read and bookmark the user guide
- Learn basic gestures
- Learn gestures for iPhone models with Face ID
- Adjust the volume
- Silence iPhone
- Find and use your apps in App Library
- Switch between open apps
- Quit and reopen an app
- Multitask with Picture in Picture
- Access features from the Lock Screen
- Use the Dynamic Island
- Perform quick actions
- Search on iPhone
- Get information about your iPhone
- View or change cellular data settings
- Travel with iPhone
- Change sounds and vibrations
- Use and customize the Action button
- Create a custom Lock Screen
- Change the wallpaper
- Adjust the screen brightness and color balance
- Keep the iPhone display on longer
- Use StandBy
- Customize the text size and zoom setting
- Change the name of your iPhone
- Change the date and time
- Change the language and region
- Add, edit, and remove widgets
- Move apps and widgets on the Home Screen
- Customize apps and widgets on the Home Screen
- Lock or hide or an app
- Organize your apps in folders
- Remove or delete apps
- Use and customize Control Center
- Change your default web browser or email app
- Rotate your iPhone screen
- View and respond to notifications
- Change notification settings
- Set up a Focus
- Allow or silence notifications for a Focus
- Turn a Focus on or off
- Stay focused while driving
- Customize sharing options
- Type with the onscreen keyboard
- Dictate text
- Commands for dictating text
- Select and edit text
- Use predictive text
- Use text replacements
- Add or change keyboards
- Add emoji, Memoji, and stickers
- Take a screenshot
- Take a screen recording
- Write and draw in documents
- Add text, shapes, stickers, and more
- Fill out forms, sign documents, and create signatures
- Interact with content in a photo or video
- Identify objects in your photos and videos
- Lift a subject from the photo background
- Camera basics
- Set up your shot
- Use Photographic Styles
- Use Photographic Styles with an iPhone 16 camera
- Take Live Photos
- Take Burst mode shots
- Take a selfie
- Take panoramic photos
- Take macro photos and videos
- Take portraits
- Take Night mode photos
- Take Apple ProRAW photos
- Use the Camera Control
- Use the Camera Control to open another app
- Adjust the shutter volume
- Adjust HDR camera settings
- Record videos
- Take spatial photos and record spatial videos for Apple Vision Pro
- Change sound recording options on iPhone 16 models
- Record ProRes videos
- Record videos in Cinematic mode
- Change video recording settings
- Save camera settings
- Customize the Main and Fusion camera lens
- Change advanced camera settings
- View, share, and print photos
- Use Live Text
- Scan a QR code
- Subscribe to Apple Arcade
- Play with friends in Game Center
- Connect a game controller
- Use App Clips
- Update apps
- View or cancel subscriptions
- Manage purchases, settings, and restrictions
- Install and manage fonts
- Buy books and audiobooks
- Annotate books
- Access books on other Apple devices
- Listen to audiobooks
- Set reading goals
- Organize books
- Use the basic calculator
- Use the scientific calculator
- Solve math with Math Notes
- Work with graphs in Math Notes
- Convert units or currency
- See previous calculations
- Create and edit events in Calendar
- Send invitations
- Reply to invitations
- Change how you view events
- Search for events
- Change Calendar settings
- Schedule or display events in a different time zone
- Keep track of events
- Use multiple calendars
- Use reminders
- Use the Holidays calendar
- Share iCloud calendars
- See the world clock
- Set an alarm
- Change your wake up alarm
- Use the stopwatch
- Add and use contact information
- Edit contacts
- Add your contact info
- Add or remove accounts
- Use NameDrop on iPhone to share your contact info
- Use contacts from the Phone app
- Merge or hide duplicate contacts
- Sync contacts across devices
- Import contacts
- Export contacts
- Get started with FaceTime
- Make FaceTime calls
- Receive FaceTime calls
- Create a FaceTime link
- Take a Live Photo
- Turn on Live Captions in a FaceTime call
- Use other apps during a call
- Make a Group FaceTime call
- View participants in a grid
- Use SharePlay to watch, listen, and play together
- Share your screen in a FaceTime call
- Request or give remote control in a FaceTime call
- Collaborate on a document in FaceTime
- Use video conferencing features
- Hand off a FaceTime call to another Apple device
- Change the FaceTime video settings
- Change the FaceTime audio settings
- Change your appearance
- Leave a call or switch to Messages
- Block and silence FaceTime calls from unknown callers
- Report a call as spam
- Modify files and folders
- Find files and folders
- Organize files and folders
- Send files from the Files app
- Set up iCloud Drive
- Share files and folders in iCloud Drive
- Transfer files from iPhone to a storage device, a server, or the cloud
- Share your location
- Meet up with a friend
- Send your location via satellite
- Add or remove a friend
- Locate a friend
- Get notified when friends change their location
- Notify a friend when your location changes
- Add your iPhone
- Add your iPhone Wallet with MagSafe
- Get notified if you leave a device behind
- Locate a device
- Mark a device as lost
- Erase a device
- Remove a device
- Add an AirTag
- Share an AirTag or other item in Find My on iPhone
- Add a third-party item
- Get notified if you leave an item behind
- Locate an item
- Mark an item as lost
- Remove an item
- Adjust map settings
- Turn off Find My
- Get started with Fitness
- See your activity summary
- Adjust your Activity ring goals
- Sync a third-party workout app
- Change fitness notifications
- Share your activity
- Get started with Freeform
- Create a Freeform board
- Draw or handwrite
- Solve handwritten math problems
- Add text in sticky notes, shapes, and text boxes
- Add shapes, lines, and arrows
- Add diagrams
- Add photos, videos, and other files
- Apply consistent styles
- Position items on a board
- Navigate and present scenes
- Send a copy or PDF
- Print a board
- Share boards and collaborate
- Search Freeform boards
- Delete and recover boards
- Change Freeform settings
- Get started with Health
- Fill out your Health Details
- Intro to Health data
- View your health data
- Share your health data
- View health data shared by others
- Download health records
- View health records
- Monitor your walking steadiness
- Log menstrual cycle information
- View menstrual cycle predictions and history
- Log a pregnancy
- Track your medications
- Learn more about your medications
- Log your state of mind
- Take a mental health assessment
- Set up a schedule for a Sleep Focus
- Turn off alarms and delete sleep schedules
- Add or change sleep schedules
- Turn Sleep Focus on or off
- Change your wind down period and sleep goal
- View your sleep history
- Check your headphone audio levels
- Use audiogram data
- Register as an organ donor
- Back up your Health data
- Intro to Home
- Upgrade to the new Home architecture
- Set up accessories
- Control accessories
- Control your home using Siri
- Use Grid Forecast to plan your energy usage
- View Electricity Usage and Rates
- Set up HomePod
- Control your home remotely
- Create and use scenes
- Use automations
- Set up security cameras
- Use Face Recognition
- Unlock your door with a home key
- Configure a router
- Invite others to control accessories
- Add more homes
- Get music, movies, and TV shows
- Get ringtones
- Manage purchases and settings
- Get started with Journal
- Write in your journal
- Add formatting, photos, and more
- Journal for your wellbeing
- Build a journaling habit
- View and search journal entries
- Print and export entries
- Change Journal settings
- Use iPhone like a magnifying glass
- Customize controls
- Get live descriptions of visual information around you
- Detect people around you
- Detect furniture around you
- Detect doors around you
- Detect text around you and have it read out loud
- Set up shortcuts for Live Recognition
- Add and remove email accounts
- Set up a custom email domain
- Check your email
- Unsend email with Undo Send
- Reply to and forward emails
- Save an email draft
- Add email attachments
- Download email attachments
- Annotate email attachments
- Set email notifications
- Search for email
- Organize email in mailboxes
- Flag or block emails
- Filter emails
- Use Hide My Email
- Use Mail Privacy Protection
- Change Mail settings
- Delete and recover emails
- Add a Mail widget to your Home Screen
- Print emails
- Explore 3D maps
- Get travel directions
- Change or add stops to your route
- View a route overview or a list of turns
- Change settings for spoken directions
- Get driving directions
- Get directions to your parked car
- Set up electric vehicle routing
- Report traffic incidents
- Get cycling directions
- Get walking directions
- Save walks or hikes
- Get transit directions
- Get traffic and weather info
- Estimate travel time and ETA
- Download offline maps
- Search for places
- Add places and notes to your library
- Mark a location with a pin
- Share places
- Rate places and add photos
- Organize places with custom guides
- Find nearby attractions, restaurants, and services
- Get information about places
- Explore places with guides
- Look around places
- Take Flyover tours
- Clear location history
- Delete recent directions
- Choose a default travel mode and units
- Report an issue with Maps
- Measure dimensions
- View and save measurements
- Measure a person’s height
- Use the level
- Set up Messages
- About iMessage
- Send and reply to messages
- Text via satellite
- Unsend and edit messages
- Keep track of messages
- Forward and share messages
- Group conversations
- Share screens
- Collaborate on projects
- Use iMessage apps
- Take and edit photos or videos
- Share photos, links, and more
- Send stickers
- Create and send Memoji
- React with Tapbacks
- Style and animate messages
- Draw and handwrite messages
- Send and save GIFs
- Request, send, and receive payments
- Send and receive audio messages
- Turn read receipts on or off
- Change notifications
- Block, filter, and report messages
- Delete messages and attachments
- Recover deleted messages
- Subscribe to Apple Music
- Get personalized recommendations
- Mark items as favorites
- Add music and listen offline
- Create an Apple Music Profile
- Share music with friends
- See what friends are listening to
- Search for music
- Find music shared with you
- Find new music
- Use the music player controls
- Use Siri to play music
- Play lossless audio
- Play Spatial Audio
- Listen to radio
- Play music together using SharePlay
- Play music together in the car
- Adjust the sound
- Queue up your music
- Shuffle or repeat songs
- Sing along with Apple Music
- Show song credits and lyrics
- Tell Apple Music what you enjoy
- Intro to playlists
- Create, edit, and delete playlists
- Collaborate on a playlist
- Join a collaborative playlist
- Add a reaction to a collaborative playlist
- Get started with News
- Use News widgets
- See news stories chosen just for you
- Read and share stories
- Follow your favorite teams with My Sports
- Listen to Apple News Today
- Subscribe to Apple News+
- Browse and read Apple News+ stories
- Use Offline Mode to read downloaded News content
- Manually download Apple News+ issues
- Listen to News stories
- Find puzzles in Apple News+
- Solve crossword and crossword mini puzzles
- Solve Quartiles puzzles
- Search for stories in News
- Save stories in News
- Clear your reading history in News
- Subscribe to individual news channels
- Get started with Notes
- Create and format notes
- Use Quick Notes
- Add drawings and handwriting
- Enter formulas and equations
- Add photos, video, and more
- Record and transcribe audio
- Scan text and documents
- Work with PDFs
- Search notes
- Organize in folders
- Organize with tags
- Use Smart Folders
- Share and collaborate
- Export or print notes
- Change the Notes view
- Change Notes settings
- Use passwords
- Find your password for a website or app
- Change the password for a website or app
- Remove a password
- Recover a deleted password
- Create a password for a website or app
- Use passkeys to sign in to apps and websites
- Sign in with Apple
- Share passwords
- Automatically fill in strong passwords
- Change weak or compromised passwords
- View your passwords and related information
- Find and share your Wi-Fi password
- Share passwords securely with AirDrop
- Make your passwords available on all your devices
- Automatically fill in verification codes
- Automatically fill in SMS passcodes
- Sign in with fewer CAPTCHA challenges
- Use two-factor authentication
- Use security keys
- Make a call
- Change your Phone settings
- View and delete the call history
- Answer or decline incoming calls
- While on a call
- Have a conference or three-way call on iPhone
- Set up voicemail
- Check voicemail
- Change voicemail greeting and settings
- Select ringtones and vibrations
- Make calls using Wi-Fi
- Set up call forwarding
- Set up call waiting
- Block or avoid unwanted calls
- Get started with Photos
- View photos and videos
- See photo and video information
- Find photos and videos by date
- Find and name people and pets
- Find group photos
- Browse photos by location
- Find recently saved photos
- Find your travel photos
- Find recently receipts, QR codes, recently edited photos, and more
- Find photos, videos, and more by media type
- Customize the Photos app
- Filter and sort the photo library
- Back up and sync your photos with iCloud
- Delete or hide photos and videos
- Search for photos and videos
- Get wallpaper suggestions
- Watch memories
- Personalize your memories
- Make and play slideshows
- Feature someone less
- Create photo albums
- Edit and organize albums
- Filter and sort photos and videos in albums
- Share photos and videos
- Share long videos
- Create shared albums
- Add and remove people in a shared album
- Add and delete photos and videos in a shared album
- Set up or join an iCloud Shared Photo Library
- Use iCloud Shared Photo Library
- Add content to an iCloud Shared Photo Library
- Edit photos and videos
- Crop, rotate, flip, or straighten photos and videos
- Undo and revert photo edits
- Trim video length, adjust speed, and edit audio
- Edit Cinematic mode videos
- Edit Live Photos
- Edit portraits
- Make stickers from your photos
- Duplicate and copy photos and videos
- Merge duplicate photos and videos
- Import and export photos and videos
- Print photos
- Find podcasts
- Listen to podcasts
- View podcast transcripts
- Follow your favorite podcasts
- Use the Podcasts widget
- Organize your podcast library
- Download, save, remove, and share podcasts
- Subscribe to podcasts
- Listen to subscriber-only content
- Change download settings
- Get started with Reminders
- Set reminders
- Make a grocery list
- Add details
- Complete and remove items
- Edit and organize a list
- Search your lists
- Organize multiple lists
- Use Smart Lists
- Print a list
- Work with templates
- Change Reminders settings
- Browse the web
- Search for websites
- See highlights
- Customize your Safari settings
- Change the layout
- Create multiple Safari profiles
- Open and close tabs
- Organize your tabs with Tab Groups
- View your tabs from another Apple device
- Share Tab Groups
- Use Siri to listen to a webpage
- Bookmark a website
- Save pages to a Reading List
- Find links shared with you
- Annotate and save a webpage as a PDF
- Automatically fill in forms
- Get extensions
- Hide distractions when browsing
- Hide distractions when reading
- Block pop-ups
- Clear your cache and cookies
- Enable cookies
- Browse the web privately
- Sign in with passkeys in Safari
- Check stocks
- Manage multiple watchlists
- Read or listen to business news
- Add earnings reports to your calendar
- Use a Stocks widget
- Translate text, voice, and conversations
- Translate text in apps
- Translate with the camera view
- Subscribe to Apple TV+, MLS Season Pass, or a channel
- Find shows, movies, and more
- Personalize the Home tab
- Buy, rent, or pre-order items
- Stream content and control playback
- Watch sports
- Manage your library
- Add your TV provider
- Change the settings
- Make a recording
- View a transcription
- Play it back
- Edit or delete a recording
- Keep recordings up to date
- Organize recordings
- Search for or rename a recording
- Share a recording
- Duplicate a recording
- About Apple Wallet
- Set up Apple Pay
- Use Apple Pay for contactless payments
- Use Apple Pay in apps and on the web
- Passes, loyalty cards, tickets, and more
- Apple Account
- Organize your Wallet
- Remove payment cards
- Change Wallet & Apple Pay settings
- Check the weather
- Check the weather in other locations
- View weather maps
- Manage weather notifications
- Use Weather widgets
- Learn the weather icons
- Find out what Siri can do
- Tell Siri about yourself
- Have Siri announce calls and notifications
- Add Siri Shortcuts
- About Siri Suggestions
- Use Siri in your car
- Change Siri settings
- Contact emergency services
- Use Emergency SOS via satellite
- Request Roadside Assistance via satellite
- Set up and view your Medical ID
- Use Check In
- Manage Crash Detection
- Reset privacy and security settings in an emergency
- Set up Family Sharing
- Add Family Sharing members
- Remove Family Sharing members
- Share subscriptions
- Share purchases
- Share locations with family and locate lost devices
- Set up Apple Cash Family and Apple Card Family
- Set up parental controls
- Set up a child’s device
- Get started with Screen Time
- Protect your vision health with Screen Distance
- Set up Screen Time
- Set communication and safety limits and block nudity
- Set up Screen Time for a family member
- Charging cable
- Power adapters
- MagSafe chargers and battery packs
- Qi-certified wireless chargers
- Use AirPods
- Use EarPods
- Apple Watch
- Wirelessly stream videos and photos to Apple TV or a smart TV
- Connect to a display with a cable
- HomePod and other wireless speakers
- Pair Magic Keyboard
- Enter characters with diacritical marks
- Switch between keyboards
- Use shortcuts
- Choose an alternative keyboard layout
- Change typing assistance options
- External storage devices
- Connect Bluetooth accessories
- Play audio from your iPhone on a Bluetooth accessory
- Work across devices using Continuity
- Use your iPhone from your Mac
- Receive iPhone Notifications on your Mac
- Use AirDrop to send items to nearby devices
- Hand off tasks between devices
- Copy and paste between devices
- Stream video and audio from your iPhone
- Allow phone calls and text messages on your iPad and Mac
- Share your internet connection with Personal Hotspot
- Use iPhone as a webcam
- Insert sketches, photos, and scans on Mac
- Start SharePlay instantly
- Connect iPhone and your computer with a cable
- Transfer files between devices
- Transfer files with email, messages, or AirDrop
- Transfer files or sync content with the Finder or iTunes
- Automatically keep files up to date with iCloud
- Intro to CarPlay
- Connect to CarPlay
- Use your vehicle’s built-in controls
- Get turn-by-turn directions
- Change the map view
- Make phone calls
- View your calendar
- Send and receive text messages
- Announce incoming text messages
- Play podcasts
- Play audiobooks
- Listen to news stories
- Control your home
- Use other apps with CarPlay
- Rearrange icons on CarPlay Home
- Change settings in CarPlay
- Get started with accessibility features
- Use accessibility features during setup
- Change Siri accessibility settings
- Quickly turn accessibility features on or off
- Overview of accessibility features for vision
- View a larger version of text you’re reading or typing
- Change display colors
- Make text easier to read
- Reduce onscreen motion
- Use iPhone more comfortably while riding in a vehicle
- Customize per-app visual settings
- Hear what’s on the screen or typed
- Hear audio descriptions
- Adjust CarPlay settings
- Turn on and practice VoiceOver
- Change your VoiceOver settings
- Use VoiceOver gestures
- Operate iPhone when VoiceOver is on
- Control VoiceOver using the rotor
- Use the onscreen keyboard
- Write with your finger
- Keep the screen off
- Use VoiceOver with an external keyboard
- Use a braille display
- Type braille on the screen
- Customize gestures and keyboard shortcuts
- Use VoiceOver with a pointer device
- Get live descriptions of your surroundings
- Use VoiceOver in apps
- Overview of accessibility features for mobility
- Use AssistiveTouch
- Adjust how iPhone responds to your touch
- Use Reachability
- Auto-answer calls
- Turn off vibration
- Change Face ID and attention settings
- Use Voice Control
- Use Voice Control commands with CarPlay
- Adjust the side or Home button
- Adjust accessibility settings for the Camera Control
- Use Apple TV Remote buttons
- Adjust pointer settings
- Adjust keyboard settings
- Control iPhone with an external keyboard
- Adjust AirPods settings
- Turn on Apple Watch Mirroring
- Control a nearby Apple device
- Control iPhone with the movement of your eyes
- Intro to Switch Control
- Set up and turn on Switch Control
- Select items, perform actions, and more
- Control several devices with one switch
- Overview of accessibility features for hearing
- Use hearing devices
- Use Live Listen
- Use sound recognition
- Set up and use RTT and TTY
- Flash the indicator light for notifications
- Adjust audio settings
- Play background sounds
- Display subtitles and captions
- Show transcriptions for Intercom messages
- Get live captions of spoken audio
- Play music as taps, textures, and more
- Get notified about car horns and sirens in CarPlay
- Overview of accessibility features for speech
- Type to speak
- Record your personal voice
- Use Vocal Shortcuts
- Overview of cognitive accessibility features
- Lock iPhone to one app
- Control what you share
- Set a passcode
- Set up Face ID
- Set up Touch ID
- Turn on Lock Screen features
- Keep your Apple Account secure
- Manage information sharing with Safety Check
- Control app tracking permissions
- Control the location information you share
- Control access to information in apps
- Control access to contacts
- Control how Apple delivers advertising to you
- Control access to hardware features
- Create and manage Hide My Email addresses
- Protect your web browsing with iCloud Private Relay
- Use a private network address
- Use Advanced Data Protection
- Use Lockdown Mode
- Use Stolen Device Protection
- Receive warnings about sensitive content
- Use Contact Key Verification
- Turn iPhone on or off
- Force restart iPhone
- Back up iPhone
- Reset iPhone settings
- Erase iPhone
- Restore all content from a backup
- Restore purchased and deleted items
- Sell, give away, or trade in your iPhone
- Install or remove configuration profiles
- Important safety information
- Important handling information
- Find more resources for software and service
- FCC compliance statement
- ISED Canada compliance statement
- Ultra Wideband information
- Class 1 Laser information
- Apple and the environment
- Disposal and recycling information
- Unauthorized modification of iOS
See photo and video information on iPhone
You can see saved metadata information about a photo or video in the Photos app. You can also change the date, time, and location stored within the item’s metadata information.
View photo and video metadata
Depending on the photo or video, you see the following details:
People identified in the photo
A caption field to describe the photo or video, and make it easier to find in Search
Items detected by Visual Look Up
What device captured the photo or video
The date and time the photo or video was taken (tap Adjust to edit the date and time)
Camera metadata such as lens, shutter speed, file size, and more
Where the photo or video was taken (tap the link to view the location in Maps; tap Adjust to edit the location)
Who shared the photo or video with you, if it was shared
What albums this photo is in

Change the date, time, or location
Tap Adjust Date & Time or Adjust Location.
To change the date, time, or location of a batch of photos, tap Select, tap the thumbnails you want to change, then follow the steps above.
IMAGES
VIDEO
COMMENTS
2nd tab: go to your country site for me its www.google.se but for you its .ca. go to the symbol in the upper-right corner, its either your avatar or a "gearwheel". now you can see that option #1 is "SEARCH SETTINGS" now go to www.google.com.hk and press on the same place and on the first option.
How to share your specific location. In iOS 14, iPadOS 14, and later, some apps can use Precise Location to get to your specific location. To share only your approximate location — which may be sufficient for an app that doesn't need your exact location — turn Precise Location off.
You can find Location Services on iPhone, iPad, and Mac. When an app is using Location Services, the Location Services icon appears on iPhone and iPad (in the status bar at the top of the screen) and on Mac (in the menu bar). Even if you disable Location Services, third-party apps and websites may still use other ways to determine your location.
Customize your start page. When you open a new tab, you begin on your start page. You can customize your start page with new background images and options. Open the Safari app on your iPhone. Tap , then tap . Scroll to the bottom of the page, then tap Edit. Favorites: Display shortcuts to your favorite bookmarked websites.
Step 1: Open Safari. To begin the process of changing your location in Safari, the first step is to open the Safari web browser on your device. Whether you're using a Mac computer, iPhone, or iPad, launching Safari is the initial action to embark on this virtual journey to a different location. On a Mac, you can find the Safari browser in the ...
To change Apple ID country/ region through an iPhone (or iPad): 1. Make sure that your device is connected to the Internet. 2. On your iPhone, tap Settings > [your name]. 3. Choose Media & Purchases and tap on View Account, then unlock your account for accessibility. 4. Tap Country/Region.
Then, select the device you want to change the location for and click 'Next'. From the map, click on each point you want to add across the route. You can add as many stops as you want. To adjust a location, drag the point using the mouse pointer on the map. To delete a point, click the 'Expand' option next to Route.
In the Location Services menu, you can scroll down to see the individual permissions for each app - Never, Ask Next Time, While Using, or Always - and tap that app to change its setting. In ...
However, if you only see an arrow without a background in the status bar, it means that the opened app can access your location if needed. You can also view a list of which apps have recently accessed your location by opening the Control Center and tapping the Location Services icon at the top. However, this option will only appear if an app ...
Part 3: How to change Safari location on iPhone. It would be great fun with your friends when you change the Safari Location on iPhone. You can bring jealous amidst your colleagues by registering your location details at holiday spots. By changing the location details, you can skip from unwanted false advertisements related to your real ...
Step 1: Open Settings. To begin the process of enabling location services for your browser on your iPhone, you'll need to navigate to the "Settings" app, which serves as the control center for customizing various aspects of your device. The "Settings" app is represented by a gear icon and is typically located on the home screen of your iPhone.
3. Adjust the font size. The default zoom amount (100%) appears at the top of the menu. Tap the smaller A on the left to decrease the default font size, or the larger A on the right to increase it. Continue taping until you're satisfied with the new size, then tap anywhere on the page to close the window. [1] 4.
We can help you turn on Location Services for the Safari app so it can determine your location. We see you viewed the Apple Support page for Clear the history and cookies from Safari on your iPhone, iPad, or iPod touch - Apple Support. Use these steps to allow access for Location Services on your iPhone:
If you want to stop Safari using your Location Date follow these steps: Open Safari. Choose Preferences from the Safari menu. Click on Websites. Click on Location. You can set this on a per ...
To check this, open Safari, then go to the Safari menu and choose "Preferences" here. Once the preferences window opens, click the "Websites" tab and select "Location" from the menu on the left. Unlike Google Chrome, which has a menu setting showing you what sites are always allowed to see your location, Safari hides this if you aren't using it ...
Control the location information you share on iPhone. You control whether iPhone and apps have information about your location. To figure out where you are when getting directions, setting up meetings, and more, Location Services uses information (when available) from GPS networks, your Bluetooth® connections, your local Wi-Fi networks, and your cellular network.
Let me show you how. Launch the Safari app and visit the website. Tap AA. Tap Website Settings. Customize Website Settings. Notably, this will set the default for the active website. If you want to change or set the default page zoom for the current website, tap the ' A ' from the bottom of the options menu.
Open Settings. Scroll down and tap Safari. Scroll down and tap Downloads. Select either iCloud Drive, On my iPhone, or Other... If you select iCloud Drive or On my iPhone, you will automatically ...
Extra Tips: How to Change Safari Location on iPhone [iOS 17/16.5] Safari always asks users to allow Location Services permission for the best user experience. Therefore, you might need to change your device's location to continue using Safari. For changing the location of your iOS device, you can use iToolab AnyGo.
Follow the steps below to change the default download location in Safari on your iPhone or iPad: Open Settings. Scroll down and select Safari from the list of apps. Under GENERAL, click on ...
With your permission, Location Services allows apps and websites (including Maps, Camera, Weather, and other apps) to use information from cellular 1, Wi-Fi 2, Global Positioning System (GPS) 3 networks, and Bluetooth 4 to determine your location 5. Apps that can show your location on the screen, including Maps, show your current location using ...
(On iPhone) If you've set a home address for a contact before, and want to use this location as your Google Maps home address, select Choose from Contacts. ... Change the From field to your other ...
Safari is the world's fastest browser, and with iOS 18, it offers even more capabilities for browsing the web. 4 Highlights intelligently surface key information — like a location's address, a summary, or more information about a movie, TV show, or song — after a webpage is loaded. The redesigned Reader brings more ways to enjoy ...
iOS 18 brings new ways to customize the iPhone experience, relive special moments, and stay connected. Customize your iPhone further by arranging your Home Screen, your Lock Screen, and Control Center in all-new ways. Photos delivers the biggest redesign ever to make it even easier to relive your special moments. Staying connected with friends and family is even better with new ways to express ...
You can hide the search field, switch to Reader, and more. Go to the Safari app on your iPhone.. Tap , then do any of the following:. Hide the search field: Tap , then tap Hide Toolbar (tap the bottom of the screen to get it back). See a streamlined view of the webpage: Tap Show Reader (if available). To return to the normal view, tap , then tap Hide Reader.
Share your location; Meet up with a friend; Send your location via satellite; Add or remove a friend; Locate a friend; ... Change the layout in Safari on iPhone. You can choose the tab bar layout that works best for you. Depending on the layout, the search field appears at the top (Single Tab layout) or bottom (Tab Bar layout) of the screen. ...
Go to Settings > Wallet & Apple Pay.. Adjust any of the following: Location: Control the location information you share. Siri & Search: Allow Siri to make suggestions across apps based on the way you use Wallet & Apple Pay. You can also allow suggestions and content from Wallet & Apple Pay to appear in Search and widgets.. Notifications: Change notification settings.
Transfer files from iPhone to a storage device, a server, or the cloud; Find My. Find people. Share your location; Meet up with a friend; Send your location via satellite; Add or remove a friend; Locate a friend; Get notified when friends change their location; Notify a friend when your location changes; Find devices. Add your iPhone; Add your ...